Accessing the Text Editor

In this section:

App Studio provides a fully integrated Text Editor that you can use to create, view, and edit the source syntax for procedures, procedure components, and other types of files required by your applications.

The Text Editor tab is shown in the following image.

In addition, you can:

Finding or Replacing Text Using the Find Group

Reference:

The Find group contains options that enable you to find or replace text. The Find group is shown in the following image.

The commands in this group are:

Find

Finds the specified text. You can also press Ctrl+F to activate the Find dialog box.

Next

Finds the next instance of the specified text.

Previous

Finds the previous instance of the specified text.

Replace

Replaces specific text with different text.

Select All

Selects all of the text in the procedure.

Reference: Find Dialog Box

You can use the options on the Find dialog box to indicate how to search for information.

The options on the Find dialog box are:

Find what

Provides a text box where you can specify the text that you want to find. Optionally, you can click the arrow to select a search term or phrase that was previously specified.

Match whole word only

Select this option to match the whole word only.

Match case

Select this option to match the uppercase or lowercase value, as specified in the Find what field.

Direction

Select up or down to indicate the direction in which the Text Editor should search.

Find Next

Allows you to find the next instance of your search term.

Mark All

Marks all instances of your search term in the Text Editor.

Cancel

Cancels the current search and closes the Find dialog box.

Reference: Replace Dialog Box

You use the options on the Replace dialog box to indicate how to use the find feature to find and replace information.

The options on the Replace dialog box are:

Find what

Provides a text box where you can specify the text that you want to find. Optionally, you can click the arrow to select a search term or phrase that was previously specified.

Replace with

Provides a text box where you can specify the text that is going to replace the text for which you are searching. Optionally, you can click the arrow to select a replacement term or phrase that was previously specified.

Match whole word only

Select this option to match the whole word only.

Match case

Select this option to match the uppercase or lowercase value, as specified in the Find what and Replace with fields.

Replace In

Enables you to specify where you would like the replacement to occur. Options include Selection or Whole file.

Find Next

Allows you to find the next instance of your search term.

Replace

Replaces the search information that you specified in the Find next field with the text or other information that you indicated in the Replace with field.

Replace All

Allows you to automatically replace all instances of the search term you indicated in the Find next field with the information you specified in the Replace with field.

Cancel

Cancels the current search and replaces and closes the Replace dialog box.

Working With Bookmarks Using the Bookmarks Group

The Bookmarks group enables you to turn bookmarks on or off, find the next bookmark, find the previous bookmark, and delete all bookmarks. The Bookmarks group is unavailable when you access the Text Editor tab through the Embedded JavaScript or Embedded CSS view tabs, in the HTML canvas. The Bookmarks group is shown in the following image.

The commands are:

Toggle

Turns bookmarks on or off.

Next

Goes to the next bookmark.

Previous

Goes to the previous bookmark.

Delete All

Deletes all bookmarks.

Placing the Cursor Using the Position Group

The Position group allows you to place your cursor at the desired line and allows you to turn off line numbers. The Position group is shown in the following image.

The commands are:

Goto Line

Displays the current line your cursor is on. You can type a different line number into the text box to place your cursor on that line.

Show Line Numbers

When selected, displays line numbers. This option is selected, by default.

Changing the Case of Text Using the Case/Comment Group

The Case/Comment group contains options for changing selected text to uppercase or lowercase. The Case/Comment group is unavailable when you access the Text Editor tab through the Embedded JavaScript or Embedded CSS view tabs, in the HTML canvas. The Case/Comment group is shown in the following image.

The commands are:

Upper

Changes the selected text to uppercase (all capital letters).

Lower

Changes the selected text to lowercase (all lowercase letters).

Change Case

Changes the case of the selected text to lowercase or uppercase depending on how the selected text appeared first. You can also change the case of selected text by using the shortcut menu on the canvas, while text is selected.

Add Comment

Inserts a new comment line if your pointer appears on a new line or changes an active line of text to a comment. You can also use the shortcut menu on the canvas to add a comment.

Remove Comment

Deletes the previous comment change. This option is similar to the Undo command on the Quick Access Toolbar. You can also use the shortcut menu on the canvas to remove a comment.

Formatting Text Using the Options Group

The Options group contains commands that you can use to format the text in a procedure. The Options group is unavailable when you access the Text Editor tab through the Embedded JavaScript or Embedded CSS view tabs, in the HTML canvas. The Options group is shown in the following image.

Note: When you access the Text Editor through the Embedded JavaScript or Embedded CSS view tabs, the only option in the Options group is Font Style.

The commands are:

Font Style

Opens the Font and Color Settings dialog box from which you can modify the appearance of the syntax in a procedure.

Show Whitespace

Replaces spaces between characters with a visual indicator.

Tab Size

Controls the number of spaces a tab character uses.

Tab Options

Provides the options to control tab characters. You can substitute spaces for tab characters or keep tab characters in the syntax.

Auto Indent

Automatically indents the syntax within a procedure.

Reset All

Restores all options back to the default settings.

Using the Text Editor Status Bar to View Contextual Information

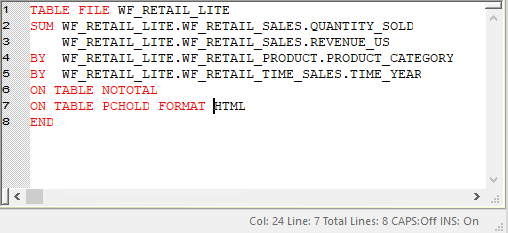
The Status bar in the Text Editor displays contextual information, such as cursor location, the number of lines in the file, and keyboard input modes.

To show the Status bar, on the Home tab, in the View group, select Status Bar. Clicking Status Bar when it is already selected hides the Status bar.

The following values display in the Status bar:

The following image shows an example of the values displayed in the Status bar.