Configuring Geographic Information

In this section:

How to:

Geographic roles have been unified to access 58 world administrative boundaries down to the postal code level, out of the box.

The server has a geographic configuration editor for customizing the list of geographic roles, basemaps, reference layers, and demographic layers. A customized geographic role can reference either an uploaded shapefile or an existing Esri Feature Layer.

Procedure: How to Edit Geographic Configuration Settings

By default, the server is configured for unified geographic roles. This configuration is controlled by the following settings.

  1. Navigate to the Workspace page, click Settings, point to Geo Services, and click Edit settings.

    The Change Settings for GEO services page opens, as shown in the following image.

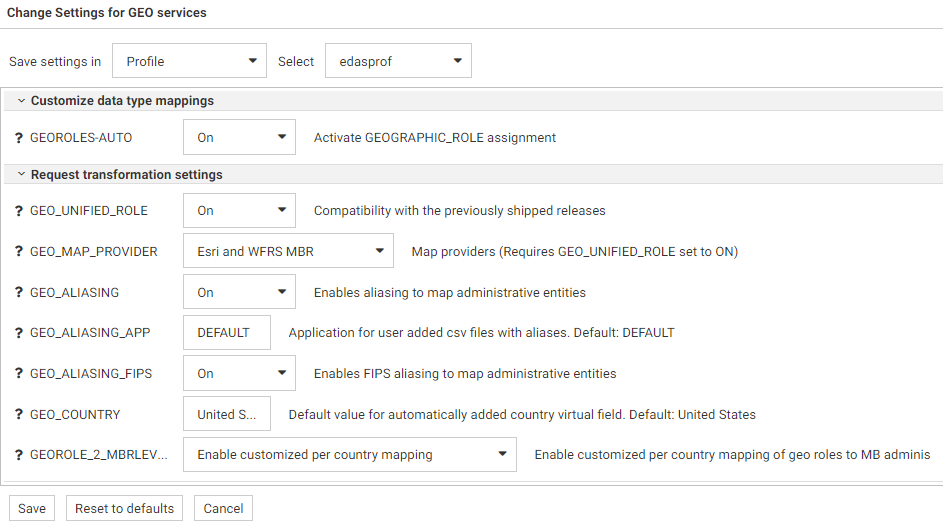
  2. The following setting controls whether geographic role assignments are automatically assigned using field name analysis.

    GEOROLES-AUTO. The default value is On. For example, if an alphanumeric field has the name COUNTRY, it will be assigned the geographic role Country.

  3. The following settings control unified geographic roles.
    • GEO_UNIFIED_ROLE. This compatibility setting must be turned on (the default) to activate unified geographic roles. Turn it off to use geographic roles from prior releases. On indicates that the new shorter set of geographic roles that combines subsets of previously used roles will be used. Off will use geographic roles from previously shipped releases.
    • GEO_MAP_PROVIDER. Assigns names of the providers of geographic maps. The list of names should be separated with slashes to be used by transformation code for mapping. Default is Esri and WFRS MBR. The currently supported set of providers includes WFRS (geographic boundaries distributed in the Reporting Server) and ESRI.
    • GEO_ALIASING. On enables aliasing to map administrative entities. Aliasing is a mechanism to support alternative names/spellings to the administrative names used as keys to find the corresponding geometry. Caution, incorrect results will be reported on a map in the case where the column data contains variations of names/spellings for the same administrative entity (resolved to the same key). Alias names are stored in .csv files. Shipped aliasing files are located in the geomaps sub-directory of the etc folder under EDAHOME. The naming convention is geo_srv_dbl_geo_role. Each data file has an associated synonym with the same name. Aliasing is currently supported for the four geo roles COUNTRY, STATE, COUNTY, and CITY. The STATE aliasing data file includes the valid country name for each state. COUNTY and CITY files include valid country and state names. Valid means the actual key value used to fetch a geometry. The default value is On.
    • GEO_ALIASING_APP. Sets an application name for user-added .csv files with aliases. DEFAULT means no user files. User-added alias data files are supported for the four geo roles COUNTRY, STATE, COUNTY, and CITY (see the description for the GEO_ALIASING setting). The default value is DEFAULT, which uses the server aliasing files.

      The best practice is to copy the desired. csv file from the _edahome/etc/geomaps folder to the application folder named in this setting, and edit it, changing aliases or adding records with new ones. There are four focexecs named geo_srv_mapkey_<geo_role> that have mandatory parameter ISO2 country name. The following is a request example that reports city names for South Africa sorted by state/province name.

      EX geo_srv_mapkey_city ISO2='ZA'
      

      Following is an example of user-created records (based on the obtained report):

      "South Africa", "Gauteng", "Johannesburg", "City of Johannesburg" "South Africa", "Western Cape", "Paarl", "Drakenstein"
      
    • GEO_ALIASING_FIPS. On enables FIPS aliasing to US map administrative entities. This setting requires GEO_ALIASING to be on. The data file with the United State FIPS aliases is processed as an extension to the main aliases data file The default value is off.
    • GEO_COUNTRY. Assigns a default value for an automatically added DEFINE field with GEOGRAPHIC_ROLE 'Country'. This mechanism is in effect during the create metadata process when the setting GEOROLES-AUTO is ON and a column with geo role COUNTRY is not detected. The generated DEFINE field will be used to create geo hierarchies required in mapping. The default value is 'United States'.
    • GEOROLE_2_MBRLEVEL. Enable customized per country mapping enables customized per country mapping of the geo roles (STATE, COUNTY, and CITY) to the MBR administrative levels. This is the default value. Disable customized per country mapping sets uniform mapping of geo roles (STATE, COUNTY, and CITY) for all countries to the MBR administrative levels (1, 3, and 5 respectively). There is a geo_role2mbrlev focexec to list countries with customized admin levels. The report does not depend on this setting.
  4. Click Save.

Editing the Geographic Configuration

Reference:

The GEO configuration editor provides a tool for editing or adding properties for geographic roles, basemaps, reference layers, and demographic layers. In addition, it enables you to add maps and shapefiles to the configuration.

Go to the Workspace page. Click Settings, point to Geo Services, then click Edit Configuration. The GEO configuration editor opens displaying the configured geographic roles, as shown in the following image.

You can select the following objects from the Object drop-down list.

You can edit the properties for a basemap or context layer (reference layer or demographic layer), or add a new one. You cannot edit the properties of a standard geographic role. To add a customized geographic role, you first add an Esri map or a shapefile (WFRS map) and assign the geographic role to the map or shapefile.

Reference: Editing the List of Geographic Roles

The following standard unified geographic roles are configured by default and cannot be changed. These geographic roles create a hierarchy that can be used to drill down or up between levels of administration in maps, reports, or charts.

  • CONTINENT.
  • COUNTRY.
  • STATE.
  • COUNTY.
  • CITY.
  • POSTAL CODE.

To add a geographic role to the configuration, you can add a new Esri map or a shapefile hosted by the Server and associate a geographic role with the new map. You can also implement NUTS geographic roles support.

Configuring Properties of Geographic Roles

The following describes columns for geographic roles in the configuration editor.

name

Is the unique name of the geographic role. It cannot have spaces, but it can have underscores (_).

Next to the name is an indicator of whether the role is a standard role or a customized role.

title

Is the description of the geographic role that is displayed in reports and in drop-down lists in the WebFOCUS tools.

returned_geometry

Is the type of geographic data returned from the map service for rendering on the map.

Valid values include:

  • GEOMETRY_AREA
  • GEOMETRY_POINT
  • GEOMETRY_LINE

When you have configured the properties, click OK to return to the Geo Configuration Editor.

The new role will display on the list of roles, Click Save to save it in the geographic configuration.

Adding a New Role for an Esri Map

To add an Esri geographic role, click Add ESRI map on the Geographic Configuration Editor.

The Create a new ESRI map role dialog box opens, as shown in the following image.

Configure the following map service properties.

name

Is a name for the geographic role.

title

Is a title to display in the WebFOCUS tools.

returned_geography

Select the type of geometry that is returned from the map service for this role. Valid values are:

  • GEOMETRY_AREA. Returns JSON polygon definitions.
  • GEOMETRY_LINE. Returns JSON line definitions.
  • GEOMETRY_POINT. Returns a JSON point.
url

Is the URL to the map service that provides the geographic data.

Click Verify after entering the URL to verify that the map service is available by going to the specified URL.

Service Parameters

Add as parameters any additional geographic roles needed to identify the exact location of the new role. For example, a city name needs state and country parameters.

Example: Adding the WebFOCUS Regions Geographic Role

The following properties add the WebFOCUS Regions role to the configuration.

Note: The parameter name corresponds to the field name in the FeatureLayer referenced in the following URL:

http://services7.arcgis.com/L95Wwv9OjRQ0tjAs/ArcGIS/rest/services/wfretail_sub_regions/FeatureServer/0

Click OK when you have finished configuring the properties.

The new role is added to the configuration as a customized role, as shown in the following image.

Click Save to save this role to the configuration.

The following request uses the WebFOCUS Regions geographic role in a map request.

DEFINE FILE WF_RETAIL_LITE

REGION/A50 (GEOGRAPHIC_ROLE=REGION) = BUSINESS_SUB_REGION;
END
 
GRAPH FILE WF_RETAIL_LITE
SUM COGS_US
BY REGION
WHERE COUNTRY_NAME EQ 'United States'
ON GRAPH PCHOLD FORMAT JSCHART
ON GRAPH SET LOOKGRAPH CHOROPLETH
ON GRAPH SET STYLE *
TYPE=REPORT, CHART-LOOK=com.esri.map, $
TYPE=DATA, COLUMN=N2, BUCKET=color, $
*GRAPH_JS_FINAL
"extensions": {
"com.esri.map": {
"overlayLayers":
[
{
"ibiDataLayer": {
"map-metadata": {
"map_by_field": "
REGION"
}
}
}
],
"baseMapInfo":
{
"customBaseMaps":
[
{
"ibiBaseLayer": "gray"
}
]
}
}
}
*END
ENDSTYLE
END

The output is shown in the following image.

Adding a New Role for a Server-Hosted Map

A server-hosted map is based on a shapefile. You must upload the shapefile (.dbf) to an application folder accessible to the server. The server will transform it to ibijson format.

An ESRI shape file is actually a collection of at least four files:

  • .dbf file. The .dbf file is a standard database file used to store attribute data and object IDs. A .dbf file is mandatory for shape files.
  • .shp file. The .shp file is a mandatory Esri file that gives features their geometry. Every shapefile has its own .shp file that represents spatial vector data.
  • .shx file. The .shx file is a mandatory Esri shape index position file. This type of file is used to search forward and backward.
  • .prj file. The .prj file is an optional file that contains the metadata associated with the shapefiles coordinate and projection system.

All files must have exactly the same name and to be located in the same directory. If they are not, the shapefile conversion will fail.

When there are several possible keys associated with a geometry, a drop down list of detected key names will be displayed. Select any one of these fields. No selection required when there is a single geometry key.

The shapefile should only be in the GCS_WGS_1984 - World Geodetic System 1984 (decimal degrees) coordinate system.

To add a geographic role for a Server-hosted map, click Add WFRS map on the Geographic Configuration Editor.

The Add WFRS hosted map dialog box opens, as shown in the following image.

Configure the following properties.

role name

Is a name for the geographic role.

Geometry type

Select either POLYGON or POINT from the drop-down list.

Esri shape

Enter the name of the application directory where the shapefile resides, or click the ellipsis (...) to navigate to the application directory. Then select the .dbf file for the role.

Load to app

Enter the name of the application directory where you want to place the ibijson file, or click the ellipsis (...) to navigate to the application directory.

Quantization type

Quantization is the process of transforming a large set of input values to a smaller set of values. When transforming the shapefile, the server will quantize points that are too close together in order to optimize map rendering performance. Two methods are available for quantization, LINEAR or GRID. The default is LINEAR.

Quantization_X

Is the threshold value for the x-axis.

Quantization_Y

Is the threshold value for the y-axis.

If the map has multiple keys, a drop-down list displays so that you can select one.

Click OK when you have finished configuring the properties.

The new role is added to the configuration as a customized role, as shown in the following image.

Click Save to save this role to the configuration.

You can test the role by right-clicking the role in the configuration editor and clicking Test. A sample map will be generated, as shown in the following image.

Adding NUTS Support

Nomenclature of territorial units for statistics (NUTS) are geographic roles specific to the European Union.

To add NUTS geographic roles to the configuration, click Add NUTS support on the Geographic Configuration Editor.

The NUTS geographic roles are added, as shown in the following image.

Click Save to save these roles to the configuration.

Adding Support for Extended Postal Codes

Click Add extended postal codes to add support for Level 1 and Level 2 postal codes used in certain countries.

Customizing Vocabulary Rules

For each geographic role, a set of vocabulary rules define how to recognize when a field name should automatically be assigned to that role. If you right-click a role, you can click Customize vocabulary from the shortcut menu.

Elements in a rule are connected by the Boolean logic operation OR (only one needs to be satisfied). Each vocabulary element contains words enclosed with special characters. Words in the rule element are connected by the Boolean logic operation AND (all need to be satisfied).

A word may be prefixed and/or suffixed with the percent character (%), which is a placeholder for any sequence of characters. If an element contains more than one word, each word has to be prefixed by the character plus (+) or minus (-). Plus indicates that the word must be found in the column name. Minus indicates that word must not be found in the column name.

For example, the following are the vocabulary rules for the role COUNTRY.

To add another rule, click Add optional.

When you are finished, click OK.

Click Save to save these rules to the configuration.

Reference: Customizing the List of Basemaps

You can edit an existing basemap definition or add a custom basemap.

Basemaps that are not vector maps are pre-rendered image tiles. Vector basemaps are delivered from ArcGIS Online as vector tiles that are rendered on the client based on a style file that is delivered with the vector tiles. This provides customization options not available with pre-rendered image tiles.

A default set of vector basemaps is configured in the GEO configuration editor in the Server. However, you can configure additional vector basemaps as needed. You can find the basemap URLs and Style URLs at http://www.arcgis.com.

Using Standard Basemaps

To add a new basemap or customize an existing basemap, select Basemap from the Object drop-down list.

The following image shows the GEO configuration editor with the Basemap object selected, showing the list of standard basemaps.

Configuring Basemap Properties

The following is a description of the properties used for basemap configuration.

name

Is the name of the basemap.

Next to the name is an indicator of whether the basemap is a standard basemap or a customized basemap.

icon

Is the name of the thumbnail for the basemap (for a standard basemap) or the URL to the thumbnail (for a customized basemap) that will appear on the Basemap drop-down list in the WebFOCUS tools or the Change Basemap map widget.

title

Is a title to display on the Basemap drop-down list in the WebFOCUS tools or the Change Basemap map widget.

url

Is the URL to the map service that provides the basemap, for a customized basemap. The map service URL can be copied from the URL field on the page showing a custom basemap. For a standard basemap, the URL is already stored in the server geographic configuration file and is not displayed.

type

Valid values are tiled and vector.

addon_json

Specifies additional JSON properties for rendering the map. For a custom vector basemap, enter the basemap map service URLs and Style URLs needed for rendering the map. The map can consist of an array of layers, each with a URL and its style URL. The style URL for each layer can be found by clicking View Style on the page showing the map layer. The map service URL for each layer can be copied from the URL field on the page showing the map layer. Enter the information in the following format.

  {"baseMapLayers":
   [
     {"url": "url_to_map_service", "styleUrl": "url_to_style"},
     {"url": "url_to_map_service", "styleUrl": "url_to_style"},
      ...
   ]
  }

Note: If the vector basemap has multiple layers, its page on ArcGIS online will have links to each layer.

Editing the Properties of a Standard Basemap

To customize the properties of an existing basemap, right-click the basemap line and click Customize BASEMAP.

The Customize Basemap dialog box opens, as shown in the following image.

Edit the properties you want to change. If you change the URL, you can click Verify to make sure the map service is valid and accessible.

When you are finished, click OK, then click Save on the GEO configuration editor Basemaps page.

Adding a Custom Basemap

To add a new basemap to the configuration, click Add.

The Create a BASEMAP dialog box opens, as shown in the following image.

Enter a name for the basemap, a URL to the thumbnail, a title to display, and the URL to the map service that provides the basemap, and click Verify.

When you have configured the properties, click OK, then click Save on the GEO configuration editor Basemap page.

Example: Configuring the Nova Vector Basemap

The following steps are needed to determine the properties associated with the Nova vector basemap.

  1. Navigate to the following URL for the Nova basemap.

    https://www.arcgis.com/home/item.html?id=75f4dfdff19e445395653121a95a85db.

    The Nova basemap page is shown in the following image.

    In the addon_json syntax, you need the styleUrl for each basemap URL defined in the vector basemap.

  2. Click the View Style button to retrieve the styleUrl. In this case, it is the following URL.

    https://www.arcgis.com/sharing/rest/content/items/75f4dfdff19e445395653121a95a85db/resources/styles/root.json?f=pjson

  3. Add the following URL for the Esri vector map service in both the url field in the GEO configuration editor and in the addon_json syntax for this basemap. You can copy this location from the URL field on the lower right of the Nova basemap page.

    https://basemaps.arcgis.com/arcgis/rest/services/World_Basemap_v2/VectorTileServer

  4. The icon value must be a URL reference. This example uses the one referenced in the thumbnail of the webmap, which is the following URL (retrieved by right-clicking the thumbnail image at the top of the page and copying the image location).

    https://www.arcgis.com/apps/mapviewer/index.html?layers=75f4dfdff19e445395653121a95a85db

Add these properties in the GEO configuration editor to define the Nova vector basemap, which consists of a single layer. Add the name, type, and a title, as follows.

name: Nova

icon: https://www.arcgis.com/sharing/rest/content/items/75f4dfdff19e445395653121a95a85db/info/thumbnail/thumbnail1580490583189.jpeg

title: Nova

url: https://www.arcgis.com/sharing/rest/content/items/75f4dfdff19e445395653121a95a85db/info/thumbnail/thumbnail1580490583189.jpeg

addon_json:

{"baseMapLayers":[{"url": "https://basemaps.arcgis.com/arcgis/rest/services/World_Basemap_v2/VectorTileServer","styleUrl": "https://www.arcgis.com/sharing/rest/content/items/75f4dfdff19e445395653121a95a85db/resources/styles/root.json?f=pjson"}]}

The following image shows the Create a BASEMAP page for configuring the Nova vector basemap in the Reporting Server GEO configuration editor.

After clicking OK, then Save, the custom vector basemap becomes available for selection in the WebFOCUS App Studio Properties panel for the Esri map component, as shown in the following image.

The WebFOCUS App Studio Esri component in this example uses the following request, named customer_locations.fex.

TABLE FILE WF_RETAIL_LITE
PRINT
     ID_CUSTOMER
     COGS_US
	 QUANTITY_SOLD
     COMPUTE LONGITUDE/D12.2 =CUSTOMER_LONGITUDE;
     COMPUTE LATITUDE/D12.2 = CUSTOMER_LATITUDE;
BY  STATE_PROV_NAME
BY  ID_CUSTOMER NOPRINT
WHERE COUNTRY_NAME EQ 'United States';
ON TABLE NOTOTAL
ON TABLE PCHOLD FORMAT XML
END

Configure the Settings panel for the Esri map to use this request for a Point of Interest layer.

Running the HTML page generates the following map, with the Nova vector basemap as the base layer.

The Nova vector basemap is also available in the Change Basemap widget, as shown in the following image.

Reference: Customizing the List of Context Layers

To add a new context layer or customize an existing context layer, select ContextLayer from the Object drop-down list.

The following image shows the GEO configuration editor with the ContextLayer object selected.

Configuring Context Layer Properties

Following is a description of the properties used for context layer configuration.

name

Is the name of the context layer.

Next to the name is an indicator of whether the context layer is a standard context layer or a customized context layer.

authorization

Is the type of authentication needed to access this context layer. Valid values are:

  • silent. Credentials for your ArcGIS application are provided in the connection string of the Adapter for Esri ArcGIS.

    Note: For instructions for configuring the Adapter for Esri ArcGIS, see the Adapter Administration manual.

  • none. No authorization is needed.
  • named. User credentials are provided in the connection string of the Adapter for Esri.
  • on premises. User credentials for a locally hosted ArcGIS server are provided in the connection string of the Adapter for Esri.
layer type

Is the type of context layer. For a cached layer, the layer type is tile. For a layer that is rendered dynamically, the layer type is featurelayer.

title

Is a title to display on the demographic layer drop-down list in the WebFOCUS tools.

uri

Is the URL to the map service that provides the context layer.

addon_json

Specifies additional JSON properties needed for rendering the context layer. For example, smartMapping properties define the border styles within the context layer.

Customizing the Properties of an Existing Context Layer

To customize the properties of an existing context layer, click the down arrow next to a context layer name or right-click the context layer line and click Customize context layer.

The Customize CONTEXTLAYER dialog box opens, as shown in the following image.

Edit the properties you want to change. If you change the URI, you can click Verify to make sure the map service is valid and accessible.

When you are finished, click OK, then click Save on the GEO configuration editor Context Layers page.

Adding a New Context Layer

To add a new context layer to the configuration, click Add.

The Create a Customized CONTEXTLAYER dialog box opens, as shown in the following image.

Enter a name for the context layer, the authorization type, a layer type, a title to display, any additional JSON needed for rendering the context layer, and the URI to the map service that provides the context layer, and click Verify.

When you have configured the properties, click OK, then click Save on the GEO configuration editor Context Layer page.