Chaining in the HTML Canvas

In this section:

You may chain controls to one another on the Parameters tab and apply conditions to links in the chain. Chaining will populate controls based on the selected value from the prior control in the chain. You can chain static and dynamic controls, link or unlink parts of a chain, and create conditions on links in a chain. Chains are represented by lines connecting control objects on the Design or Parameters tab. Note that chaining is applicable only for controls, not parameters.

Note:

Automatically Chaining Parameters From the New Parameters Dialog Box

How to:

The auto chain option enables you to automatically chain selected controls from the New Parameters dialog box. Chaining populates controls based on the selected value from the prior control in the chain. The auto chain option is useful since it creates the chain, or links of a chain, automatically.

Note: Automatic chaining creates a basic chain with default functionality that does not include any conditions. You may create conditions for a chain through the Parameters tab.

When importing or referencing a report with parameters to an HTML page, the controls are not chained by default. You may choose to include or exclude individual controls in a chain with the Chain control column from the New Parameters dialog box.

Additionally, when the auto chain option is selected, a separator is added to the parameters list on the New Parameters dialog box. A separator is used to separate controls into multiple chains and can be moved up or down in the chain sequence.

Procedure: How to Auto Chain Controls From the New Parameters Dialog Box

The auto chain option creates the chain, or links of a chain, automatically. When the auto chain option is selected, a separator is added to the parameters list. A separator is used to separate controls into multiple chains and can be moved up or down in the chain sequence.

  1. In the HTML canvas, import or reference a report with parameters.

    The New Parameters dialog box opens.

  2. Select Auto chain controls in above specified order.

    Tip: You may use the up or down arrows to change the order of the selected control before selecting this option.

    The Chain control option is selected for all controls and a separator is added as the last object to the list of parameters.

  3. To create multiple chains, click the separator row and use the up or down arrows to change the location of the separator in the chain.

    Note: If the default separator is moved up, another separator is added to the end of the list.

  4. Click OK to close the New Parameters dialog box and add the control to the HTML page.

    On the Design tab, when creating multiple chains from the New Parameters dialog box, each set of chained parameters appears on a new line, regardless of the grouping option selected from the New Parameters dialog box. This behavior is set through the Start each chain on a new line option, located on the Form Settings dialog box in the HTML Page tab of the App Studio Options dialog box. This enables you to see the relationship of the chains within the form. Start each chain on a new line is selected by default.

    On the Parameters tab, chains are represented by lines connecting control objects.

  5. You can remove a chain by clicking Break binding from the shortcut menu when a chain link is selected.

Procedure: How to Chain Controls From the New Parameters Dialog Box

The Chain control column enables you to include or exclude individual controls in a chain, from the New Parameters dialog box.

  1. In the HTML canvas, import or reference a report with parameters.

    The New Parameters dialog box opens.

  2. Select the Chain control check box for the controls to be included in the chain.

    The controls are chained in the order that they appear on the New Parameters dialog box. You may use the up or down arrows to change the order of the selected control before chaining controls.

    Note: If a control is excluded from a chain, the chain automatically links only the selected controls.

  3. Click OK to close the New Parameters dialog box and add the control to the HTML page.

    On the Design tab, when creating multiple chains from the New Parameters dialog box, each set of chained parameters appears on a new line, regardless of the grouping option selected from the New Parameters dialog box. This behavior is set through the Start each chain on a new line option, located on the Form Settings dialog box in the HTML Page tab of the App Studio Options dialog box. This enables you to see the relationship of the chains within the form. Start each chain on a new line is selected by default.

    On the Parameters tab, chains are represented by lines connecting control objects.

  4. You can remove a chain by clicking Break binding from the shortcut menu when a chain link is selected.

Creating Pop-Up Controls

How to:

For a DOCUMENT object, you can use pop-up controls to:

To create pop-up controls, you can:

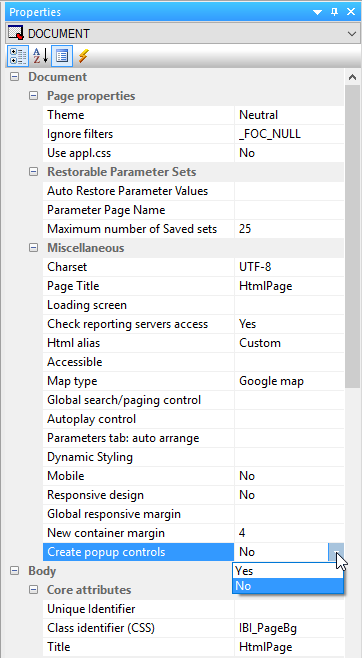
The Create popup controls property on the Properties panel is shown in the following image. Possible values are Yes and No. No is the default value.
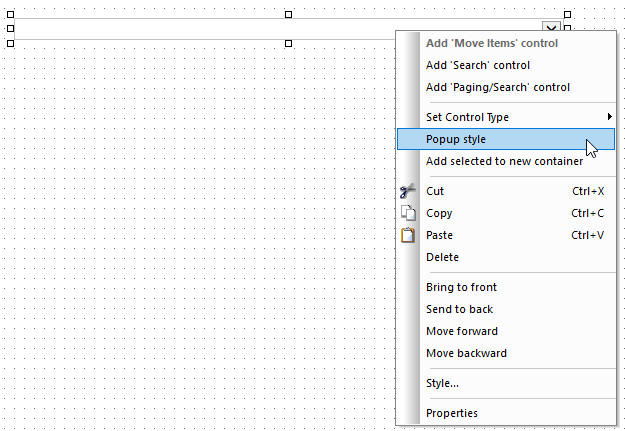
The Popup style right-click shortcut option for a drop-down control is shown in the following image. (Disabled for Edit Box, Text Area, Calendar, and Slider).
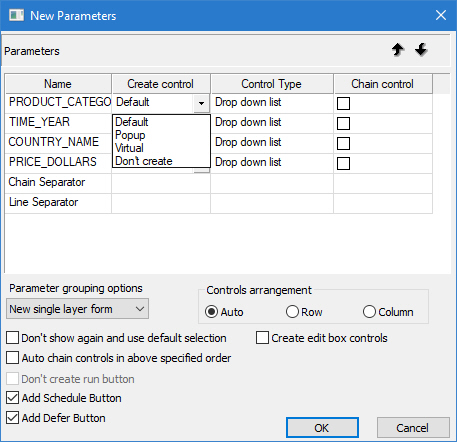
The New Parameters dialog box is shown in the following image. The Popup option is available in the drop-down menu in the Create control column.


The following image shows an example of a pop-up control.
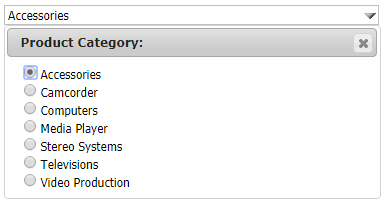

Pop-up drop-down control

Procedure: How to Add a Title to Pop-Up Controls

You can add a title bar and specify a customized title for pop-up controls in an HTML page.

To add a title bar, in the Properties panel, set Display Title Bar to Yes. When Display Title Bar is set to Yes, the Title Text property becomes available. Type a value in this field to display in the pop-up control title bar at run time.

  1. Create an HTML page that includes a control object.
  2. Change the control to a pop-up control.
    You can do this in one of the following ways:
    • Before adding controls to the page, open the Properties panel. For the DOCUMENT object, set the Create popup controls property to Yes.

      Any controls added to the page are created as pop-up controls.

    • In the New Parameters dialog box, when creating the control, select Popup from the Create control column.
    • Right-click the control and click Popup style.
    Note:
    • Edit boxes, text areas, calendars, and sliders cannot use pop-up styling.
    • Multiselect drop-down controls use pop-up styling, by default.
  3. Select the control, and open the Properties panel. When the control is set to use pop-up styling, the Display Title Bar property becomes available.
  4. Set the Display Title Bar property to Yes.
  5. When the Display Title Bar property is set to Yes, the Title Text property appears. Type the text for the control title into this field, as shown in the following image.
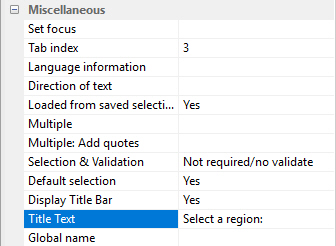
    Properties panel with options to set pop-up control title

    If you leave the Title Text field blank, the unique identifier of the control or the label assigned to the control, if there is one, is used as the title text.

  6. Run the HTML page and click the control.

    The text specified by the Title Text property appears on the control title bar, as shown in the following image.
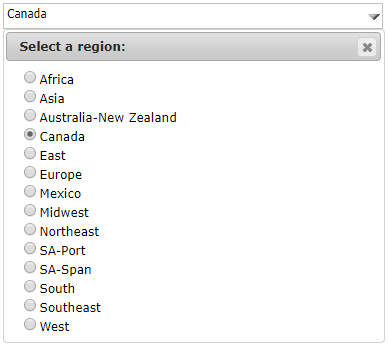
    Pop-up drop-down list with the title Select a region

Using the Chain Separator and Line Separator

How to:

The chain separator and line separator options allow for chains and parameters to be grouped or split depending on which settings are turned on. When used, the two separators do the following:

Chain separator. When Start each chain on a new line is on, this separator creates new chain groups on new lines. When Start each chain on a new line is off, this separator starts a new chain wherever it is placed in the New Parameters dialog box. The controls are positioned in one row and wrap at the end of the form.

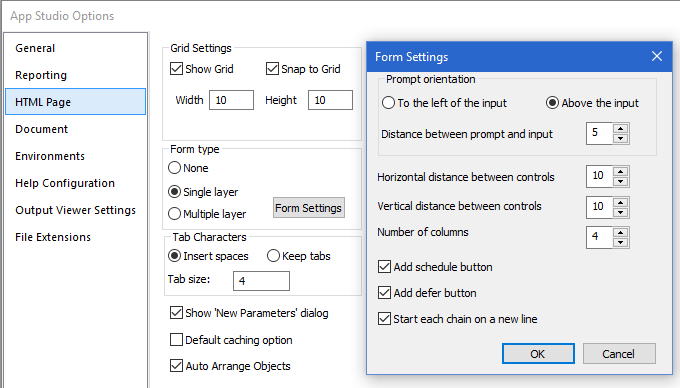
Note: Start each chain on a new line is turned on, by default. This option can be found in the Form Settings dialog box, in the HTML Page section of the App Studio Options dialog box, as shown in the following image.
Line separator. This separator creates a line break wherever it is placed.

Procedure: How to Use the Chain Separator and Line Separator

  1. Create a new procedure that uses the GGSALES Master File and prints REGION, CATEGORY, PRODUCT, and BUDDOLLARS.
  2. Create a WHERE statement with the same fields detailed in step 1, using a dynamic parameter.
  3. Save the procedure, naming it separator_example.fex.
  4. Create a new HTML file.
  5. Insert a report component.
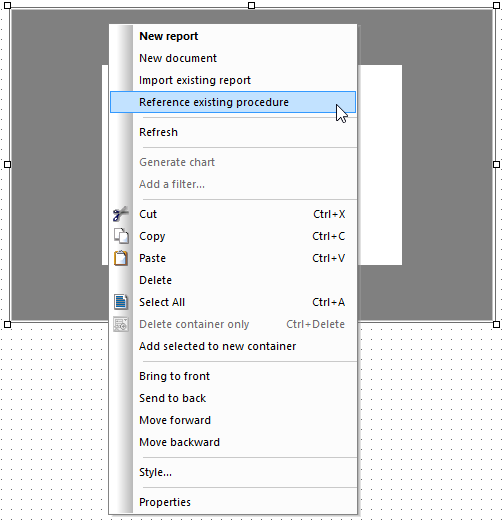
  6. Right-click the report and select Reference existing procedure, as shown in the following image.
  7. Select the previously created procedure, separator_example.fex, and click OK.

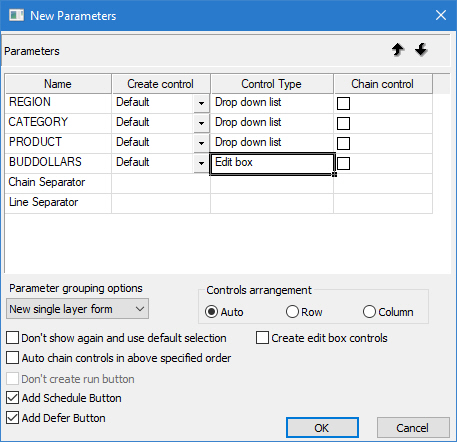
    The New Parameters dialog box opens, as shown in the following image.


    New Parameters dialog box with 4 parameters
  8. Select the Auto chain controls in above specified order option.
  9. Move Line Separator above BUDDOLLARS, using the up arrow key.

    A copy of the line separator is moved up while the original stays in the starting position. This is so you can add multiple line separators.

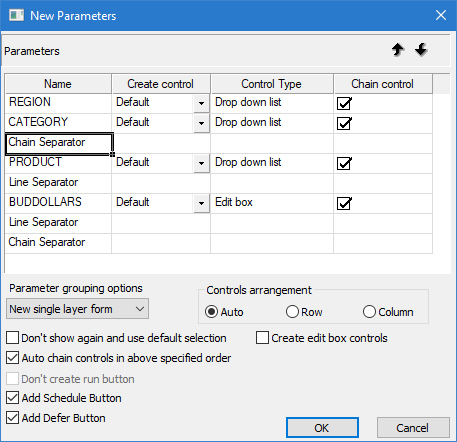
  10. Move Chain Separator above PRODUCT, using the up arrow key.

    A copy of the chain separator is moved up while the original stays in the starting position. This is so you can add multiple chain separators.

    The New Parameters dialog box will look like the following image.


    New Parameters dialog box with Chain and Line Separator
  11. Click OK.

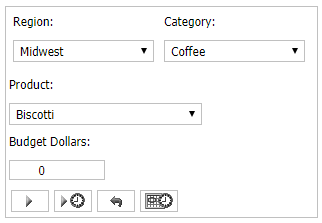
    The report is added to the HTML page. REGION and CATEGORY are on the first line and make up one chain. PRODUCT is on the second line, while BUDDOLLARS is on a separate, third line.

    The parameters are shown in the following image.


    Parameter form with separators

Chaining Controls on the Parameters Tab

How to:

Chaining enables you to associate two or more related values. When you chain controls together, chained values are filtered as selections are made to each parameter control. For example, if you chain the PLANT parameter to the STATE parameter, only PLANT values for the currently selected STATE value will be available instead of all the plants in the data source. Each time a selection is made, all chained controls that come after will be dynamically updated. Chaining also enables you to add, remove, and reverse the order of controls in the chain.

Values are processed with a caching mechanism that gathers all of the necessary values prior to loading the page. This method automatically combines all of the necessary requests into a single HTTP request and maps the result sets to the appropriate controls, greatly reducing the load time involved with sending multiple requests for data.

If a parameter has two or more incoming bindings, the value selected last will be displayed as the parameter.

Note: When a parameter is populated by two or more controls, the value of the last control used will be assigned to the parameter.

Procedure: How to Chain Controls on the Parameters Tab

  1. Create an HTML page using input controls to supply parameter values.
  2. Click the Parameters tab.
  3. Select the center of the control object and drag the control to the center of the next control object in the chain.

    Repeat this step for each link in the chain.

  4. Optionally, apply condition settings to the chain to determine how parameters are populated.

    If using static controls, you must apply conditions for each link in the chain. Conditions need to be created for each value of the control chained from, and those values must be mapped to the correct value(s) that will be displayed in the control that it is being changed to.

Procedure: How to Remove a Link in the Chain

  1. While on the Parameters tab, select the arrow head on the line so that the line is bold.
  2. Right-click and select Break binding.
  3. Repeat this step for each link in the chain that you want to break.

Procedure: How to Reverse the Order of Chained Controls

  1. While on the Parameters tab, select the arrow head on the line so that the line is bold, right-click and select Break binding.
  2. Select the center of the control object and drag the control to the center of the next control object in the chain.

    Notice the direction of the arrow between the control objects. You may reverse the direction of the link in the chain or reverse the order of the chain by changing the direction of each link.

    • If reversing the direction of a link in the chain, drag the control object in the desired order.
    • If reversing the order of a chain, drag the control objects in the desired order.

    Tip: In some scenarios, when reversing the order of chained values, you may want to move the controls from the default location on the Parameters tab so that you can better see the direction of the chain. Moving objects on the Parameters tab will not affect the Design view of your layout.

    • Press the Shift key and select the control object and bound parameter to move the objects as a set.
    • Chain the control objects together.
  3. Optionally, apply condition settings to the chain to determine how parameters are populated.

Arranging Controls

You can choose the arrangement of controls in the New Parameters dialog box, without any additional steps, after the parameter controls are generated. This gives you the flexibility to design your HTML page, without the need for moving the controls after creation.

The Controls arrangement option, as shown in the following image, indicates the placement of controls.


New Parameters dialog box with 4 parameters

The following are possible values for the Controls arrangement option:

Applying Conditions to a Chain

How to:

Reference:

A chain contains conditions for each link in the chain. The conditions are linked to the values being selected in the control object. You may apply multiple conditions to one link. The settings for the condition describe how the link should behave. The following options are available:

If using static controls, you must apply conditions for each link in the chain. Conditions need to be created for each value of the control chained from, and those values must be mapped to the correct values that will be displayed in the control that it is being changed to.

Reference: Settings Panel (Conditions)

The Settings panel appears when creating a condition for a chain link on the Parameters tab. A chain contains conditions for each link in the chain.

The conditions are linked to the values being selected in the control object. The settings for the condition inherit the values of the prior bound control and provide additional condition settings. This section describes the additional condition settings.

The Settings panel contains the following fields and options when creating a condition:

Conditions

The conditions list enables you to create multiple conditions for the link. Default is the only initial condition.

  • To create a new condition, click the New icon. Condition(n) is created, where (n) is the number, and added to the Conditions drop-down list. You may type in a unique condition name, choose Selected values, and set the condition settings.
  • Click the Delete icon to remove the selected condition from the list. Note that the Default condition name cannot be deleted.
Actions

Select an action for the chain link to control. The options offer variations to populate, show, hide, execute, and select the values. The list of available options are:

  • Populate, show. Populates the control and displays it at run time. This is the default action for all conditions.
  • Populate, hide. Populates the control and does not display it at run time.
  • Populate with alternate, show. Populates the control with alternate values derived from a procedure, or value list, that is not the default and displays the control at run time.
  • Populate with alternate, hide. Populates the control with alternate values derived from a procedure, or value list, that is not the default and does not display the control at run time.
  • Show. Shows the control, but does not populate it.
  • Hide. Hides the control, but does not populate it.
  • Execute. Executes the bound object. For example, if you bind a control to a Submit button and change the value in the control at run time, the report/chart automatically executes when you change the value, without having to click the Submit button.
  • Select. Selects the bound object. For example, if you bind a control to a tab item and select a value in the control at run time, the bound object (the tab item) is automatically selected as the active tab on the page.
  • Use As Target. This action is used in conjunction with a control whose values are procedure names or HTML file names. Selecting this option, binds the control to a frame for the output.
Values compare operator

Values compare operator provides chaining logic scenarios to include such options as Equal, Not Equal, Greater Than, Less Than, and so on. This option sets the condition for how to populate the control being linked to.

Equal is the default Values compare operator.

Selected values

Selected values enable you to provide the values used in the condition. When creating a new condition, the Selected values section is activated. You may type selected values in the input box or click the ellipsis button to select values from the list.

The list of values that appears is based on the values of the prior bound control in the chain.

When selected values are entered, the Multiselect operator field is activated.

Multiselect operator

The Multiselect operator options are activated when selected values are entered for the condition. Options are One of or All of. One of is based on one of the values shown in the Selected values, being selected in the prior control, in the chain. All of is based on the value of all of the Selected values, being selected in the prior control, in the chain.

One of is the default multiselect operator.

Resolves parameter (“To:” field is required)

From. The From field specifies where to get the value used in the To field, if the control being chained from is a map or activeX control.

To. The To field is used to dynamically generate the selection list used to populate the control being chained to. This field displays the parameter whose value will drive the condition evaluation. The parameter name linked to the prior control in the chain is displayed by default. The ellipsis button provides a pop-up dialog of the other parameter values (from the report) to be resolved.

Compare operator

The compare operator provides parameter chaining logic scenarios to include such options as Equal, Not Equal, Greater Than, Less Than, and so on. This sets the compare operator to populate the control.

Equal is the default Compare operator.

Procedure: How to Create a New Condition

  1. Insert a report with parameters in the HTML canvas.
  2. Drag control objects on the Parameters tab to create a chain.

    Chains are represented by lines connecting control objects on the Parameters tab.

    Chaining controls will populate parameters with values at run time, based on values selected in prior controls on the chain.

  3. Click a link in the chain.

    The Settings panel shows the bound control values and the Default condition settings for the link in the chain.

  4. Click the New icon to create a multiple condition for the chain.

    Condition(n) is created, where (n) is the number, and added to the Conditions drop-down list, and the Selected values section is activated. You may type in a unique condition name.

  5. You may type in a unique condition name, choose Selected values, and set the condition settings for the new condition.
  6. Optionally, you may click the Delete button to remove the selected condition from the list.

    Note: Default, the initial condition, cannot be deleted.

Procedure: How to Select the Action for a Condition

  1. Insert a report with parameters in the HTML canvas.
  2. Drag control objects on the Parameters tab to create a chain.

    Chains are represented by lines connecting control objects on the Parameters tab.

    Chaining controls will populate parameters with values at run time, based on values selected in prior controls on the chain.

  3. Click a link in the chain.
  4. In the Setting panel, select the action for the condition from the Actions drop-down list. For example, to hide the control being chained to, select Hide.

    Populate, show is the default option.

When running the HTML page, the action for the chained control is applied.

Procedure: How to Select the Values Compare Operator for a Condition

  1. Insert a report with parameters in the HTML canvas.
  2. Drag control objects on the Parameters tab to create a chain.

    Chains are represented by lines connecting control objects on the Parameters tab.

    Chaining controls will populate parameters with values at run time, based on values selected in prior controls on the chain.

  3. Click a link in the chain.
  4. In the Setting panel, select the chaining logic for the parameter being chained to, in the condition, from the Values compare operator drop-down list.

    Equal is the default option.

The compare operator is applied to the value selected.

Procedure: How to Apply Selected Values With a Multiselect Operator to a Condition

  1. Insert a report with parameters in the HTML canvas.
  2. Drag control objects on the Parameters tab to create a chain.

    Chains are represented by lines connecting control objects on the Parameters tab.

    Chaining controls will populate parameters with values at run time, based on values selected in prior controls of the chain.

  3. Click a link in the chain.
  4. In the Settings panel, click the New icon to create a multiple condition for the chain.

    Condition(n) is created, where (n) is the number, and added to the Conditions drop-down list, and the Selected values section is activated. You may type in a unique condition name.

  5. You may type selected values in the input box or click the ellipsis button to select values from the list.

    The list of values that appears is based on the values of the prior bound control in the chain.

    Tip: You may also use the pop-up icons to select a field and close the pop-up dialog box. The green icon is OK, the red icon is Cancel, double-clicking a value will select the value and close the dialog box without using any button, and pressing the Esc key will cancel the dialog box without using any button.

    When selected values are entered, the Multiselect operator field is activated.

  6. Select the chaining logic for the selected values from the Multiselect operator drop-down list.
    • One of is based on one of the values shown in the Selected values, being selected in the prior control, in the chain. This is the default selection.
    • All of is based on the value of all of the Selected values, being selected in the prior control, of the chain.

The selected values and multiselect operator are applied to the condition.

Procedure: How to Resolve Parameters for a Condition

It is recommended that you populate the controls first, before chaining. When you populate first, certain information is obtained that allows the determination of the best choice for Resolves parameter. If you chain first and then populate, the information cannot be obtained because the chaining is already established. If you chain first, you must manually set Resolves parameter.

  1. Insert a report with parameters in the HTML canvas.
  2. Drag control objects on the Parameters tab to create a chain.

    Chains are represented by lines connecting control objects on the Parameters tab.

    Chaining controls will populate parameters with values at run time, based on values selected in prior controls on the chain.

  3. Click a link in the chain.
  4. In the Setting panel, click the Resolves parameter ellipsis button to select a parameter name to resolve. If a custom procedure that has a filter (or filters) populates the control, the values list shows the parameters from the filters. If a data source populates the control, the values list shows all of the fields from the data source shown in the Object Inspector.

    The value in the Resolves parameter field should be either:

    • The field name that limits the values for the next control in the chain, if a data source populates the control.
    • The parameter name from the procedure, if a procedure populates the control.

    In most cases, this value will be populated by default and will not need to be changed.

    Tip: You may also use the pop-up icons to select a field and close the pop-up dialog box. The green icon is OK, the red icon is Cancel, double-clicking a value will select the value and close the dialog box without using any button, and pressing the Esc key will cancel the dialog box without using any button.

The parameter value is resolved in the chain if no filter is specified.

Procedure: How to Select the Compare Operator for the Parameter

An example of when to apply chaining logic is when a form offers two lists of dates so that you can select a FROM/TO date range. By chaining these parameters together and applying the Greater than parameter compare operator, this ensures that when a date is selected for the FROM parameter, only dates that follow the FROM date display in the TO date control, eliminating the possibility of selecting an invalid date range.

  1. Insert a report with parameters in the HTML canvas.
  2. Drag control objects on the Parameters tab to create a chain.

    Chains are represented by lines connecting control objects on the Parameters tab.

    Chaining controls will populate parameters with values at run time, based on values selected in prior controls on the chain.

  3. Click a link in the chain.
  4. In the Setting panel, select the chaining logic option from the Compare operator drop-down list. This sets the compare operator to populate the control.

    Equal is the default option.

The compare operator is applied to the parameter selected.

Procedure: How to Enable Cache Processing for Chained Values

You may enable cache processing for chained values in two ways:

  • Enable the caching option for the HTML page and all objects on the page.
  • Enable cache run time data for a dynamic control or a condition.

    A chain contains conditions for each link in the chain. The conditions are linked to the values being bound to the control object. If you change the options for the condition, it will also be applied to the control, and vice versa.

Caching options are turned off by default.

  1. To enable caching options for all objects on the HTML page, in the App Studio Options dialog box:
    • Select the HTML Page tab.
    • Select Default caching option.
    • Click OK to close the App Studio Options dialog box.
  2. To enable caching options for a dynamic control or condition:

    A chain contains conditions for each link in the chain. The conditions are linked to the values being chained to the control object. If you change the options for the condition, it will also be applied to the control, and vice versa.

    For a dynamic control:

    1. Create a dynamic input control to supply parameter values.
    2. Select the dynamic control object from the Parameters tab.

      The Settings panel opens, showing the dynamic control options.

    3. Select Cache run time data to cache the run time data for the selected input control.

      Note: This setting overrides the Default caching option from the HTML Page tab, in the App Studio Options dialog box.

    4. Select the center of the control object and drag the control to the center of the next control object.

      When binding controls, the conditions inherit the values set in the dynamic control settings.

    For a dynamic condition:

    1. Click a link on the chain to open the Settings panel for the condition.
    2. Select Cache run time data to cache the run time data for the selected input control. This option is only available for dynamic controls.

      This setting overrides the Default caching option from the HTML Page tab, in the App Studio Options dialog box.

    When running the HTML page, data for the chained value is cached to improve performance.