Using the Maintain Data App

In this section:

How to:

The Maintain Data product has been fully integrated into WebFOCUS App Studio. The Maintain Data App icon, available in the Containers group of the Components tab, enables you to draw a Maintain Data container on the HTML canvas. The Containers group of the Components tab is shown in the following image.


HTML canvas Components tab Containers group

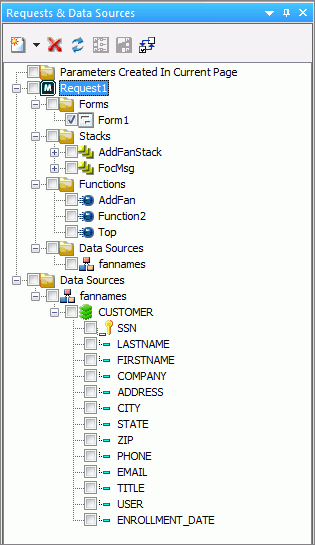
When a Maintain Data file is added to an HTML page, it displays as a request in the Requests & Data Sources panel. Maintain Data requests display all functions, data sources, forms, variables, stacks, and parameters that are used in the Maintain Data file. If the Maintain Data request does not contain one of these components, it is not displayed beneath the request. A Maintain Data request in the Requests & Data Sources panel is shown in the following image.

Maintain Requests & Data Sources

You can create new functions, variables, and stacks, as well as add additional data sources and parameters by using the shortcut menu on the nodes. To edit a Maintain Data component, right-click the item and select Edit Source or Edit. The Edit Source option allows you to edit the entire Maintain Data file. The Edit option opens the Edit Function dialog box, where you can edit the signature and description of that function.

Many of the Maintain Data request components can be dragged to the canvas, or other panels, to automatically create the components and tasks needed to run the Maintain Data component. The following are examples of how you can drag Maintain Data components to a canvas.

Automatically Running Converted Maintain Data Files

When adding an existing Maintain Data file to your HTML page, you are prompted to run that Maintain Data file after the page is loaded. Clicking Yes (recommended) creates an action for the load task in the Tasks & Animations panel. This means that the Maintain Data file will connect once the HTML page is loaded. If you click No, no action is created for the load task.

Procedure: How to Use the Maintain Data App Container

The Maintain Data App container is created in the HTML canvas. This container enables you to construct the application front-end (or user interface). Then, you develop the code that extracts data from your data sources and updates the data sources with new data.

  1. In your Domain, create an HTML page.
  2. Click the Maintain Data App icon in the Containers group of the Components tab.

    Your cursor turns into a crosshair.

  3. Draw a box on the HTML canvas to create your Maintain Data App container. This is the container in which you will create your form.
    Note:
    • You can also drag an existing form onto the HTML canvas. This prompts you to create a multipage control.
    • When you place a Maintain form on the canvas, you can choose to use a multi-form container. If you choose not to use a multi-form container, you can add it later.
    • If you have a Maintain form on the canvas, you can right-click the form name, the form, or the Forms folder, and select Add form to container. All of the forms are added to the object on the form.
    • If you decide to use the Maintain form container, after already having forms on the canvas, the container must be big enough to contain the largest form.

Creating Maintain Data Requests

Maintain Data requests are submitted from the Request & Data Sources panel. There are two basic types of requests to create new applications: Embedded and External. Both Embedded and External requests allow you to create applications manually, or using Update Assist. When you create a request manually, you design the forms, write the navigation and validation, and update the procedures using the Maintain Data Editor. Update Assist enables you to create simple applications and add, update, or delete records against any data source for which you have read/write access.

Procedure: How to Create an Embedded or External Request

The following steps walk you through the process of creating an Embedded request or External request manually. Also used to migrate existing Maintain procedures.

  1. In a Domain folder, create a new HTML page, using the HTML/Document wizard.
  2. On the Requests & Data Sources panel, select the down arrow next to the New icon, select Embedded Request or External Request, and then click New Maintain Data.

    By default, for an Embedded request, Request1 is created.

    For an External request, provide a name for your request in the Save As dialog box and click OK.

  3. Right-click the Request1 parameter and select Use data sources.
  4. From the Data Sources in Procedure dialog box, select New.
  5. Browse to the location of your Maintain Data data sources, select the one to use, click OK, and then click OK again.
  6. Click HtmlPage1 to display the canvas.
  7. On the Requests & Data Sources panel, expand the Forms folder and then expand Request1.

    By default, Form1 has been created.

Procedure: How to Create a Request Using Update Assist

You can create an application using Update Assist that adds records, updates records, or deletes records against any data source for which you have read/write access. Data navigation and input validation are automatic. This means you get an update application with no need to design forms, or to write navigation, validation, or update procedures.

  1. In a Domain folder, create a new HTML page, using the HTML/Document wizard.
  2. On the Requests & Data Sources panel, select the down arrow next to the New icon, select Embedded Request, and then select New Maintain Data with Update Assist or select External Request and then select Maintain Data: New with Update Assist.
  3. Select the Master File from the Open File dialog box. The Update Assist dialog boxes correspond to the steps needed to generate Update Assist applications.
    Note:
    • If you are using a single segment Master File, Update Assist consists of two steps.
    • If you are using a multi-segment Master File, Update Assist consists of three steps. The additional dialog box asks you to first select the lowest segment in the hierarchy that you want to update.

    For more details on using Update Assist, see the WebFOCUS App Studio Maintain Data Getting Started content.