Overview of Developing App Studio Maintain Data Applications

In this section:

Now that you know what a App Studio Maintain Data application is and how it works, you are ready for a step-by-step view of the development process. This section summarizes the steps.

Another way to get started immediately developing App Studio Maintain Data applications is by using Update Assist. All you need is a Master File for the data source for the application you want to create.

Step 1: Creating the Domain

Your first step is to create the Domain for the application.

To start App Studio, from the Start menu, click the WebFOCUS App Studio shortcut, under the Information Builders folder.

Step 2: Describing the Data

From the File/Folder Properties panel, set the Application Paths attribute to the location of the Master Files and data source files.

Step 3: Creating the Front End

Your next step in developing an application will probably be to create the front end, meaning the user interface with which the end user interacts. Your user interface is made up of forms, which you develop using the HTML canvas.

  1. From the Requests & Data sources panel, create an external or embedded Maintain Data request.
  2. Expand the node for the request.
  3. Right-click Forms and select New form.

One of your procedures is designated as the starting procedure, which means that App Studio Maintain Data runs this procedure to run your application. You probably want the opening form of your application to be in this procedure (although it does not have to be here). You use the Properties dialog box to specify the starting procedure.

App Studio Maintain Data supplies you with a form (named Form1) in every procedure and supplies the code to display this form immediately after running the application. Using the name Form1 in the initial form of your application is recommended.

After you have created your forms, you can edit them using the HTML canvas.

You can also create tasks and actions that call Maintain Data functions (Cases).

Step 4: Creating the Data Access Logic

How to:

Your next step in developing the application is to create the data access logic, meaning the code that extracts data from the data source, manipulates it, and writes it back to the data source.

You code all of your data access logic using the Maintain Data language. The Maintain Data language is a robust yet simple, object-based 4GL. It is consistent across all platforms while incorporating the functionality of a 3GL and the data access capabilities of SQL.

You must specify which data sources you want a procedure to access before writing any code to read or write to that data source.

Procedure: How to Make a Procedure Access a Database

Specify which data sources you want a procedure to access.

  1. If you want to put your data access code in a separate procedure (to take advantage of n-tier processing), create a procedure in your application.
  2. In the Requests & Data Sources panel, right-click the procedure, and then click Use data sources.
  3. Select the data sources this procedure will access and click OK.

Procedure: How to Write Maintain Language Code

  1. Double-click the procedure to open the Maintain Data Editor.
  2. Between the CASE Top and END keywords, specify the code that your procedure will run. You can do this in either of the following ways:
    • Right-click in the window and click Language Wizard in the shortcut menu. Then, follow the instructions to generate your Maintain Data language code.
    • Type the code that your function runs. For more information, see Command Reference in the App Studio Maintain Data Language Reference manual.

You can obtain context-sensitive Help by selecting any keyword and pressing the F1 key. Notice also that your procedure code is color-coded.

Step 5: Setting Up Front End and Data Access Procedures to Call Each Other

How to:

After you have written the front-end and data access procedures, you must set them up to call each other, and pass data back and forth. Since all variables are local, meaning defined only within the context of a procedure, you must pass these variables back and forth.

For example, suppose you have an application running on a Windows web server that accesses accounting data on UNIX and inventory data on MVS. A procedure called GetAccData, accesses the data on the UNIX machine and a procedure called GetInvData, accesses the data on the MVS machine. Both of these procedures pass data back to the Start procedure on the Windows machine, which displays a form with this data.

Procedure: How to Set Up Procedures to Call Each Other

  1. Declare all variables in the calling procedure (parent) and called procedure (child).
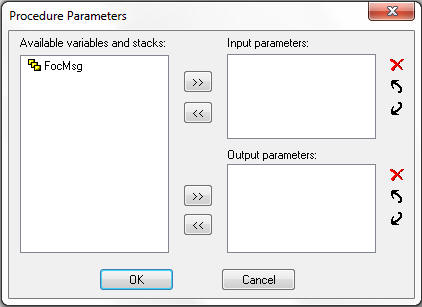
  2. In the called procedure, use the Procedure Parameters dialog box to declare what parameters it expects to receive and what data it passes back to the calling procedure. To open this dialog box, right-click the procedure and in the shortcut menu, click Add parameters, as shown in the following image.


  3. In the calling procedure, use the CALL command. The parameters of the CALL command determine the data that gets passed to the called procedure and what data gets passed back. You can easily place a CALL statement in your procedure using the Language Wizard.

    For more information, see Command Reference in the App Studio Maintain Data Language Reference manual.

Step 6: Run the Application

After you have created all of your application procedures, it is time to test them. Click the Run button to run the HTML page to see what it looks like.

If there are any errors, they are listed in the Output window.