About Your Update Assist Application

In this section:

Reference:

This section describes how to run your application and how Update Assist applications work.

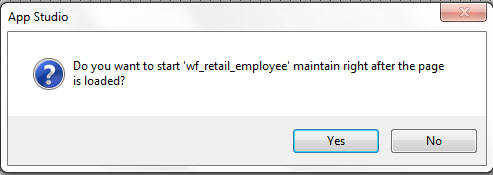
Once you click Finish in the final Update Assist window, the dialog box shown in the following image opens. Click Yes to start Maintain Data right after the page is loaded.


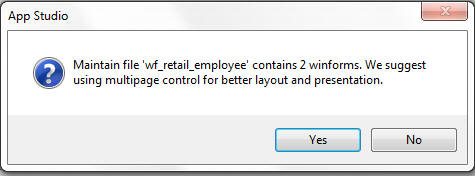
If the Maintain Data file contains Winforms, the dialog box shown in the following image opens. Click Yes to create a multi-page control.


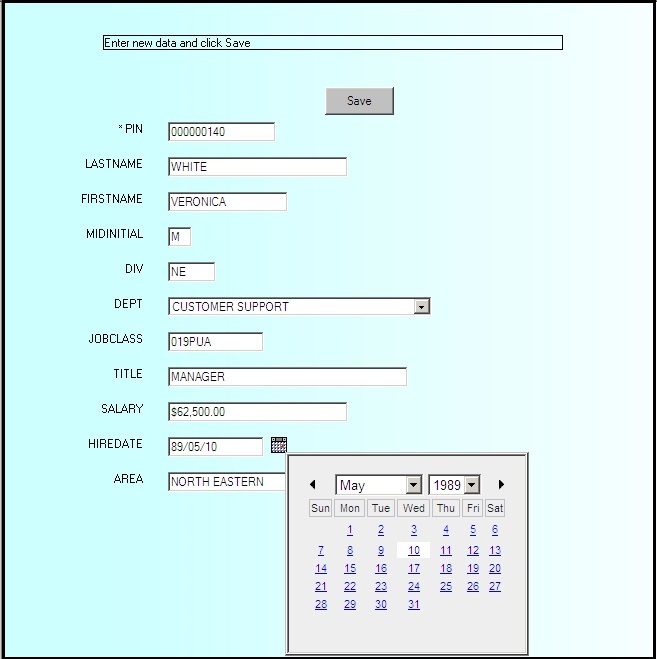
Maintain Data generates the files needed for your application, and runs the application, if specified.

Reference: Working With Empty or New Data Sources

  • In tree navigation. If you select the Add option for any data segments that do not contain data, the Tree will display a period (.) for the null segment. You can right-click on the period (.) to enter new data for that segment.
  • In combo box navigation. For any data segments that do not contain data, the combo boxes display a [New] command. This option enables you to enter new records.

Calendar Control for Date-Formatted Fields

A calendar icon appears next to changeable date-formatted fields. When a user clicks the calendar icon, a calendar appears, as shown in the following image. Any date selected on this calendar is entered into the date field. Users can also type dates into the date field manually.

Calendar diagram

Date-Stamping Fields

How to:

Many DBMSs allow you to create a time stamp field. This automatically fills the field with the current date and/or time and saves the user having to do it. There are many reasons at an application level for doing this. The most common is to give reporting applications some way to track when a record was first created or when each change was entered.

Note: If you are using an external DBMS that directly supports Date and Time Stamp field types, you will not need to use this technique. Instead, make sure the field that contains the time stamp is set to Changeable = No to prevent Update Assist from touching that field.

Procedure: How to Date-Stamp a Field in an Update Assist Application

To date-stamp a field in an Update Assist application, so that when a user clicks New, the application can set the initial value of the field to the current date in the stack before it is displayed in the form:

  1. Open the SegmentName.mnt file in the HTML canvas.
  2. Add the following line of code to the top of the Maintain Data procedure, just above Case Top:
    MODULE IMPORT(MNTUWS);

    This imports the library of functions included with App Studio Maintain Data.

  3. Scroll down to the newrecord case and add the following code right below the first Stack Clear statement:
    COMPUTE TheDate/MDY = Today();
    COMPUTE stack.datefield = TheDate;

    where stack and datefield are the stack name and field name to which you want to assign the current date.

Note: If you have multiple fields that need to be set to the current date, you only need to set the variable TheDate once and can reuse it as many times as you need.

Example: Date-Stamping a Field in the MOVIES Data Source

If you wanted the Release Date field from the MOVIES data source to contain the current date, your code would look like this:

COMPUTE TheDate/MDY = Today();
COMPUTE Movinfo_stack.RELDATE = TheDate;

Auto-numbering Fields in Update Assist Applications

How to:

Some DBMSs allow you to create an auto-number field. This automatically fills the field with a sequence number that is the last record index plus one. This saves the user having to make up an arbitrary key for the record.

Procedure: How to Auto-Number a Field in an Update Assist Application

To auto-number a field in an Update Assist application, so that when a user clicks New, the application can set the initial value of the field to the next sequence number in the stack before it is displayed in the form:

  1. Open the SegmentName.mnt file in the HTML canvas.
  2. Scroll down to the newrecord case and add the following code right below the first Stack Clear statement:
    Stack clear SegmentNameStk;
    For all next MasterFileName.SegmentName.autonum into SegmentNameStk;
    NextVal/I5 = SegmentNameStk(SegmentNameStk.FOCCOUNT).val + 1;
    Stack clear SegmentNameStk;

Note: If you are using an external DBMS that directly supports Date Stamp field types, you will not need to use this technique.

Continuing to Display Current Values After a New Action

How to:

By default, Update Assist clears all text boxes and controls in the form on a New action. You can have the values stay in the text boxes by editing the SegmentName.MNT file.

For example, users of some types of applications may be entering many similar records, one after another, and would like to display a record, then essentially have the New action display a copy of the record which they can edit before clicking Save.

Procedure: How to Continue Displaying Current Values After a New Action

  1. Open the SegmentName.MNT file and go to the newrecord case.
  2. Comment out the line that clears the stack, using a double dollar sign ($$).