Creating a User
Using the Add User screen, you can create a new user for a company.
Procedure
- Click Create. The Add User screen is displayed.
-
Enter different types of details in the following sections for the user being created:
- Password: User defined password.
- LDAP: LDAP-based authentication where password is not stored within the application. If you choose the LDAP security type:
The user must already exist in the LDAP directory server.
Certain properties need to be configured using the Configurator. Refer to the TIBCO MDM System Administration for details. When this security type is selected, that user is searched in the existing user list of the LDAP directory server. If user is not found, an error is displayed otherwise user gets created for the selected company using this security type.
If LDAP is selected as the security type, the Password fields do not get displayed as LDAP server does not require a password for authentication.
Note: If LDAP authentication is selected while configuring the server, there are following 3 options available: None, Simple, and Strong. If the administrator selects None, the password is not authenticated but the user must type something in the Password field. If Simple or Strong is selected, the password typed in the login screen is authenticated using the LDAP server.
-
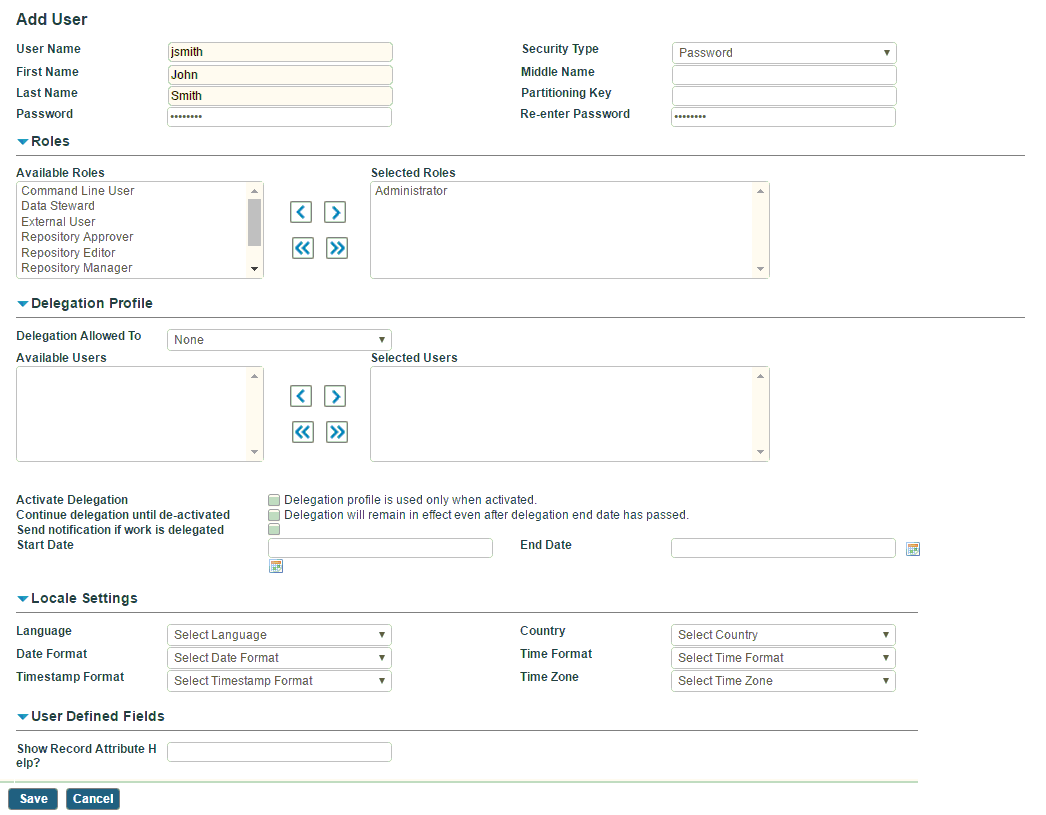
Roles: Each user in TIBCO MDM is assigned roles that control the user’s access and privileges. You can assign any user one or more predefined roles.
- To assign a single role, select one from the Available Roles list and click ">" to move it to the Selected Roles list.
- To assign multiple roles, press Ctrl and click roles from the Available Roles list and click '>' to move the selected multiple roles to the Selected Roles list.
- To assign all roles, click ">>". All roles are moved to the Selected Roles list.
- Administrator: A user that deals with all the administrative aspects of TIBCO MDM. The tasks include creating users, assigning roles, granting specific permissions, including those for repository records.
- Data Steward: A user who is responsible for the definition, management, control, integrity or maintenance of a departmental or Company data resources.
- External User: External user gets notifications and action items in the Inbox.
- Repository Approver: User who reviews and approves Synchronization Profile before publishing.
- Repository Editor: User who gives on-line record editing access rights to other users.
- Repository Manager: A Synchronization Profile specialist who identifies Synchronization Profile data fragments. This user can also build, administer repositories, and create custom rules.
- (GDSN only) Channel Manager: A user who is responsible for business activity in a particular sales channel. Typically, this user is responsible for relationships with Datapools or a set of buying organizations.
- (GDSN only) Sales Rep: Member of the supplier sales organization who acts upon current items in the Inbox that pertain to his or her area. Sales Rep is NOT created for the MDM edition. If it existed already, it is NOT deleted during migration.
- Support Engineer: A user that deals with all the support aspects of TIBCO MDM. The Query Tool menu item will be visible for the user with this role.
- Work Supervisor: A Work supervisor has rights similar to those of an admin user (except the system operations). A work supervisor monitors all operations and work items of other users. This user can reassign work items, add and confirm records without sending them to workflow, and cancel a workflow process at any time.

The following table displays the access rights of each role.
| Menu / Role | TIBCO Admin (tadmin) | Admin | Data Steward | External User | Repository Approver | Repository Editor | Repository Manager | Channel Manager (GDSN only) | Sales Rep (GDSN only) | Support Engineer | Work Supervisor |
|---|---|---|---|---|---|---|---|---|---|---|---|
| Inbox | X | X | X | X | X | X | X | X | X | X | X |
| Administration > All Company Profiles | X | ||||||||||
| Administration > User Accounts | X | X | X | ||||||||
| Administration > Roles | X | X | X | ||||||||
| Administration > My Company Profile | X | X | X | X | X | ||||||
| Administration > Backend System Profiles | X | X | X | X | X | X | X | ||||
| Administration > Resource Security | X | X | X | ||||||||
| System Operations | X | X | |||||||||
| Master Data > Data Sources | X | X | X | X | |||||||
| Master Data > Repositories | X | X | X | X | X | X | |||||
| Master Data > Subset Rules | X | X | X | X | X | X | |||||
| Master Data > Synchronization Profiles | X | X | X | X | X | X | |||||
| Master Data > Synchronization Formats | X | X | X | X | X | X | |||||
| Master Data > Mass Update | X | X | |||||||||
| Browse and Search | X | X | X | X | X | X | X | X | X | ||
| Business Process | X | X | X | ||||||||
| Event Log | X | X | X | X | X | ||||||
| Support Tools > Query Tool | X | X | |||||||||
| Support Tools > Log Download | X | X | |||||||||
| NOTE: “X” denotes the availability of the menu for the role. In case of “X” marked for the main menu, all sub-menus are available for the particular role. For example, Administrator and Work Supervisor have access permissions for all sub-menus under Master Data. | |||||||||||
- Delegation Profile: specify the
delegation profile of the user. You can forward work items assigned to you to another user. The users are available for selection depending on their roles and privileges. To activate the delegation profile, you need to specify how the delegation will be activated and deactivated and whether to send notification when work is delegated.
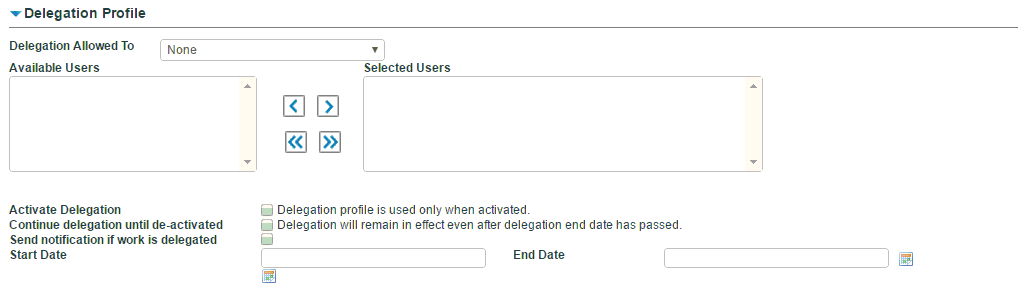
Using the delegation and reassignment feature, you can control delegation and reassignment of work items from one user to another.
Delegation and reassignment is based on a list of specified user roles and their related access privileges. A delegation profile is used to limit the roles and users to whom work can be reassigned.
For each organizational role, the TIBCO MDM administrator specifies which roles can be delegated by another role. When a user attempts to reassign a work item, the action is limited to a select list of user roles. Only users with the appropriate roles and access privileges are shown as possible candidates for the reassignment.
- Locale Settings: specify the locale setting details in the following fields:

- Language and Country: Select the language and country.
- Date Format: Select a date format from the drop-down list. The supported formats are:
MM/DD/YYYY
DD-MON-YYYY
MM/DD/YY
DDMMYYYY
YYYY-MM-DD
YYYY/MM/DD
DD-MM-YYYY
DD/MM/YYYY
DD-MM-YY
All date fields on the screens are displayed in the selected format for this user.
- Time Format: Select a time format from the drop-down list. The supported formats are:
hh:mm:ss (24 hours)
hh:mm:ss AM/PM (12 hours)
All time fields on the screens are displayed in the selected format for this user.
Note: If you do not select the date or time format, the default format is selected from Configurator. By default, the MM/DD/YYYY and hh:mm:ss formats are specified for the Default Display Date Format and Default Display Time Format properties respectively. However, if you have specified the date or time format using UI, the selected date and time format take precedence over the application level configuration. - Timestamp Format: Select a timestamp format from the drop-down list. The supported formats are:
YYYY-MM-DD hh:mm:ss.S – Time is displayed in 24 hours format with milliseconds. S indicates milliseconds.
YYYY-MM-DD hh:mm:ss.S AM/PM – Time is displayed in 12 hours format with milliseconds.
YYYY-MM-DD hh:mm:ss.S z – Time is displayed in 24 hours format with milliseconds and time zone. Z indicates time zone. By default, the system time zone is displayed.
YYYY-MM-DD hh:mm:ss.S AM/PM z – Time is displayed in 12 hours format with milliseconds and time zone.
Note: If you do not select the timestamp format, the default format is selected from Configurator. By default, the YYYY-MM-DD hh:mm:ss.S format is specified for the Default Display Timestamp Format property. However, if you select the timestamp format using UI, the selected timestamp format takes precedence over the value that is specified for the Default Display Timestamp Format property. - Time Zone: Select the time zone specific to your region from the drop-down list. If you do not select any time zone, the system time zone is applicable.
- Show Record Attribute Help?: enter yes or no to activate the mouse over display of Help in the record add, modify, and copy screens. The default (if no data input is provided here) is to display the Help.