Click New and select Procedure.
Response: A Procedure Element tab is opened.
In the Data Sources tree, click on the database procedure you wish to use.
Click Select.
Response: The database procedure is added to the tab. Information Designer analyzes the database procedure and makes a guess as to whether it is a pre-update procedure or a query procedure (it never sets post-procedure by default).
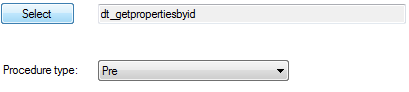
Select the Procedure type: Pre-update procedure or Post-update procedure.
Comment: Pre-update procedures are always executed first in an information link. Post-update procedures are always executed last in an information link.
If the database procedure requires any Input Parameters, their name and type are displayed.
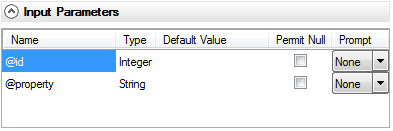
Select whether the input parameter should receive a Default Value by typing a value (of the appropriate type) in the input field. If not, leave the field blank.
Comment: Type ?param_name to use a parameter as the default value, where param_name is the name to identify the parameter by. Note: If you use a parameter for the default value, you must choose Prompt: None. See Parameterized Information Links for more information.
Select whether you want the end user to be prompted for a single value, multiple values, or not at all, from the Prompt drop-down list.
Comment: If you select multiple values, the end user will be allowed to enter several values. The procedure will run once for each of these values in an iterative loop. For more information, see Multiple Value Procedure Prompts.
If you want to allow the input parameter to be Null, select the Permit Null check box.
Example 1: Type a Default value and set prompt to None. This means that the specified default value will always be used as input parameter.
Example 2: Leave Default value empty, select Permit Null and Single value prompt. This will cause the end user to be prompted for a value. If the end user does not enter a value in the prompt, Null will be used.
Example 3: Leave Default value empty, leave Permit Null empty and Single value prompt. This will cause the end user to be prompted for a value. If the end user does not enter a value in the prompt, an error message will appear since Null is not allowed.
Comment: You cannot select the combination: No Default value, Not allow Permit Null and No Prompt, since this is a paradox.
In the Description field, type your own description of the procedure.
Click Save.
Response: The Save As dialog is displayed.
Click to select the folder where you wish to save the procedure element.
Click Save.
Response: The procedure is saved in the selected folder, and will be denoted with the ![]() icon. Note that the procedure object will be visible to the end user in the list of information links. You can also make larger, more complex information links using the procedure when creating an information link in Information Designer.
icon. Note that the procedure object will be visible to the end user in the list of information links. You can also make larger, more complex information links using the procedure when creating an information link in Information Designer.