Deploying an Adapter Instance for Load Balancing in TIBCO Administrator
After configuring load balancing in TIBCO Designer, you can use TIBCO Administrator Enterprise Edition to deploy the adapter instances. The instances can be deployed on the same machine, or multiple machines. In the following section, we use an adapter instance contains Subscription Service with load balancing as the example.
To deploy an adapter instance for load balancing, you have to complete the following tasks:
| • | Creating an EAR file |
| • | Deploy an Adapter Instance for Load Balancing |
Creating an EAR file
For Subscription Service with load balancing, you can create the EAR file in the following three ways:
| • | An EAR file contains one project with two Subscription Service services |
To create an EAR file, complete the following steps:
Procedure
| 1. | In TIBCO Designer, select Tools > Create Project EAR from the menu, and then provide a name and file location for the EAR file in the Configuration tab. |
| 2. | Click Build Archive, and then click Yes in the confirmation message dialog that is displayed. |
| 3. | Click OK to complete creating the EAR file. |
Two separate EAR files contain two Subscription Service services in one project
To create the EAR files, complete the following steps:
Procedure
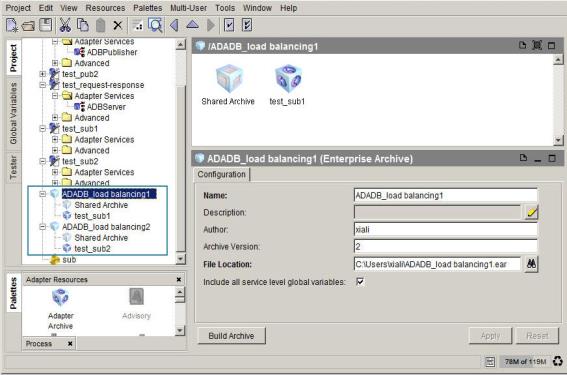
| 1. | In TIBCO Designer, select Tools > Create Project EAR from the menu, and then provide a name and file location for the EAR file in the Configuration tab. For example: |
Name: ADADB_load balancing1
File Location: TIB_ADADB_HOME\demo
| 2. | Click the ADADB_load balancing1 icon in the Project panel, and then drag Adapter Archive from the Palettes panel to the Design panel. |
| 3. | Click the Browse button beside the Adapter field, and the Select a Resource dialog is displayed. Select the test_sub1 item, and then click OK. Then click Apply. |
| 4. | Click the ADADB_load balancing1 icon again, click Build Archive, and then click Yes in the confirmation message dialog that is displayed. Click OK to complete creating the EAR file. |
| 5. | Repeat step 1 to step 4 in this procedure to create the second EAR file. For example: |
Name: ADADB_load balancing2
File Location: TIB_ADADB_HOME\demo\
See the section highlighted by the blue rectangle in the following figure.
Figure 193: Creating Two Separate Subscription Service EAR Files
If you want to execute a BusinessWorks process in TIBCO Designer after deploying the project in TIBCO Administrator, you have to configure the process.
To configure the process, complete the following steps:
Procedure
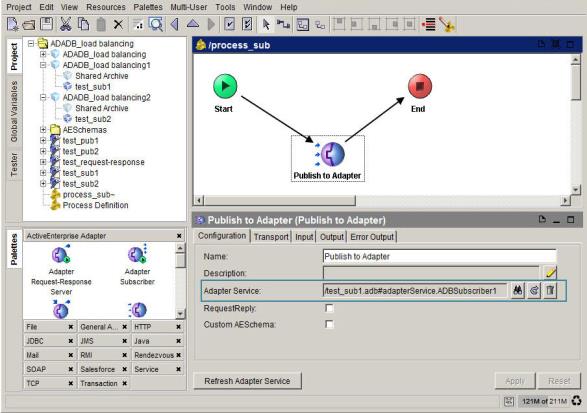
| 1. | Drag the Process Definition icon from the Palettes panel to the Design panel, and then specify the process name. For example: process_sub. |
| 2. | Click the process_sub icon in the Project panel, and then drag the Publish to Adapter icon from the Palettes panel to the Design panel. Click the Create Transition button from the tool bar to establish a work flow. |
| 3. | Click the Publish to Adapter icon in the Design panel, click the Browse button beside the Adapter Service field, and then select the test_sub1 Subscription Service in the Select a Resource dialog that is displayed. Click OK to finish the selection. |
Figure 194: Configuring a Subscription Service Process
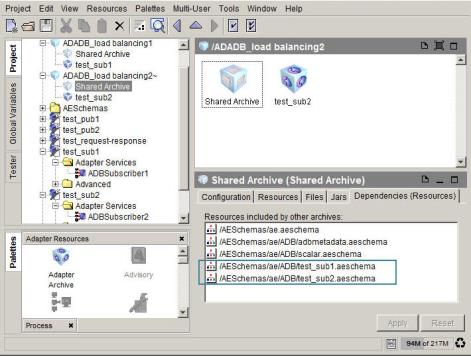
Click the Shared Archive icon in the second EAR file you created, ADADB_load balancing2, and then click the Resources tab in the Configuration panel.
| 4. | Click the Browse button and then select the test_sub1 Subscription Service in the Select a Resource dialog. Click OK to finish the selection. Click Apply. |
| 5. | Click the Dependencies (Resources) tab, and the dependency between the two Subscription Service services is displayed. See the section highlighted by the blue rectangle in the following figure. |
Figure 195: Establishing the Dependency Between Two Subscription Services
Two separate projects with each Subscription Service enabled with load balancing
To create the EAR files in two separate projects, complete the following steps:
Procedure
| 1. | In TIBCO Designer, select Tools > Create Project EAR from the menu, and then provide a name and file location for the EAR file in the Configuration tab. For example: ADADB_load balancing_1. |
| 2. | Click Build Archive and then click Yes in the confirmation message dialog that is displayed. |
| 3. | Click OK to complete creating the EAR file. |
| 4. | Repeat step 1 to step 3 in this procedure to create the second EAR file in the second project. For example: ADADB_load balancing_2. |
If you want to execute a BusinessWorks process in TIBCO Designer after deploying the projects in TIBCO Administrator, you have to configure the process.
To configure the process, complete the following steps:
Procedure
| 1. | Drag the Process Definition icon from the Palettes panel to the Design panel, and then specify the process name. For example: process_sub. |
| 2. | Click the process_sub icon in the Project panel, and drag the Publish to Adapter icon from the Palettes panel to the Design panel. Click Create Transition from the tool bar to establish a work flow. |
| 3. | Click the Publish to Adapter icon in the Design panel, click the Browse button beside the Adapter Service field, and then select the test_sub1 Subscription Service in the Select a Resource dialog that is displayed. Click OK to finish the selection. |
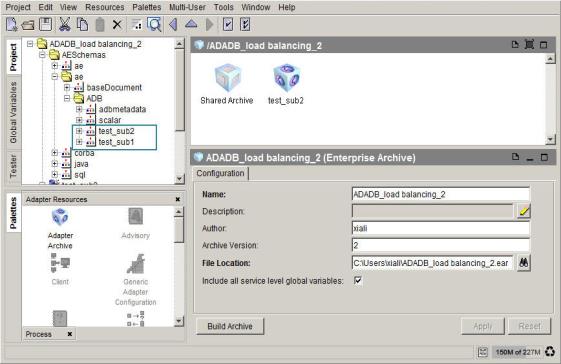
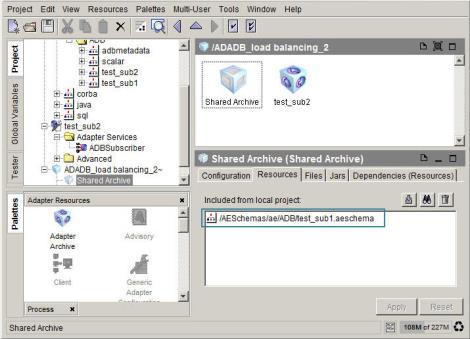
| 4. | Select ADADB_load balancing_1 > AESchemas > ae > ADB -> test_sub1 from the Project panel, and then copy the test_sub1 to the second project ADADB_load balancing_2. See the section highlighted by the blue rectangle in the following figure. |
Figure 196: Copy the test_sub1 Class to test_sub2
| 5. | Open the second EAR file, ADADB_load balancing_2 in the second project. |
| 6. | Click the Shared Archive icon, and then click the Resources tab in the Configuration panel. Click the Browse button, and then select AESchemas > ae > ADB > test_sub1 in the Select a Resource dialog. Click OK to finish the selection. Click Apply. See the section highlighted by the blue rectangle in the following figure. |
Figure 197: Establishing the Dependency Between Two Subscription Services in Two Separate Projects
Deploy an Adapter Instance for Load Balancing
Procedure
| 1. | Start TIBCO Administrator Enterprise Edition, click the Application Management folder, and click New Folder. Provide a name for the folder in the Name field, and click Save. |
| 2. | Click the folder you just created, and then click New Application. |
| 3. | Click the Browse button and navigate to the EAR file you created in TIBCO Designer, and then click OK. The New Application Configuration dialog is displayed, and then click Save. |
| 4. | Expand the Configuration item, and then double-click the name.aar file. |
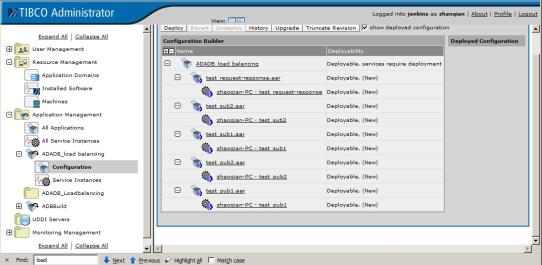
Figure 198: Importing the EAR File into TIBCO Administrator
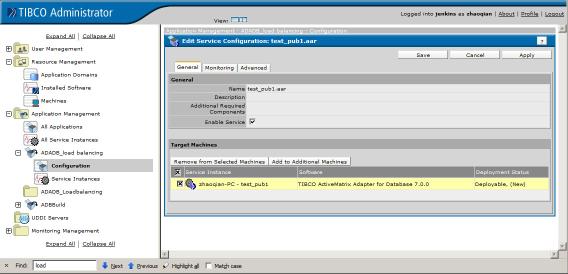
| 5. | Click Add to Additional Machine and select the machine to bind to and click OK. |
Figure 199: Adding to Additional Machine to Bind to
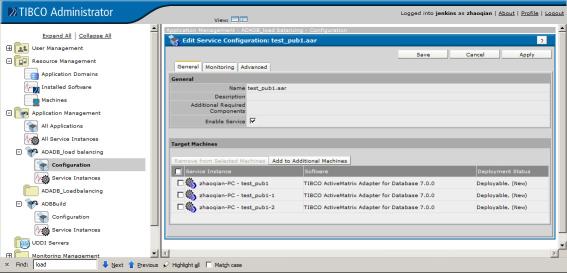
| 6. | Repeat to create the number of adapter instances required for your environment. For example, the following figure shows that three adapter instances have been added. |
Figure 200: Creating the Required Adapter Instances
| 7. | Click Save. |
The adapter instances are ready to be deployed. After the instances are deployed, when a message is sent to the adapter, the instance that is not busy handles the request.