Load Balancing Across Adapter Instances
This section explains how to configure and use load balancing in different services.
Publication Service
The following example describes how to configure load balancing at design time for publisher endpoints. Services of Publication Service (shortened as publication services hereafter) with the same mutex name specified are in the same load balance group.
Note: When working with load balancing in publication services, note the following conditions:
|
•
|
When creating two or more instances, you must load the same source table to all publication services in each instance you created. |
|
•
|
The automatically generated publishing tables must be the same for all publication services in each instance. To ensure consistency of the publishing tables, if you select the Write to Database on Save check box in one instance, you must clear this check box in other instances. |
|
•
|
Specify the same mutex name on the Publisher Options tab for all publication services in each instance. |
|
•
|
Specify the same message subject name on the Advanced tab for all publication services in each instance. |
To finish this example, you have to perform the following tasks:
Creating a Publication Adapter Instance
To create a Publication adapter instance, complete the following steps:
|
1.
|
Start TIBCO Designer and open a project. |
|
2.
|
Click the root project folder in the Project panel, for example,
ADADB_load balancing
Drag the ActiveDatabase Adapter Configuration icon from the Palette panel to the Design panel. Click OK in the displayed confirmation prompt. |
|
3.
|
Fill in the Configuration tab fields as follows, and then click Apply: |
|
—
|
Enter test_pub1 in the Instance Name field. |
|
—
|
Select the database type you are using, such as Oracle, from the Vendor list. |
|
—
|
Select the Write To Database On Save check box. This default option writes configuration information to the database when you save the project in TIBCO Designer. |
|
4.
|
Click Apply after configuring the relevant fields on the Design-time Connection tab and the Run-time Connection tab. Then click the Save icon from the tool bar to save the project. |
|
5.
|
Repeat step 2 to step 4 in this procedure to create another Publication adapter instance, for example, test_pub2. Note that you must clear the Write to Database on Save check box. |
Adding a Publication Service
To add a publication service, complete the following steps:
Procedure
|
1.
|
In the Project panel, expand test_pub1 > Adapter Services. |
|
2.
|
Drag the Publication Service icon from the Palettes panel to the Design panel. The icon name changes to ADBPublisher automatically. |
|
3.
|
Select the appropriate transport type on the Configuration tab. By default, the Rendezvous transport type is selected. |
|
4.
|
Repeat step 1 to step 3 in this procudure to add the publication service to the test_pub2 instance. |
Configuring Load Balancing
To configure load balancing, complete the following steps:
Procedure
|
1.
|
Select test_pub1 > Adapter Services > ADBPublisher and then add a table on the Table tab. Click Apply. |
|
2.
|
Click the Configuration tab, select the Use Polling Batch Size check box, and then set a value in the Polling Batch Size (Maximum Rows) field. |
|
3.
|
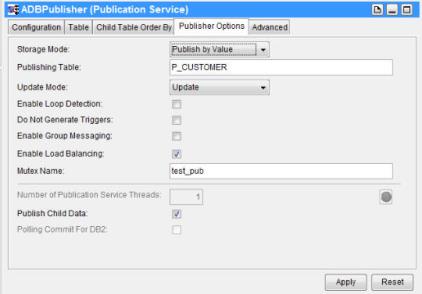
Click the Publisher Options tab and select the Enable Load Balancing check box. The Mutex Name field is displayed. |
|
4.
|
Select either of the following ways to create the mutex table, and then click Apply: |
|
—
|
Enter a name in the Mutex Name field, and the publication service will create a mutex table. For example, test_pub. |
|
—
|
You can define a mutex table by yourself, and then enter the mutex table name into the Mutex Name field. For example, you can use the following SQL statement to create the mutex table in the load balancing mode:
CREATE TABLE test_pub (COL1 INT)
 |
|
5.
|
Click the Advanced tab and specify a name in the Message Subject field. For example, test_loadbalancing_pub. Click Apply. |
|
6.
|
Repeat step 1 to step 5 in this procedure to configure load balancing in the publication service test_pub2. |
At run time, the publication services of the same load balancing group create a mutex table that was configured at design time, poll the same publishing table, and distribute loads. The publication services synchronize by locking the mutex table to obtain and update the sequence information.
Note: For Sybase, the publisher load balancing feature requires the ddl in tran option be set to true: sp_dboption database_name,"ddl in tran", true
Subscription Service and Request-Response Service
TIBCO Rendezvous Distributed Queue or TIBCO JMS Queue can be used to achieve load balancing across adapter instances for Subscription Service and Request-Response Service. The following figure is an example for using TIBCO Rendezvous Distributed Queue for load balancing. It shows three adapter instances, each connected to a database server (not shown) that contains replicated data.
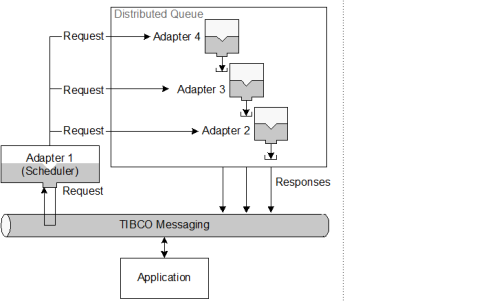
The adapter instances have been set up to use distributed queue with one instance acting as the scheduler. Only one of the three adapter instances will receive an incoming request from an application. The scheduler will assign certified requests to the least loaded member of the queue.
A queue member’s load is determined by the number of pending processes that are waiting to be processed by the Request-Response thread of the member database. After the request is processed, the processing configuration sends a response back to the requesting application.
Configuring an Adapter Instance to use TIBCO Rendezvous Distributed
Queue or TIBCO JMS Queue for Load Balancing
Note: When working with load balancing in Subscription Service and Request-Response Service, you have to note the following conditions:
|
•
|
In case of two or more Subscription instances, if you want to create the same exception table or opaque exception table, select the Write to Database on Save check box in one instance and clear this check box in the other instances. If you do not want to create the same exception table or opaque exception table, you can select the Write to Database on Save check box in all instances. |
|
•
|
When you create two or more Subscription instances, you must load the same source table to all services you created. |
|
•
|
When you specify the message subject name in the Advanced tab for all Subscription Service services, you must make sure the message subject names are all the same. |
|
•
|
When you specify the destination name in the Advanced tab for all Request-Response Service services you created, you must make sure the destination names are all the same. |
|
•
|
To enable load balancing for Request-Response Service with TIBCO Rendezvous Distributed Queue configured, add multiple activities in the business process to communicate with Request-Response Service. If you do not add multiple activities, only one adapter instance works in load balancing. |
To finish this example, you have to perform the following tasks:
Creating a Subscription Adapter Instance
Procedure
|
1.
|
Start TIBCO Designer and open a project. |
|
2.
|
Click the root project folder in the Project panel, for example,
ADADB_load balancing.
Drag the ActiveDatabase Adapter Configuration icon from the Palette panel to the Design panel. Click OK in the confirmation message dialog that is displayed. |
|
3.
|
Fill in the Configuration tab fields as follows, and then click Apply: |
|
—
|
Enter test_sub1 in the Instance Name field. |
|
—
|
Select the database type you are using, such as Oracle, from the Vendor list. |
|
—
|
Select the Write To Database On Save check box. This default option writes configuration information to the database when you save the project in TIBCO Designer. |
|
4.
|
Click Apply after configuring the relevant fields on the Design-time Connection tab and the Run-time Connection tab. Then click the Save icon from the tool bar to save the project. |
|
5.
|
Repeat step 2 to step 4 in this procedure to create another Subscription adapter instance, for example, test_sub2. Note that you must clear the Write to Database on Save check box. |
Adding a Subscription Service
To add a Subscription Service, complete the following steps:
Procedure
|
1.
|
In the Project panel, expand test_sub1 > Adapter Services. |
|
2.
|
Drag the Subscription Service icon from the Palettes panel to the Design panel. The icon name changes to ADBSubscriber automatically. |
|
3.
|
Select the appropriate transport type on the Configuration tab. By default, the Rendezvous transport type is selected. Select Distributed Queue from the Quality of Service list.
Or select JMS from the Transport Type list and then select Queue from the Quality of Service list. |
|
4.
|
Repeat step 1 to step 3 in this procedure to add a service to the test_sub2 Subscription instance. |
Configuring Load Balancing
If you select TIBCO Rendezvous as the transport type and Distributed QUeue as the quality of service, complete the following steps:
Procedure
|
1.
|
Select test_sub1 > Adapter Services > ADBSubscriber, and then add a table on the Table tab. Click Apply. |
|
2.
|
Click the Advanced tab, and then specify the name in the Message Subject field. For example, test_loadbalancing_sub. Click Apply. |
|
3.
|
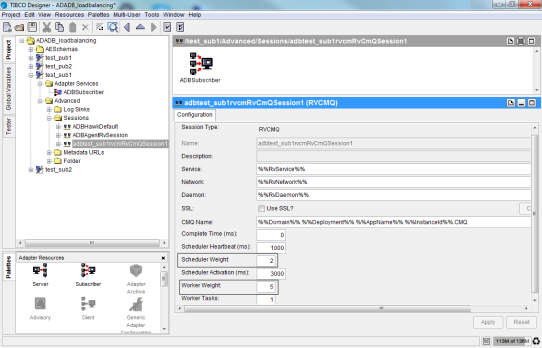
Expand test_sub1 > Advanced > Sessions > adbtest_sub1rvcmRvCmQSession1, and then set the values for the Scheduler Weight and Worker Weight fields. Click Apply.
The scheduler weight indicates how you plan to allocate the jobs. Its default value is 1. The worker weight indicates the exact number of executed jobs. No matter what value you set for the scheduler weight, during run time, the adapter will execute the jobs according to the value you set for the worker weight. |
|
4.
|
Copy the adbagent.tra file in the TIB_ADADB_HOME\bin directory to two files, named t1.tra and t2.tra for example. |
|
5.
|
Set the tibco.instanceid property to tibco.instanceid t1 in the t1.tra file and tibco.instanceid t2 in the t2.tra file. |
|
6.
|
In the t1.tra file, change adbagent.tra to t1.tra in application.args -system:propFile TIB_ADADB_HOME/bin/adbagent.tra. Similarly, change adbagent.tra to t2.tra in the t2.tra file. |
|
7.
|
Open two command line windows, and run the same instance named custom_RPC in the two command line windows separately.
In this example, the commands are:
adbagent --propFile C:\ADB7\t1.tra -system:repourl
C:\ADB7\test.dat -system:configURL custom_RPC
adbagent --propFile C:\ADB7\t2.tra -system:repourl
C:\ADB7\test.dat -system:configURL custom_RPC
After you complete the load balancing configuration, you can develop a business process to verify your configuration. In the business process, create two requests and send data to the instance custom_RPC. If the two Request-Response Service services can handle their requests separately, the load balancing configuration takes effect. |