Logging Tab
Use the settings available in the Logging tab to configure a log file or log sinks, including which types of trace messages you want to log and where they are sent. Click Apply to apply the changes before leaving this tab. See the following figure:
Figure 75: Adapter Instance: Logging Tab
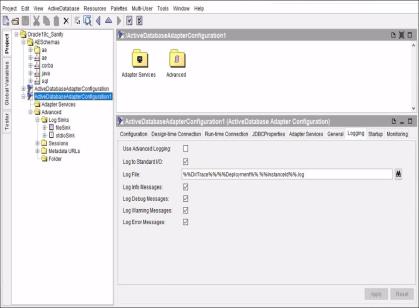
The following table lists and explains the fields on the Logging tab:
|
Field |
Description |
|
Use Advanced Logging |
You can choose whether to use custom logging options. By default, this check box is not selected. To add custom log sinks, select this check box and configure log sink resources from the Log Sinks folder in the Advanced folder of the adapter instance. See Guidelines for Creating and Configuring the Log Sinks for more information. |
|
You can select this check box to send logging information to the console window where the adapter is started. By default, this check box is selected. Logging information is displayed when you select this check box. |
|
|
File to which logging information is written. The default log file name for the adapter is Global variables can be used to specify the location of the log file. See Working with Global Variables at Design Time for more information. |
|
|
Log Info Messages |
You can select this check box to send all messages of the For when to turn on the option, see Guideline for Turning on the Log Levels. |
|
Log Debug Messages |
You can select this check box to send all messages of the For when to turn on the option, see Guideline for Turning on the Log Levels. |
|
Log Warning Messages |
You can select this check box to send all messages of the For when to turn on the option, see Guideline for Turning on the Log Levels. |
|
Log Error Messages |
You can select this check box to send all messages of the For when to turn on the option, see Guideline for Turning on the Log Levels. |
Guidelines for Creating and Configuring the Log Sinks
When you select the Use Advanced Logging check box in the Logging tab, you have complete control of selecting the destinations and associating desired roles with each of the destinations.
To create and configure the log sinks, select the Log Sinks folder inside the Advanced folder in the Project panel. You can customize the predefined file sink or STDIO sink, or create additional sinks for any of the following types by dragging a Generic Log Sink from the Palette panel to the Design panel.
Figure 76: Creating a New Log Sink
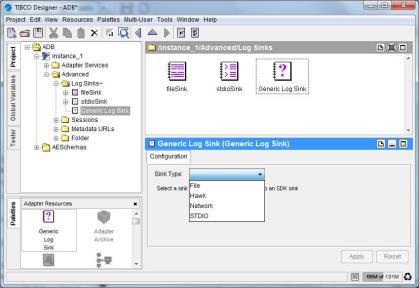
| • | File A File sink sends logging information to files. |
| • | Hawk A HAWK sink uses the HAWK session, created and used by the adapter for monitoring purposes, to send logging information to TIBCO Hawk. |
| • | Network A Network sink sends logging information both on TIBCO Rendezvous and TIBCO JMS. |
| • | STDIO A STDIO sink sends logging information to standard I/O. |
See "Custom Log Sink Reference" in TIBCO Designer Palette Reference for configuration options of each type of sinks.
Guideline for Turning on the Log Levels
The log levels available are Info, Debug, Warning, and Error messages. The logging messages generated depend on the levels you selected. Turning on the level can affect the performance of the adapter. For better results, turn on the required roles only.
You can configure three types of logs (log sinks) to hold trace messages, corresponding to three levels (roles) of trace messages, Information, Warning, and Error. A fourth level of trace messages, Debug, is reserved and cannot be enabled unless requested by the TIBCO Product Support Group. This option writes a lot of information to the log file and significantly reduces the speed of the adapter.