Creating an Action Template
To create the action template, use the CustomAction.atp file from Sample Action Rule Templates and User Interface Files.
Procedure
- Copy the contents of the CustomAction.atp file and rename the file with the custom action name. For example, in the sample custom action Request Counter, we have named the action template file RequestCounter.atp.
-
Change the
Qname of the action,
version, specify the
category and the
subcategory:

-
Specify the parameters of the action. These parameters are defined inside a parameter group.

- Change ‘$PARAMETERGROUPNAME’ to the name of the parameter group name.
- Change ‘$INPUT1’ to the name of the first input parameter.
- Change the ‘$INPUT 1 DISPLAY NAME’ to the name specified in the previous step or to any alternate name that should be displayed to the user.
- Change the ‘$FIRST INPUT’ to enter the description of the parameter that is being defined.
- Set hidden to true/false. If set to true, the parameter is not visible to the user on the UI, if set to false it is visible on the UI.
-
Change ‘$TYPE_OF_INPUT’ to the type of the input parameter.
For a list of supported types, see Parameters and Action Templates.The parameter tags can be repeated to add additional parameters that are needed to define the action.
- Change the ‘CustomActionAction’ to the name of the custom action. Change the description, the implementation Id and the Intents.
-
Change the
config fragment as expected by the action.
configFragment is interpreted by Velocity Engine at run time to produce the xml fragment that is used to initialize the action. The
$INPUT1 and
$INPUT2 are the two inputs which are passed in a format that can be interpreted by the velocity engine.

-
Change the ‘$Path_To_CustomAction.xsd’ to point to the path of the Custom Action schema. ‘useWSPolicySchema’ can be set to
true if the custom policy adheres to the WS Policy schema.

-
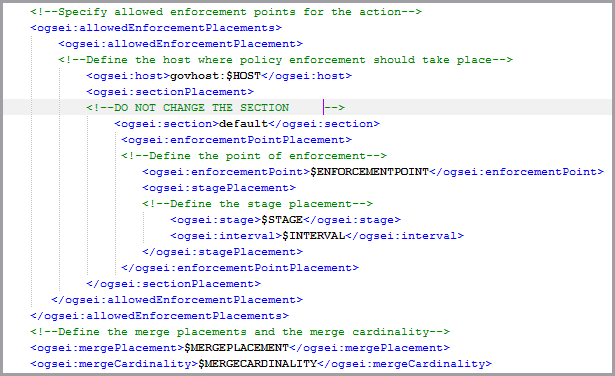
Change the
$HOST. The host can be a pipeline or host.
$ENFORCEMENTPOINT, $STAGE,
and $INTERVAL need to be changed depending on where the action needs to be invoked.

For a complete set of allowed host, section, enforcement points, stage and interval, see Sample Action Source Code.The last two tags specify the merge placement and cardinality. AllowedEnforcementPlacements define all the allowed locations where this action could be used.
The actual place where this is used is determined in the Rule Template by using this Action Template. The mergePlacement and mergeCardinality are defined only in the action template. The Rule template cannot define the placement or cardinality of the action it is using.
On completion, the custom action template is ready to be used. For a complete action template refer to the following:
CustomPolicies/samples/requestCounter/template/RequestCounter.atp.
The CustomPolicies folder is located at:
TIBCO_HOME/pd/1.2/samples/CustomPolicies

