Changing the Style of a Control Based on an Input Value
Once you have defined various CSS classes, you can configure the form so that the specific class to be applied to a component of the form is based on a value input by the user. In this task, we will create a computation action, so that the background color for the Claim Amount control is determined by the value a user enters in the field.
We will use the pre-defined CSS file, claims.css. The class to be applied will be either .warning, .problem., or no class at all, depending on the user’s input.
Procedure
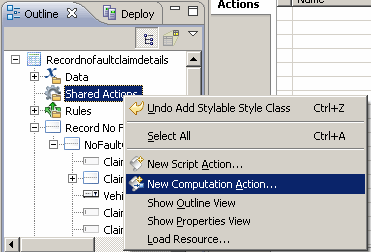
- In the Outline view, right-click Shared Actions and click New Computation Action. This opens the Add Action dialog.
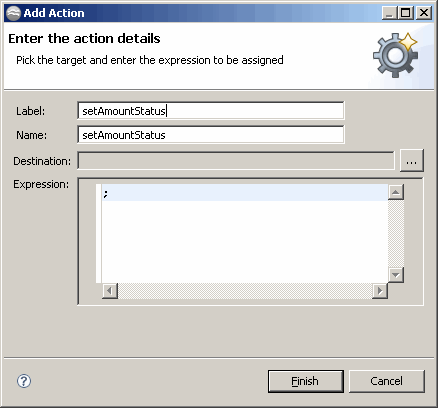
- In the Add Action dialog, type setAmountStatus in the Label field.
- For the Destination field, indicate where the action will be applied. To do this, click the elipsis icon to open the Choose Destination dialog. Expand the Claim Amount item by clicking the plus sign, and click Style Class to select it:
-
In the Add Action dialog, enter the following script in the Expression text area:
var amount = control.NoFaultClaimField_ClaimAmount.getValue();
var style = "";
if (amount > 5000) {
    "problem";
} else if (amount > 2000) {
    "warning";
} else {
    "";
}
The fields of the Add Action dialog should now be complete, as shown here:
- If the amount entered by the user is greater than 5000, the style defined in the .problem class will be applied to the Claim Amount control.
- If the amount is greater than 2000, up to 5000, the style defined in the .warning class will be applied.
- If the amount is 2000 or less, no CSS class will be applied, and the style for the control will be unchanged.
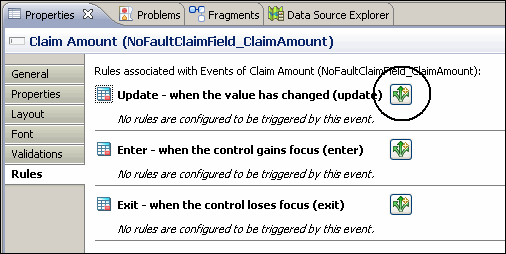
- Now we will create a rule to specify when the above script is to be used. Click the Claim Amount field in the Design view of the form. Click the Rules tab in the Properties view. To define a rule to be used when the control is updated, click the icon to the right in the Update portion of the Rules property sheet. This will open the New Rule dialog:
- In the Define Actions screen, click the plus sign to open the Add Action dialog for adding an action to a rule:
- In the Add Action to Rule screen, click the radio button Pick an existing action. Click the elipsis to the right of the field to open the Select Item dialog:


Result
Next Steps
You can now:
- Install the solution to this Tutorial and compare it with your version. See the instructions in the following section for how to do this.
- Optionally, you can assign participants to the user tasks. To do this:
- Assign a position in the organization model (from the project EasyAsExtendedOMSolution that you imported earlier) as the participant for each of the user tasks. The How to Design a Simple "WelcomeUsers" Process tutorial describes how to do that.
- If you wish, you can then deploy the project, as described in the How to Implement and Deploy the "Welcome Users" Application for deploying the "WelcomeUsers" project.
Next topic: Verifying the Tutorial Solution
Previous topic: Setting a CSS Class at the Control Level
Copyright © Cloud Software Group, Inc. All rights reserved.