Configuring Validation Profile (.apf) Files
By default, any validation error that occurs causes a transaction to be rejected. When a transaction is rejected, the 997 generated contains an AK5 segment with a Transaction Set Acknowledgment Code of 'R' for the transaction. When validating EDI transactions, it is desirable to be able to control whether a validation error causes the rejection of the entire transaction or not.
Sometimes you might want the error reported and the transaction rejected. At other times, you might want to report the error in the 997 but to accept the transaction anyway. For example, the generated 997 has a Transaction Set Acknowledgment Code of 'E' for accepted with errors. You might want validation errors ignored altogether, or you might want only some validation errors ignored.
In conjunction with EDISIM Validator, TIBCO BusinessConnect™ Container Edition - EDI Protocol powered by Instream® now provides the ability to configure the severity errors, which occur in EDI transactions.
Severity Level
When a transaction is rejected, the segments in the generated 997 acknowledgment looks something like the following information:
ST~997~0001'
AK1~HC~000000001'
AK2~837~000000001'
AK3~CLM~36~2300~8'
AK4~11+3~1362~1~AP'
AK5~R'
AK9~R~1~1~0'
SE~9~0001'
The AK2 segment identifies the transaction that is rejected. The AK3 and AK4 segments give information about where errors occur in the transaction. The AK5 segment indicates that the transaction rejected, and contains a transaction status code of 'R'.
The AK9 segment indicates that the group is rejected, 'R', since only one transaction exists in the group and that transaction is rejected. If some of the transactions in the group are accepted while others are rejected, the status of the group in the AK9 segment is 'P', which indicates that at least one transaction in the group is rejected.
When a transaction type is rejected, error information is also sent to the private process on the subject AX.BC.BC instance name.X12.ERROR.VALIDATION. This error information contains the transaction ID of the transaction, which has validation errors and descriptive information about the validation errors.
Setting different severity levels to validation errors affect the information about the validation errors that is contained in 997 acknowledgments and the error information reported to the private process. It also affects whether the given transaction is converted from EDI to XML or from XML to EDI. When a transaction is rejected, no conversion takes place.
The following table describes the four levels of severity, which can be configured for validation errors and their effect on how error information is reported:
| Severity Level | 997 Acknowledgment | Error Information to Private Process | Data Conversion Occurs? |
|---|---|---|---|
| Ignore | AK5 segment reports transaction status of 'A' for accepted. AK3 and AK4 segments are not present. | No error report is generated to the private process | Yes |
| Informational | AK5 segment reports transaction status of 'A' for accepted. AK3 and AK4 segments are not present. | The cause of the error is reported in the message to the private process with the error code and a description of the error. The error description begins with Information. | Yes |
| Warning | AK5 segment reports transaction status of 'E' for accepted with errors. AK3 and AK4 segments contain information about the location of the error in the transaction as appropriate. | The cause of the error is reported in the message to the private process with the error code and a description of the error. The error description begins with Warning | Yes |
| Error | AK5 segment reports transaction status of 'R' for rejected. AK3 and AK4 segments contain information about the location of the error in the transaction as appropriate. | The cause of the errors is reported in the message to the private process with the error code and a description of the error. | No |
| Fatal | Similar in behavior to the 'Error' type but is used for system errors. | No |
Severity Scope
The scope of error severity setting is a transaction level. Normally an error severity setting applies to all validation errors of the specified type within the entire transaction.
Validating Severity Levels
The procedure for validating the error severity settings for a transaction is similar to that for configuring the guideline for the transaction. You have to first create a Validator Profile file for a transaction using EDISIM Validator, and then upload this file in the Protocol Editor of the TIBCO BusinessConnect Container Edition UI.
- Creating a Validator Profile (.apf) File
You can create a Validator Profile file by using the EDISIM Validator.
- Start EDISIM > Validator.
- Click Options > Validator Profile.
- In the Message tab, select a message. Select one of the severity types and save it:
- Ignore
- Informational
- Warning
- Error
- Fatal
- Ignore
- In the Save Profile As dialog, save the changed profile to a new profile of the type Validator Profile (*.apf).
- Click File > Open. An EDI data file is opened, such as sample data X12_5010_850.dat.
- Click Open. An EDI compliance check is automatically performed.
- Select the guideline to validate the data file: 5010_850 that is imported from X12_5010_850.sef.The following figure shows the validation result:
Figure 61: Select Standard Dialog
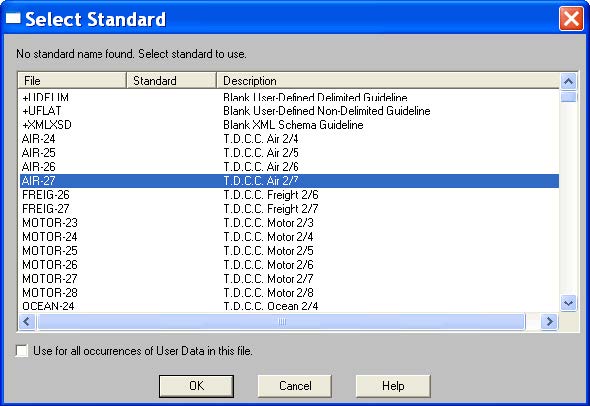
Figure 62: EDI Compliance Check
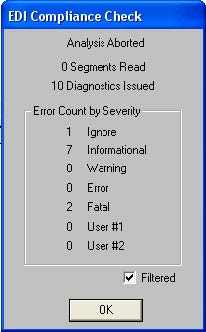
The Diagnostics window provides the Validator analysis of the selected guideline.
B. Applying the Validator Profile File (.apf) to a Transaction
After creating a Validator Profile file, associate a transaction with the Validator Profile in X12 to apply the file to the transaction
To apply a Validator Profile file to a transaction:
In Admin UI, click Operations Editor tile and then select the X12 link.
Expand the operations tree and select the transaction, which you want to configure the .apf file and then click the Guideline tab.
In the Validator Profile File (.apf) field, click Upload file to upload the validator profile file.
To apply a Validator Profile file to a transaction for a particular operation in a business agreement, bind the transaction, and then override the transaction settings. For details, see Operation Bindings TabSelect the file type:
File Reference: When you select this option, enter the path to the file reference you want to use.
Uploaded File: When you select this option, navigate to the location of the file you want to upload. In this case, search for the file that you save in Task A.