Using EDI Guidelines
You can find the guidelines that are used for this tutorial in the EDICE_HOME\samples\sampleDocs\guidelines directory.
The guideline files are named as follows:
-
X12_4030_850.std
-
X12_5010_850.sef
-
X12_5010_997.sef
-
X12_5010_999.sef
-
X12_TA1.sef
Default Guideline
For the Inbound transaction to work with the default guideline, enter and save
X12 Transaction.Notify 5010-5020_850 = X12_5010_850.sef
in the default_guidelines.map file at the <dir>/bcce-1.2.0/images/services/cms/bcce-cms-1.2.0/config location.
For the outbound transaction to work with default guideline, enter and save
X12 Transaction.Notify 5010-5020_850 = X12_5010_850.sef
in the default_guidelines.map file at the <dir>/bcce-1.2.0/images/services/is/bcce-is-1.2.0/config location.
Viewing a Guideline
This procedure explains how to view the guideline used in the tutorial.
To import a guideline, perform the following steps:
-
Start TIBCO Foresight EDISIM.
-
Click Standards Editor. The Empty Guideline - Edisim dialog box is displayed.
-
From the menu, click File > Import > Import Single .SEF and Open.
-
Navigate to the
EDICE_HOME\samples\sampleDocs\guidelinesdirectory. -
Select the
X12_5010_850.seffile, and then click Open. -
If the SEF Import Correction dialog box is displayed, click Skip Correction.
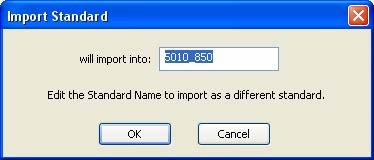
-
In the Import Standard dialog box, keep or change the standard name, which you want to import this guideline into, and click OK.
Figure 44: Import Standard
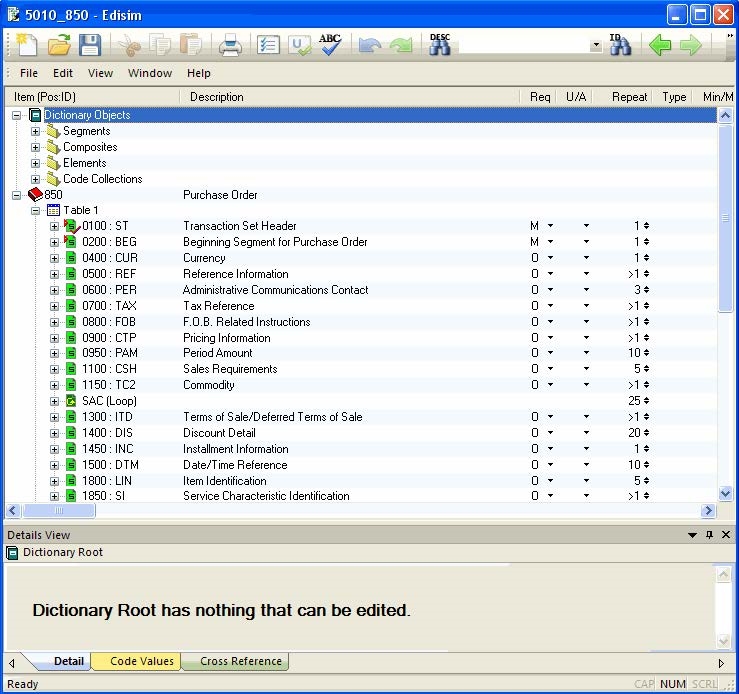
The imported standard 5010_850 is now displayed.
-
Click on the left to display the purchase order guideline.
Figure 45: Elements of the Purchase Order
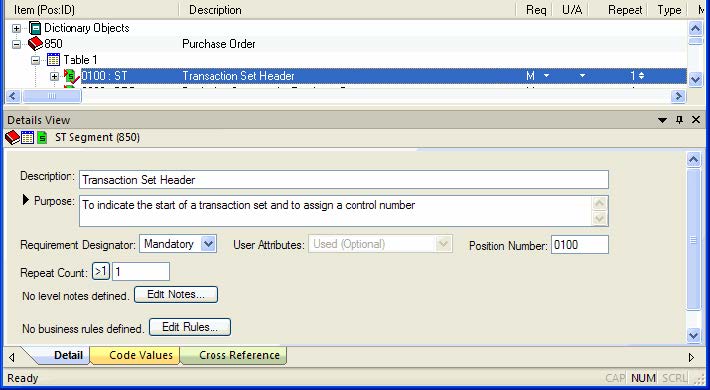
When you expand and highlight elements in the Guideline panel, the properties of each element are displayed in the Details View panel.


Figure 46: Details View Panel
Loading Guidelines to the X12 Protocol
This section describes how to load the guidelines and XSDs for the X12 messages. TIBCO BusinessConnect EDI Protocol powered by Instream contains a sample configuration file for this tutorial. You can load guidelines to the X12 protocol by importing the configuration file into the Operations Editor.
To import the configuration file into the Operations Editor, perform the following steps:
-
Log into BusinessConnect Container Edition Admin UI.
-
On B2B Administration tile, click Operations Editor.
-
In the protocol column, select X12 and then click Import icon.
-
In the Import Operations panel, click change next to the Upload Configuration Data File field.
-
In the Change File panel, click Browse next to the Upload file field to navigate to the configuration file directory.
-
Select the corresponding configuration file, and then click Open.
-
For the first tutorial:
EDICE_HOME\samples\interfaces\X12-00403.csx -
For the second tutorial:
EDICE_HOME\samples\interfaces\ X12-850_PO_Positional.csx
-
-
In the Change File panel, click OK.
-
In the Import Operations panel, set a password (optional) and click Import.
Reviewing the Guidelines
This procedure describes how to review the guideline loaded for the purchase order transaction.
-
Click X12 protocol.
-
In the Operations Editor|X12 dialog, click expand all to display all X12 operations.
-
Click the 00403 > 005010 > 850 transaction link.
-
Click the Guideline tab.
Note that X12_5010_850.sef is displayed in the Guideline File for validating X12
Partner data (.sef or .std) field.
-
Click Save to save the configurations.
-
In the Operations Editor|X12 dialog, click Done.