In this task you create two rules, one called
CreateAccount and one called
DuplicateAccountCheck. Both rules can fire when a
Create event is asserted into the Rete network.
However, the DuplicateAccountCheck rule has a higher
priority, so it will fire before the CreateAccount
rule.
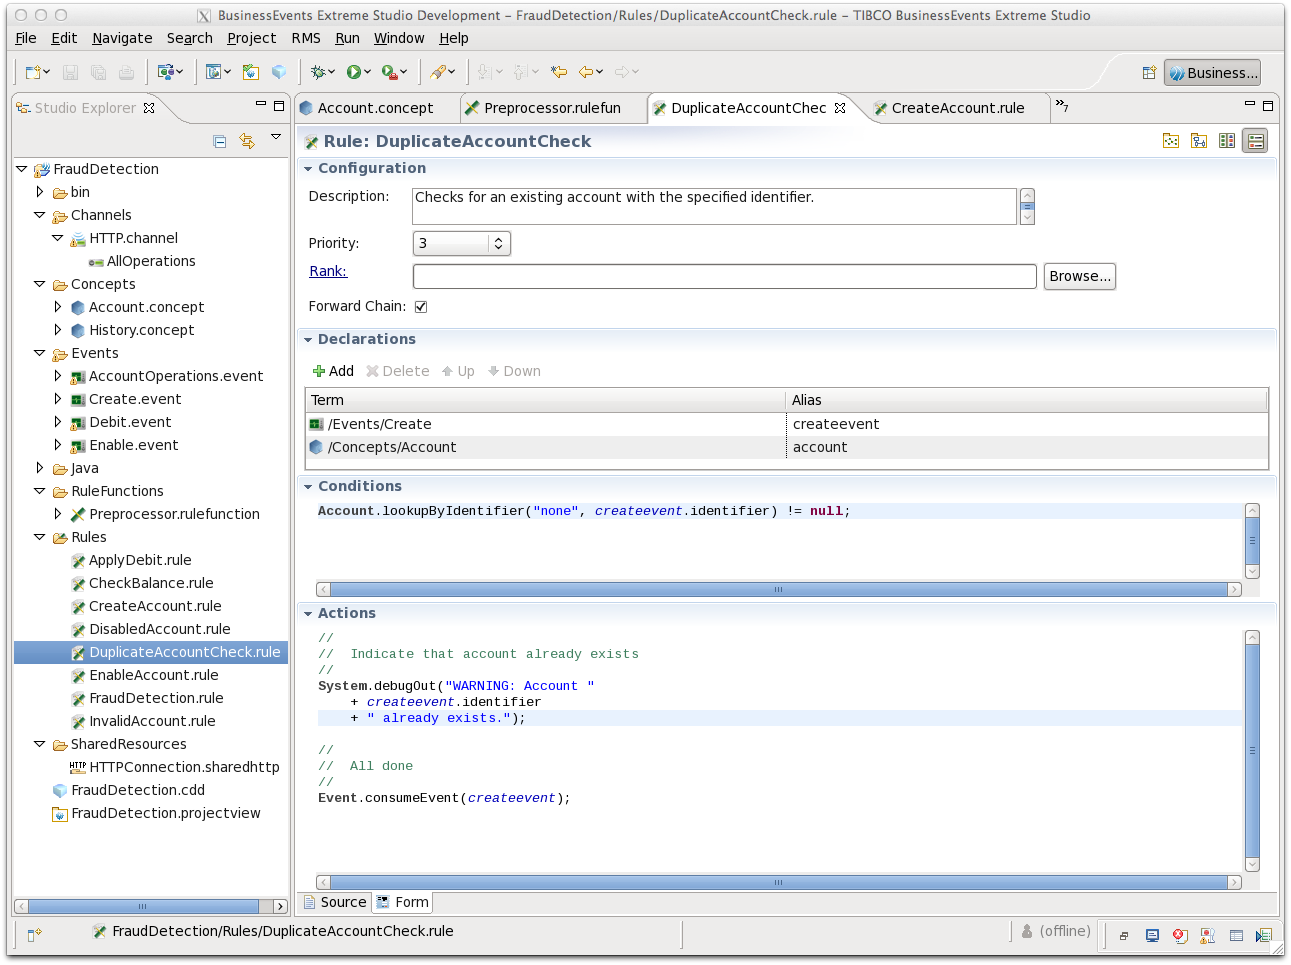
The DuplicateAccountCheck rule checks whether the
account identifier provided in the Create event matches
the account identifier of any Account instance already
in the Rete network. One of the two following situations must
occur:
A matching identifier exists in the Rete network: the
DuplicateAccountCheckrule prints a message to the console, and consumes — that is, deletes — theCreateevent. Because that event is consumed, theCreateAccountrule does not fire.No matching identifier exists in the Rete network: the
DuplicateAccountRulerule does nothing, and then theCreateAccountrule fires, and creates theAccountconcept instance.
What are rules and how are they created? Rules define actions to take when certain conditions are met. Rules are written in the TIBCO BusinessEvents® Extreme rule language, which is similar to the Java language. Rules are declarative and are generally narrow in scope. A rule has three parts: the declaration (declare), the conditions (when), and the actions (then). As with rule functions, you can work in a source view, which displays the Java-like code, or in a form view.
How are rules used at runtime? The rule engine checks all changes and additions to the Rete network and evaluates or reevaluates rules, using their declaration and conditions, as needed. Eligible rules are added to the rule agenda.
What is the rule agenda A rule fires when it is at the top of the agenda. The engine determines the order of firing using rule declarations and conditions, and each rule’s priority and rank (if these features are used). As the contents of the Rete network change, the engine reevaluates rules and removes any that are no longer eligible to fire. See Understanding Conflict Resolution and Run to Completion Cycles in TIBCO BusinessEvents® Extreme Application Architect’s Guide for details.
How can you prioritize rule execution? The Priority setting on a rule is used to determine the order in which rules are fired. Those with a number closer to one fire first. Within a set of rules that have the same priority, a ranking feature enables you to determine which fire before others. The ranking feature uses a callback rule function that enables you to specify business logic to establish the rank of a rule. When there is no reason to force rules to execute in a particular order, leave the Priority and Rank fields set to the default and let the runtime engine determine rule order.
How can you create concept
instances? In this task you instantiate an object instance
using its ontology function. Another way is using the
Instance.createInstance() function. The
Instance.createInstance function uses the XSLT mapper
to map any of the scope variables (such as properties, attributes and
event payloads) to the new instance properties. You can also create event
instances in a similar way, using the
Event.createEvent() function.
![[Note]](images/note.png) | |
See Run-time Inferencing Behavior in TIBCO BusinessEvents® Extreme Application Architect’s Guide. |
You see the New Rule Wizard. In the Rule name field, type
DuplicateAccountCheck. In the Description field, typeChecks for an existing account with the specified identifier. ClickFinish.In the Form tab, set the Priority field to 3. It’s a higher priority than 5, the default. You’ll set the
CreateAccountrule to priority 5, so that theDuplicateAccountCheckrule always fires before theCreateAccountrule.Expand the Declaration section as needed so you can see empty rows below the headings Term and Alias.
Each of the sections can be expanded and contracted as needed.
Drag the
Accountconcept from the TIBCO BusinessEvents® Extreme Studio Explorer tree into the first empty row in the Declarations section. You see the project path of theAccountconcept in the Term column, and account in the Alias column.Similarly, drag the
Createevent into the next available row. Change the event alias tocreateevent.Declaration The Declaration provides the scope of the rule. It lists all the entity types to be used in the rule, and their aliases. By default the alias is set to the entity name in lower case letters. You can change it as desired.
In the Conditions panel, type the following:
Account.lookupByIdentifier("none", createevent.identifier) != null;This uses the generated query function for the
AccountByIdentifierkey. This will return an account with the specified identifier if the account already exists.In the Actions panel, just below the Conditions panel, type these statements:
//
//    Indicate that account already exists
//
System.debugOut("WARNING: Account "
    + createevent.identifier
    + " already exists.");

//
//    All done
//
Event.consumeEvent(createevent);
These actions are done only if the conditions are met. If not, then the next rule in the agenda fires — and that is the
CreateAccountrule, which you’ll define next.You are also consuming the event, so it cannot trigger any other rules.
Save and close the resource.
You see the New Rule Wizard. In the Rule name field, type
CreateAccount.Click
Finish.In the Form tab, set the Priority field to
5. This is a lower priority than theDuplicateAccountCheckrule.Drag the
Createevent from the TIBCO BusinessEvents® Extreme Studio Explorer tree into the first empty row in the Declaration section. Change the alias name tocreateevent.This rule has no conditions — the
DuplicateAccountCheckrule means there is no need. You could have combined the two rules into one. There are many ways to write rules for a project. You have to use your judgment.In the Actions panel, you’ll use an ontology function to create the
AccountFrom the top menu select
Window > Show View >
            Other > TIBCO BusinessEvents® Extreme
 > Catalog Functions
. The Catalog Functions view displays on the right (unless your Eclipse IDE is configured differently — it could display along the bottom, for example).Below each concept, event, and rule function is its ontology function. Expand
Ontology Functions > FraudDetection > Concepts > Account > Account.Drag the
Accountfunction into the Actions section. You see its signature:Concepts.Account.Account( /*extId String */, /*identifier String */, /*balance double */, /*status String */, /*averageMonthlyBalance double */, /*recentDebitBalance double */)Update the function to create the
Accountconcept, and type the rest of the actions as follows. You can double click the tab to expand the rule editor, to make rule writing easier.// // Create a new account // Concepts.Account.Account( "" /* no external identifier */, createevent.identifier, createevent.balance, "Enabled" /* account is enabled by default */, createevent.averageMonthlyBalance, 0 /* no current debits" */); System.debugOut("INFO: Created account " + createevent.identifier); // // All done // Event.consumeEvent(createevent);Save and close the resource.
