Defining Attributes (Step 3)
Attributes define the structure of a repository. To create attributes:
- Click the
 icon in the Palette and then click in the Repository (under an attribute group) to add the Attribute.
- Enter an attribute name.
Attribute properties can be edited directly by clicking the attribute or selecting the repository and then clicking the Attributes tab in the Properties window.
Attributes can be reordered by dragging and dropping the attribute properties.
Add and
Delete icons are provided to add and delete an attribute property. Select an attribute and use the
![]() delete icon to delete it, or use the
delete icon to delete it, or use the
![]() add icon to add an attribute.
add icon to add an attribute.
You can change the flag property by a single mouse click. You can modify all the attribute properties in the property section. The size of attribute columns in property section is arranged to show more data.
Click the Create Attribute Group button if you want to create a new attribute group. Click the Group Sequence button if you want to reorder attribute groups.
When you select an attribute group in the drawing pane, the Properties tab displays all attributes within that attribute group. You can see and add the General and Advanced informations per attribute:
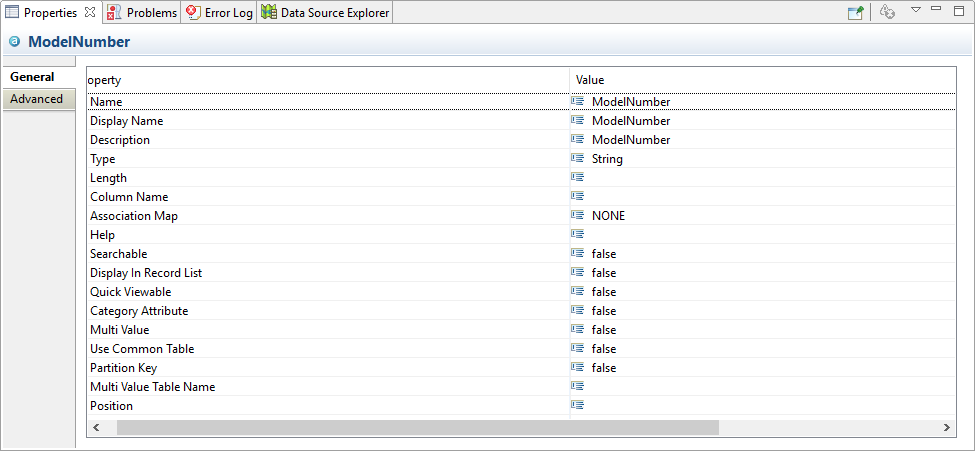
- Name - The name for the attribute (maximum of 30 characters, a-z, A-Z, 0-9 and _)
- Display Name - The display name for the attribute (maximum of 60 characters, less restrictive naming conventions compared to name). Duplicate display names are allowed.
- Description - Description for the attribute (maximum of 4000 characters).
- Type - The data type for the attribute (String, File, Amount, Boolean, Integer, Date, Decimal, Custom Decimal, Timestamp, Long, and URL). The Long data type is native data type which maps to Java Long. The maximum length is 19. The URL is a derived data type based on String. The maximum length is 4000 and default length is 256. If the length is zero or blank value, default length is assigned. The Custom Decimal is like the Decimal data type. The maximum length is 29. The custom decimal is indicated by the decimal length 29 minus the assigned length. For example, (18,11).
- Length - Attribute length
- Column Name - A unique database column name for the attribute. Name must comply with database requirements if database has validations defined for attribute column name.
- Association Map - Can choose any attribute as ID (Record Id), IDEXT (Record ID Extension), or EFFECTIVEDATE. The available mappings in the Association Mapping drop-down list are NONE, ID, IDEXT, and EFFECTIVEDATE.
- Help
- Searchable - Select to mark the attribute for display in search results.
- Display In Record List - Select this option to display the attribute in the Record List
- Quick Viewable - Select to include the attribute in the Quick view section of the Record Relationship tab.
- Category Attribute - Select this option to define the attribute as a Category Specific. When an attribute is defined as Category Specific, you can either enter a table name or use common tables. Category Specific attribute share the same predefined common tables used for multi-value attributes. In addition, the new predefined MV_SHARED_BOOLEAN_TABLE table is available for the Boolean data type.
- Multi Value - Whether attribute is multi-value.
- User Common Table - Whether the multi-valued/category specific attribute uses predefined common table.
- MultiValue Table Name - The multi-value table name if the attribute is a multi-value attribute.
- Partition Key - Select to define the attribute as partition key.
- Position - The position for the attribute.


In addition to the existing properties, you can also add a new custom attribute property in the attributeAdvancedProperties.properties file available in the .metadata folder of the studio project. After adding the custom property, the newly added custom property appears in the Advanced tab in the properties section.
- Required - Specify if you want attribute as mandatory attribute.
- QualityMode - Displays the selected quality mode. The available options are:
- NONE : indicates that the quality mode is not selected.
- DEFINED : indicates that the attribute has a value. That means, the value should not be empty.
- VALIDATED : indicates that a rulebase constraint has been associated with the validation of the attribute.
- VERIFIED : indicates the verification of an attribute, that is, external validation. For example, address verification and email verification.
- QualityCategorization - attribute name in which the quality attribute is categorized.
- QualityGoal - indicates the quality value of an attribute.