Artifact Explorer Panel Reference
After the successful check out, the business rules and decision tables are displayed in the project explorer panel. To view entire checked out project artifacts in the project explorer panel select the All Projects artifact group. In the project explorer you can perform various operations on the artifacts and even check out other projects. You can also group or view artifacts according to your requirement.
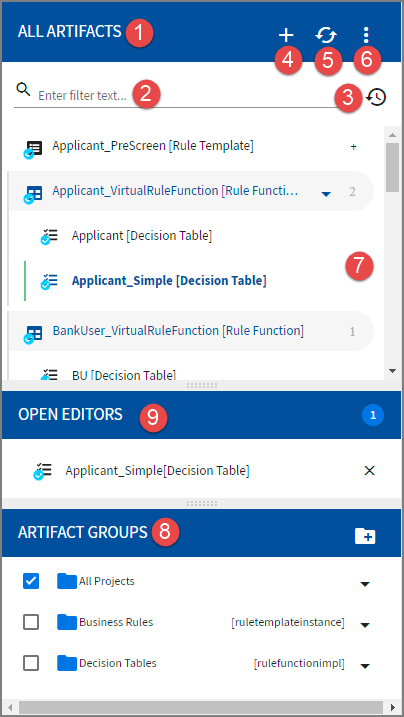
| Element No. | Element Name | Description |
|---|---|---|
| 1 | Project Explorer Head | Displays the type of artifacts that are displayed on the Project Explorer. In case of the Show Breadcrumbs navigation style, this displays the breadcrumbs for the artifacts. |
| 2 | Filter | Enter the filter text to filter the artifacts in the project explorer. |
| 3 | Recently Opened Artifacts | You can view the list of recently opened artifacts by clicking the down arrow icon. |
| 4 | Checkout Artifacts/ Import Project | Click the Plus icon to import a project or check out artifacts of a project. |
| 5 | Refresh All Projects | Refresh the artifacts |
| 6 | Navigation Style | Click the
Menu icon to select the navigation style for the project explorer. The following navigation styles are available:
|
| 7 | Project Explorer | Displays list of artifacts of the checked out project. You can use the filter, navigation style, and artifact groups to filter the artifacts list on the project explorer. Click the managed artifacts (business rule and decision table) to open them in their respective editor.
Select the managed artifact and click the down arrow ( Delete
Deletes the artifact. Click
Confirm on the confirmation screen to delete the artifact. After deletion commit the changes to the project using the tree view.
You can also delete a project from the workspace using the tree view. Commit
Commits the changes to the artifact for approval. In the Commit Changes window, enter a comment for the changes in
Message text box. Click the artifact name to review the changes for commit. Click
Confirm to commit the changes to RMS repository.
Synchronize
Synchronizes the update from the server to your local copy of the artifact. For more details about the fields present on the Synchronize Artifact window, see
Synchronize Artifact Details Window Reference.
Revert
Reverts the update (if not committed) done to an artifact. In the Revert window, click the artifact name to review the changes to revert. Click
Confirm to revert the changes.
Lock
Locks the artifact for the user and other user cannot commit any changes to the table until it is unlocked. This option works only if the
ws.scs.locking.enable property is set to true in
RMS.cdd.
Rename
Provide a new name to the artifact. After changing the file name, commit the changes so the artifact is treated as a new artifact.
History
View list of the revisions of the artifact that were committed. For each revision, you can click
View Content to view the revision that was committed or you can click
View Commit to view the revision details.
Audit Trail
Displays the list of actions performed on the artifact by users. You can refine the results using the filters available in the
Audit Trail window. For more information on the fields, see
Viewing Audit Trail of an Artifact or Project.
Export
Exports the artifact to your local computer. Decision table is exported as an Microsoft Excel file ( .xls or .xlsx) while business rule is exported as a
.ruletemplateinstance file. For details, see Exporting Artifacts from TIBCO BusinessEvents WebStudio.
Projects You can select this option for an artifact to perform actions on the project that it belongs to. Groups You can select this option for an artifact to edit the artifact group that the it belongs to. (Project only) Sync to Repository
Synchronize the (non-managed) project artifacts changes, that you have made externally after performing check out in WebStudio, into RMS. Select the option to open Sync To Repository screen, which displays the list of artifacts that are synced to the repository. Click
Confirm to sync artifacts to RMS.
(Project only) Validate
Validates decision tables and business rules of the project, for any access control violations or syntax errors. EAR file for the project must be present in the deploy location; otherwise, the validate command fails.
All the errors are displayed on the Problems tab at the bottom of the editor. New errors in syntax are added to these existing errors. Double-click errors to see the problematic view. (Project only) Generate Deployable
Generates deployable files (EAR and class files) using the TIBCO BusinessEvents Studio project files, located in the RMS project folder. The deployables are generated in the location configured in the
RMS.cdd file by the property
ws.artifact.deploy.location, see Generated Files Location.
Select this option to display the Generate Deployable screen. In the Generate Deployable screen enter the value of the following fields and click
Confirm to generate deployables:
|
| 8 | Artifact Groups | Select the artifact group to display the respective artifact type in the project explorer. The values are:
You can also create a custom group where you can add artifacts that you want. Click on the Create a new artifact group icon, enter the new group name and click OK. You can add artifacts to group using either of the following options:
|
| 9 | Open Editors | Displays all the open artifact editors in the workspace |