Migrating Projects Using TIBCO Business Studio™ for BusinessWorks™

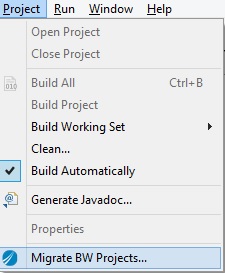
TIBCO BusinessWorks™ Container Edition provides an easy way to migrate TIBCO ActiveMatrix BusinessWorks™ 5.x projects by using the Migrate BW Projects menu option in TIBCO Business Studio for BusinessWorks.

Prerequisites

  • Perform validation and ensure that TIBCO ActiveMatrix BusinessWorks™ 5.x project does not have errors.
  • Optionally, schemas without namespaces should be refactored before migration.
  • Remove spaces in the namespace.
  • Remove or update any retrieve WSDL processes.
  • It is recommended to add missing namespaces for the schemas.
  • Ensure that there are no spaces or special characters in the folder names.
  • Global variables with integer values but datatype as String must be updated to data type as Integer. Examples include timeouts, message size, and so on.
  • Ensure that no two resources like schemas, WSDLs, DTDs, and so on, have the same name when they have a common hierarchical structure or layout.

Procedure

  1. In TIBCO Business Studio for BusinessWorks, choose Project > Migrate BW Projects.

  2. In the Project Migration Wizard, click Migrate Single BusinessWorks 5x Project to migrate a single TIBCO ActiveMatrix BusinessWorks™ 5.x project, or click Migrate Multiple BusinessWorks 5.x Projects to migrate multiple TIBCO ActiveMatrix BusinessWorks™ 5.x projects.
    When migrating single TIBCO ActiveMatrix BusinessWorks™ 5.x projects, you can also migrate selective processes or subprocesses. Select the Select Processes for Migration check box, and provide the required information as explained in Step 6, below. After the required information is provided, the Select Processes button is displayed.
    Note: The Select Processes for Migration check box is disabled when you select the Migrate Multiple BusinessWorks 5.x Projects option. This check box can be used only to migrate single projects.
    The list of processes in the selected TIBCO ActiveMatrix BusinessWorks™ 5.x project are displayed in the Project Migration Wizard. The processes can be viewed in the Flat Hierarchy or the Tree Hierarchy structures.
  3. Click Select Linked Processes to select all the subprocesses under the main process. clear the check box for the process you do not want to migrate.
    To view the processes that are selected for migration, click Show Linked Process Hierarchy. The static and dynamic processes to be migrated are displayed.
  4. While migrating selective processes, to select or clear the already migrated existing processes, select the Re-Select Process check box provided on the Select Processes page of the Migration Wizard.
    Note: During the re-migration process, the module properties are not changed.
  5. Click Migrate Project.
  6. Specify the relevant information in the following fields.
    1. Click Browse in the Select Project(s) to be migrated field and provide the location of the TIBCO ActiveMatrix BusinessWorks™ 5.x project that you want to migrate. Note: History of the last five migrated project paths can be retrieved by selecting CTRL+ Spacebar.
    2. The Select Migrated Project Location field displays the location of the current open workspace where the project will be migrated. Click Browse if you want to provide a different workspace.
    3. Click the Select Third Party JAR's folder field to browse for third party jars required for your project.
    4. The Single XPath Function Group Project check box is selected by default, to create all custom XPaths as a single plugin project and under a single custom XPath. After migration, the custom XPath function group plugin project is included in the application project. The classes folder can now be found in the customXPathFunction.jar file, and is no longer available in the plugin project. This jar file is also added to the project class path.
    5. In the Select ProjectLibs (DTLs) used by Project field, click Browse to select the project libraries to be used for the project.
    6. In the Select Java Libraries used by Project field, click Browse and provide the location of the JAR files on disk if the TIBCO ActiveMatrix BusinessWorks™ 5.x project is using external JAR files in context with Java activities.
      It is recommended you place the external JAR files in a single location. These JAR files can then be in-lined in the migrated TIBCO BusinessWorks Container Edition project.
  7. Click Migrate Project.
    Note:
    • The process count displayed on the Migrate page of the Project Migration Wizard is inclusive of migration service agents.
    • The tooltip available for the Migration progress bar displays the general information about migration process.
    • The Project Migration Wizard displays the migration status in blue and green colors, where blue and green colors indicate the starting and completion of the migration process respectively.
    • You can cancel the migration process anytime by clicking the Cancel button available in the Project Migration Wizard.
  8. Click Finish after the migration is complete.

Project with Subprocess after Migration

Subprocesses in TIBCO BusinessWorks Container Edition use a standardized concept of receiving and replying messages through a service.

Before Migration

After Migration

The Call Process is migrated as a Direct Call Process.