Sharing SmartMapper Recommendation through External Database
With TIBCO BusinessWorks Container Edition
-
PostgreSQL
-
Microsoft SQL Server
-
Oracle Database
When you map the target data elements to the source data elements (expressions) for the first time, two tables are created in the database. One of these two tables contains the mapping and the other one contains the version of the mapping done.
To enable the smart mapper feature:
- Procedure
-
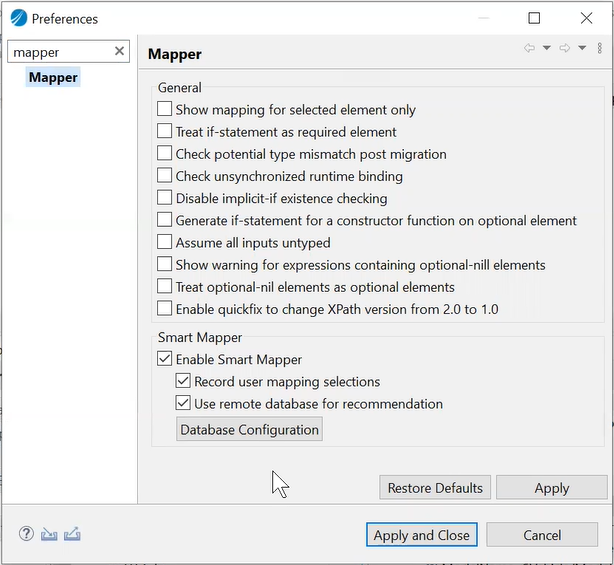
Navigate to Window > Preferences > Mapper. The mapper options are displayed.

-
Select the Enable Smart Mapper check box available under the Smart Mapper section.
-
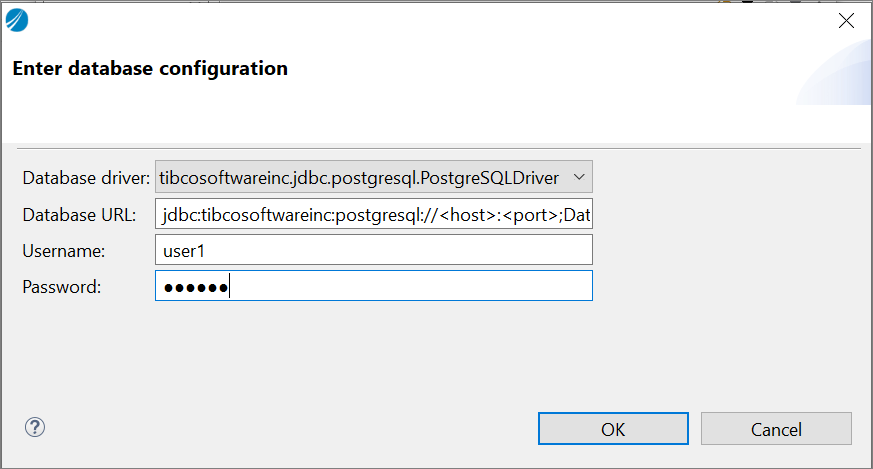
Click Database Configuration. The Enter database configuration window is displayed.

-
Select a database driver from the list of available drivers. When you select the database driver, the database URL is automatically generated.
-
Enter the host, port, and dbname or serviceName values in the database URL.
-
Enter the Username and Password in the respective fields for the selected driver.
-
Click OK, Apply, and then Apply and Close.
To create a mapping between the data elements and expressions:
- Procedure
-
Open the required process in your application.
-
Select the activity in which you want to map the elements.
-
Select the Input tab under Properties tab of the selected activity.
-
Drag an element from the Data Source tab and drop it on the required expression available in the right side pane. The Drop wizard is displayed.
Note: The first time you map the elements, drag the complex element and drop it on the required expression and select the SmartMap option, and click Next, and then Finish. The two tables, with mapping and version details, are created and then proceed with mapping the individual elements. -
Select the SmartMap option, click Next, and then Finish.
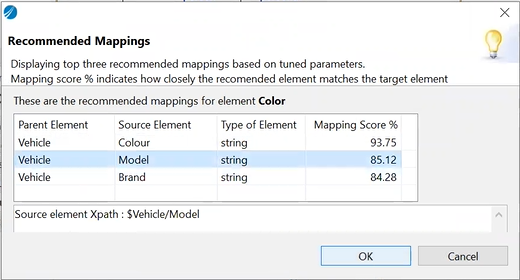
- You can check the recommended mappings by right-clicking the data element and selecting the Recommended Mappings option.

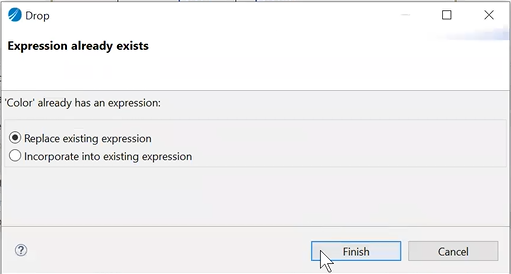
- If you are mapping a data element to an already mapped expression, the application displays a message that the expression already exists and whether you want to replace existing expression or incorporate into existing expression. By default, the Replace existing expression option is selected.
- To remove the mapping of an individual data element, right-click the data element and select the Remove Mapping option. The mapping done for the data element is deleted from the process as well as database.
- To remove all the data element mappings at once, right-click the complex data element, and select the Reset to Default Recommended Mappings option. All the mapped elements are deleted from the process as well as database. If you remove the mapping of a complex data element by right-clicking the complex data element and selecting the Remove Mapping option, the mapping is removed from the process only, but not the database.
- To see the mappings done by another user, you must click anywhere outside the process editor pane and then click the activity for which the mapping was done by another user. Clicking anywhere outside the process editor refreshes the properties tab to display the updated mappings.