Creating a DataGrid Connection
In the Getting Started tutorial, the second task you must do using the plug-in is to create a DataGrid connection.
In the plug-in, a DataGrid shared resource represents a distributed database. The DataGrid shared resource is available at the Resources level. To use ActiveSpaces DataGrid activities, you must create a DataGrid connection and then add a table to the DataGrid.
Before you begin
You must create a project as described in Creating a Project .
- Procedure
- In the Project Explorer view, expand the created project.
- Right-click the Resources folder and click to open the ActiveSpaces window.
- The Resource Folder, Package, and Resource Name of the DataGrid resource are provided by default. If you do not want to use the default configurations, browse and change them accordingly.
- Click
Finish.
The DataGrid Editor opens. See DataGrid Connection Parameters.
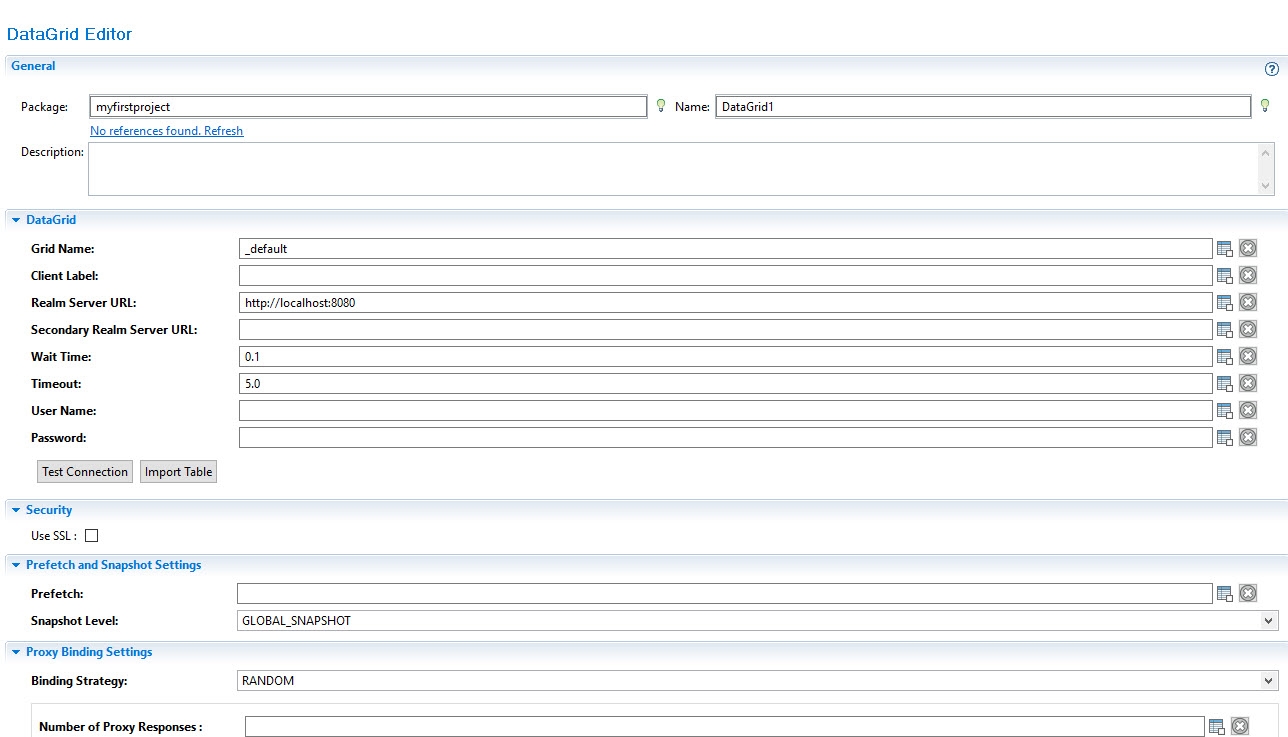
- In the
General panel, provide the following details where required.
- The details that you provided in step 3 are seen in Package and Name.
- Optional: Enter details in Description for the DataGrid.
- In the
DataGrid panel, provide the following details where required.
- Optional: Enter the Grid Name.
- Optional: Enter the Client Label.
- Enter the RealmServer URL. The default provided is: http://localhost:8080.
- Optional: Enter details of a backup server in Secondary Realm Server URL.
- Enter Wait Time. The default value is 0.1 second.
- Enter Timeout. The default value is 5.0 seconds.
- Enter the authenticated User Name for the server.
- Enter the authenticated Password for the server.
- In the
Security panel, provide the following details as required.
- Optional: Select the SSL check box.
- If you have selected the SSL check box, enter the path for the SSL certificate in Trust File.
- In the
Prefetch and Snapshot Settings panel, provide the following details where required.
- Enter prefetch details.
- Select the snapshot level.
- In the
Proxy Binding Settings panel, provide the following details as required.
- Select the Binding Strategy. The default value is random strategy.
- If the binding strategy is random, enter the Number of Proxy Responses. Or, if the binding strategy is named, enter Pipe(|) Separated Proxy Names.
- Save the details. Restart TIBCO Business Studio.
Important: If you are creating a new project in TIBCO Business Studio, you must restart before the next step.Note: If you want to reconnect automatically to the ActiveSpaces datagrid when it is restarted after it is shut down due to failure or maintenance, you must set the property,
-Dbw.asplugin.isFailFastMechanismForConnectionDisabled=truein the VM arguments in TIBCO Business Studio during design time and then include the property in the config.ini file of the plug-in during runtime. - Click Test Connection to validate the connection.

What to do next
After you have created a DataGrid, the next task is to add a table. See the Getting Started tutorial.