Using the Wizard to Create a OData Service

A OData service provider exposes the resources in a process definition that can be invoked by clients using one of the operations as QUERY, READ, CREATE, UPDATE, and DELETE.

Prerequisites

If a schema definition does not exist, create (or import) a schema definition in the process to which you want to add the OData service. To import an existing XSD file, drag and drop the .xsd file from the File Explorer to the Schemas folder of your project.
To create a new schema file in TIBCO Business Studio™, do the following:
  1. In Project Explorer, right-click the Schemas folder.
  2. Select New > XML Schema File.
  3. In the Schema Editor, right-click in the respective box to add a directive, element, type, attribute, or group.
Note: When you create a OData service, make sure to edit the Default Host field in the HTTP Connection Resource to reflect the actual host name. By default, the Default Host field is set to localhost.

Procedure

  1. In the Project Explorer, select the process to which you want to add the OData service. There are multiple ways to invoke the wizard to create a OData service.
    • From the main menu, select File > New > BusinessWorks Resources > BusinessWorks OData Resource.
    • Right-click the menu, select New > BusinessWorks OData Resource.
    • Click on Create OData Service in the process editor area. (Note that OData services can only be created in stateless ActiveMatrix BusinessWorks™ processes.)
  2. In the 
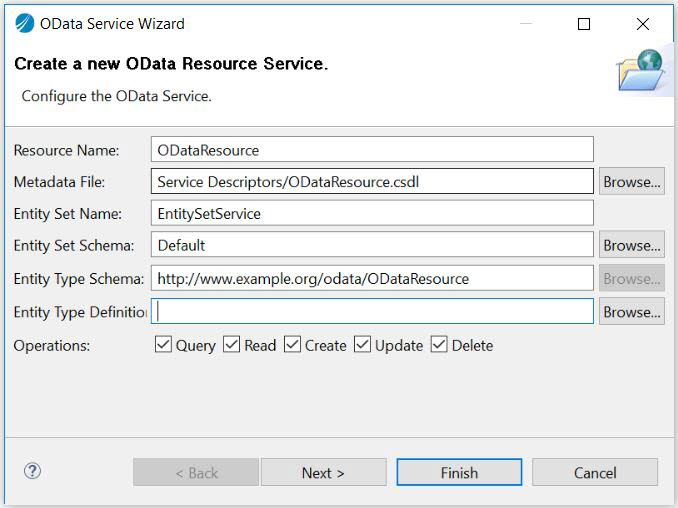
OData Service Wizard window, configure the OData service implementation by specifying the values for Entity Set Name, Entity Type Definition, and Operations.
    • Resource Name: Name for the new OData service
    • MetaData File: Name of the generated CSDL file.
    • Entity Set Name: Name of the entity set.
    • Entity Set Schema: Specifies the value for the schema name, where the entity set is created.
    • Entity Type Schema: Specifies the value of the schema name, where the entity type is created in the CSDL file.
    • Entity Type Definition: Select the resource schema for the OData service, if needed.
    • Operations: By default, all the operations are selected. Select or deselect the operations as needed.
  3. Click Next to configure the entity type properties. At least one property must be set as Key. You can add or remove property if needed. The following are the supported data types for keys:
    • Edm.Boolean
    • Edm.Byte
    • Edm.Date
    • Edm.DateTimeOffset
    • Edm.Decimal
    • Edm.Duration
    • Edm.Guid
    • Edm.Int16
    • Edm.Int32
    • Edm.Int64
    • Edm.SByte
    • Edm.String
    • Edm.TimeOfDay
  4. Click Finish.
    The wizard adds the OData service and the selected operations and also creates a process definition with the multiple operations. It generates a .csdl file in the Service Descriptors folder of your project when it creates the service. The OData service always implements the constructor operator.
    Note: For a property of Decimal data type, we must add precision and scale to the property in the generated CSDL file.
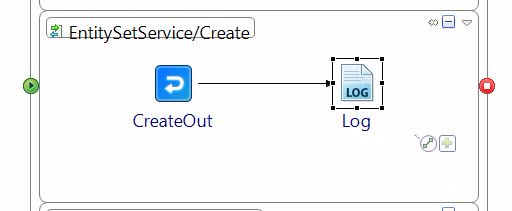
  5. Add activities to the process and configure them appropriately. For example, update the CREATE process to add a Log activity to log the requests and connect the CreateOut activity to Log activity.
  6. Configure the input and output properties for the activities. For example, select a CreateOut activity and select Properties > Input. Expand the data tree in the Data Source tab and map the create element from the left to the create Response element on the right to echo the element. Similarly, for Log activity, map the create element on the left to the ActivityInput message element on the right.
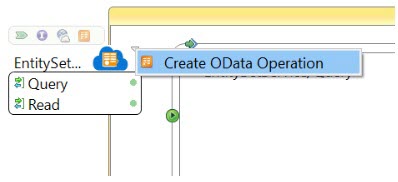
  7. You can optionally add an operation to the service using the Create OData Operation wizard. To open this wizard, click on the down arrow and click Create OData Operation to open the wizard.

  8. Save your changes.

Result

The OData service is built and can be tested using the Postman Client or OData palette activities.