|
| Copyright © Cloud Software Group, Inc. All Rights Reserved |
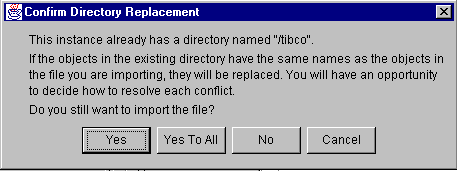
During the import process, you have some control over rejecting or accepting import of duplicate repository directories or duplicate repository objects. You cannot control, however, whether a directory or object is imported that does not exist in the current repository instance. The RepoExport and RepoImport command line tools, available in TIBCO_HOME/tra/<version>/bin allow for more fine grained operations.
You can use the RepoImport and RepoExport command line tools instead of TIBCO Designer. These tools allow you to use schema validation as part of your export process if desired.
2. From the right-button menu, choose Export Repository Instance.
1.
2. Right-click the repository and choose Import Repository Instance.
3. Select an XML file that had previously been exported from a repository, either using TIBCO Designer or using the RepoExport command-line utility.Figure 118 Confirm Directory Replacement Dialog Box
4. Click Yes to replace the contents. In that case, TIBCO Designer first completely empties the existing repository instance and then imports all information from the file.
5. Click No if you want to partially replace the existing repository. In that case, TIBCO Designer prompts you whether duplicates should be replaced:
6.
The Advanced tab specifies information for both local and remote repositories.
2. With the Repository Finder selected, click the Advanced tab in the configuration panel.Figure 119 Advanced Tab in Configuration Panel
Table 94 Advanced Tab
3. Click the Advanced tab in the configuration panel.Figure 120 Advanced TabTIBCO Designer displays the object and its attributes. Attributes usually have names, attribute types, and other properties. The value of each attribute is either a string or a global name. In the example above, the attribute with the name statusMsg has an attributeType that is a global name.
• The name:value pairs inside the association lists are called properties of the attribute. For example, name, attributeType, and isKey are properties of the attribute. Custom properties are also allowed.
3.
5. To change the value of a property inside an attribute, triple-click the property to select it, then type the new value into the edit field that opens. In the screen shot below, the defaultStartup property of the startup attribute is being edited.Figure 121 Change Value of a Property
6. Figure 122
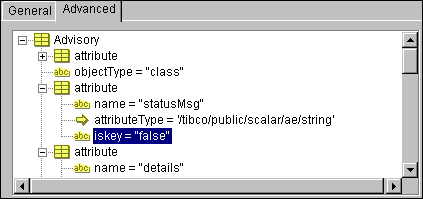
Icons in Exteneded Prperties Editor
Table 95 Icons in Extended Properties Editor Add a reference to another object inside the repository. You can use this, for example, to point to a session you created in the public area of the project. The patch always starts with /tibco, for example, /tibco/public/session/.../mySession.
You can click Rollback to undo changes since the last commit.
|
| Copyright © Cloud Software Group, Inc. All Rights Reserved |