Copyright © Cloud Software Group, Inc. All Rights Reserved


Chapter 1 Getting Started With TIBCO Designer : TIBCO Designer Interface Overview

TIBCO Designer Interface Overview
The TIBCO Designer interface allows you to perform various functions. This section describes the TIBCO Designer main window and explains what you see in each of its panels.
Main Window
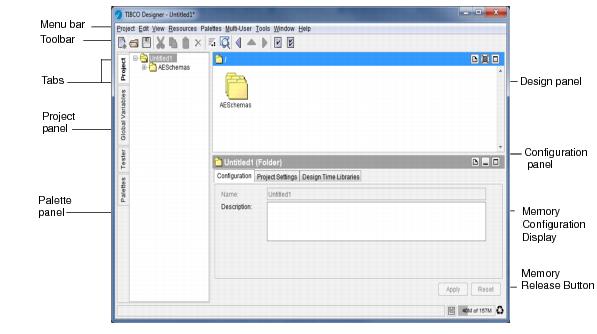
Figure 3 illustrates the TIBCO Designer window.
Figure 3 The TIBCO Designer Window
The TIBCO Designer window has these components:
The following sections explain the contents of each panel.
Project Panel
A project contains resources that implement the enterprise integration. This includes services (producers and consumers of information), any business logic that may be applied to that information, and deployment information.
By default, the project panel allows you to view the Project Display or Global Variables Display. When used in conjunction with other projects, the panel can be used for other purposes, for example, in conjunction with the TIBCO ActiveMatrix BusinessWorks tester.
Project Display
With the Project tab selected, the project panel displays the project tree. This includes the top-level (root) folder and the hierarchy of resources. The hierarchy of folders and resources corresponds to the hierarchy of folders and files in the project folder.
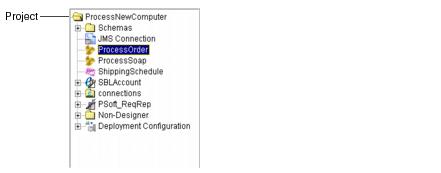
Figure 4 illustrates an example project, ProcessNewComputer, in the project panel. Multiple TIBCO products were used to create the integration project: it contains two TIBCO ActiveMatrix BusinessWorks process definitions (ProcessOrder and ProcessSoap) and a Siebel adapter (SBLAccount).
Figure 4 Project Tree in Project Panel
Global Variables Display
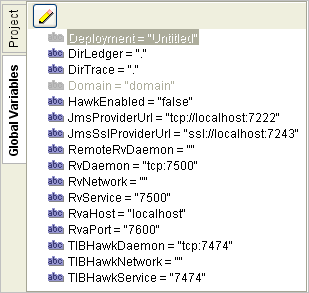
Global variables are associated with each project. To display them, click the Global Variables tab of the project panel. Clicking the pencil icon displays the global variable editor. See Working With Global Variables for more information.
Figure 5 Global Variables in Project Panel
 
Resources
Resources are the components of a project. A simple TIBCO Designer resource corresponds to an object in a TIBCO application, such as an adapter configuration, an adapter service, a process definition, or an FTP activity.
Resources can be complex and contain other resources, much like a folder can contain other folders on your computer's file system. For example, an adapter configuration may contain multiple folders with multiple publisher or subscriber service resources.
Each top-level resource (for example, each adapter configuration) corresponds to a file in the project’s hierarchy of files in the project directory. This design allows developers to use a source control system and to check out only the top-level resources they are working with from a source control system, thus sharing their work.
Most resources have context-sensitive help available for the configuration of that resource. Right-click on the resource and choose What Is This? from the popup menu for more information on configuring the resource.
Palette Panel
Palettes organize resources and allow you to add them to your project. You select resources in the palette panel and drag and drop them into the design panel to add them to your project.
See Working With Palettes for more information.
Design Panel
The design panel displays the current resource selected in the project panel. For resources that contain other resources, the contents of the selected resource are shown in the design panel. For example, if you select a folder, its contents is displayed.
Configuration Panel
The configuration panel allows you to specify various configuration options for each resource. The type and the purpose of the selected resource determine the contents of the configuration panel. Usually there are one or more tabs in the configuration panel that allow you to access the various configuration options. The tabs organize the configuration options for the resource.
Click the help icon in the top right corner of the configuration panel for online help on the current selection.
After you have added the configuration information, you must click the Apply button for each tab. If you decide you do not want to add the configuration information, click Reset before you apply any changes to return to the previous values for each field in the tab.

Copyright © Cloud Software Group, Inc. All Rights Reserved