Appendix
- Excel Essbase format and use
- EPMA ADS format and use
- Samples
- Administrative data
- Data mapping logging
- Import and export report
- Migration & Back-up procedures
- Changes management
- Adding custom dimension
- Extension
- Integration with TIBCO EBX® Match and Cleanse Add-on
- Integration with TIBCO EBX® Rules Portfolio Add-on
- Known limitations
Excel Essbase format and use
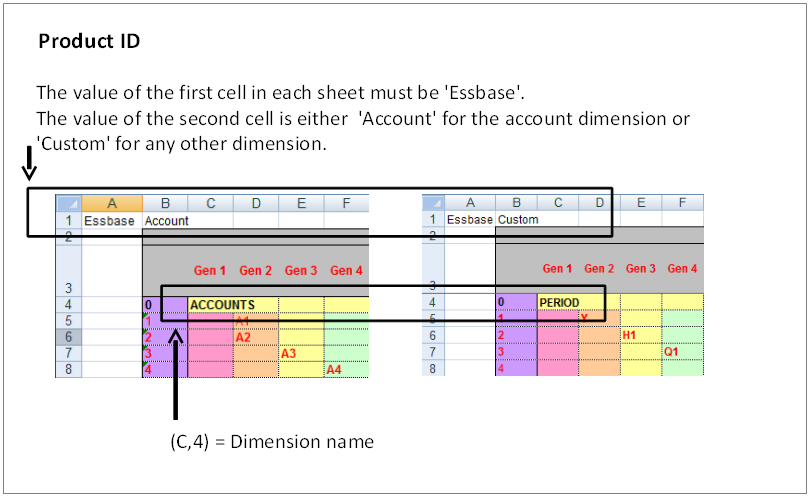
Identification of Essbase application
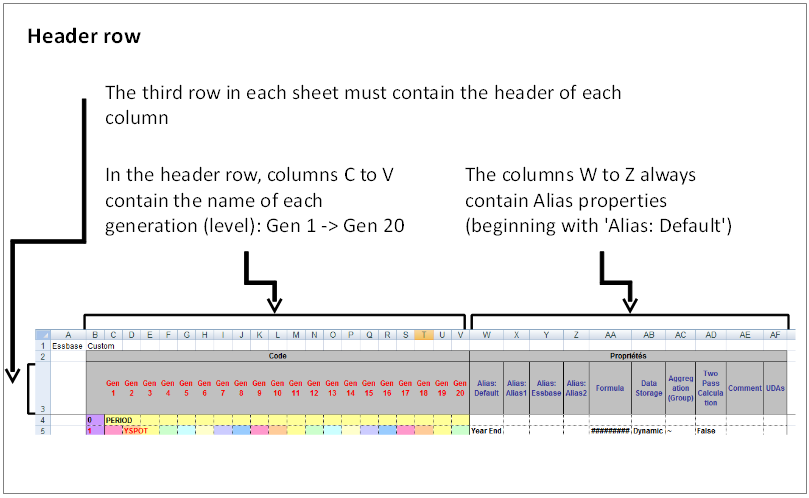
Header structure
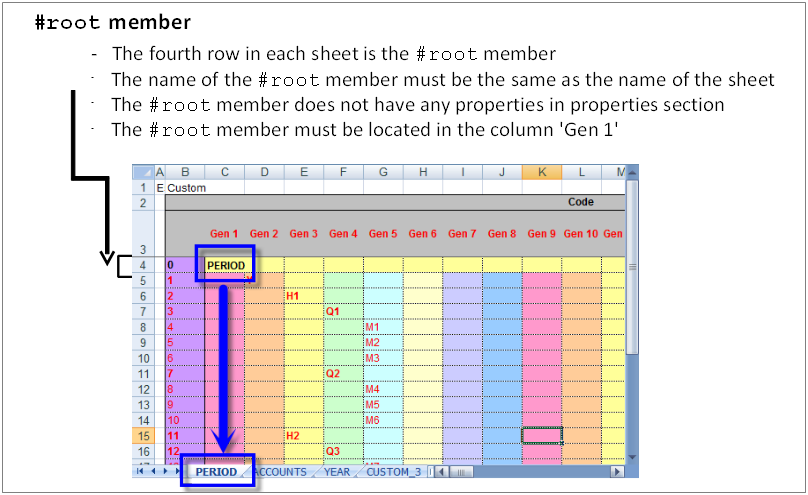
Root member structure
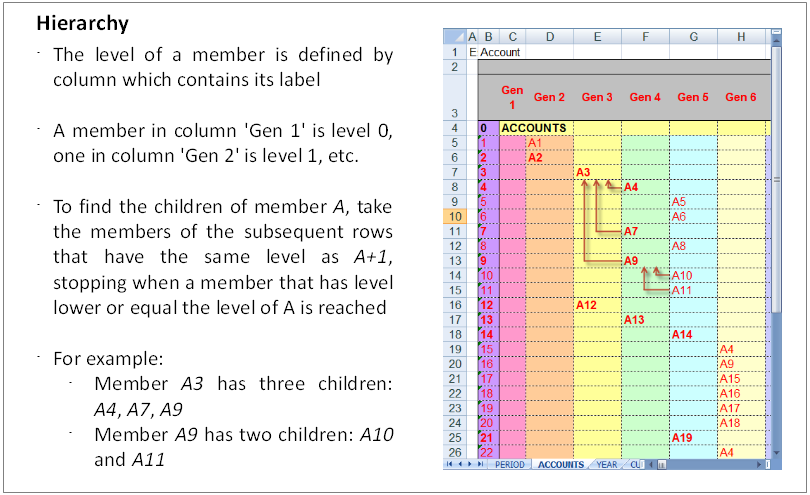
Hierarchy structure
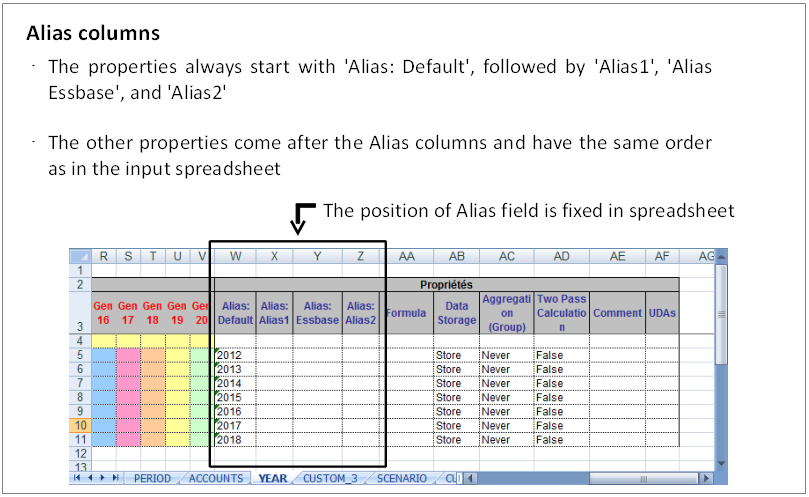
Alias columns
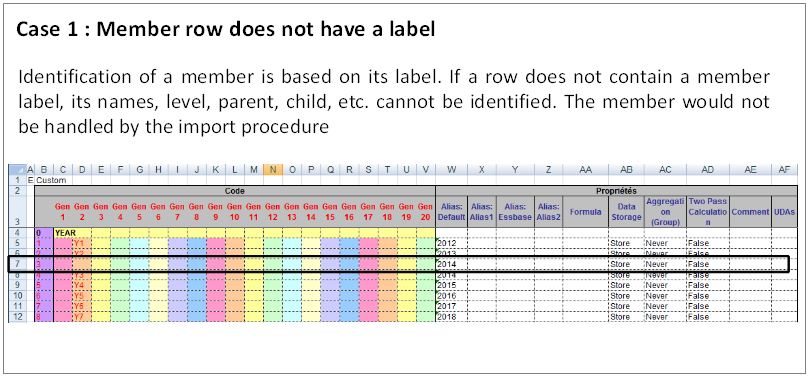
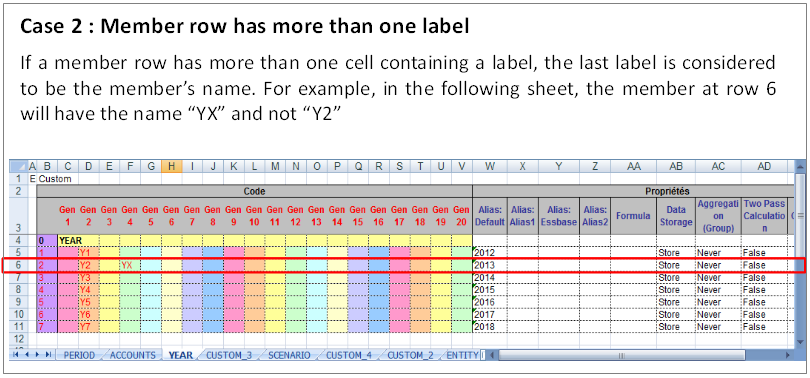
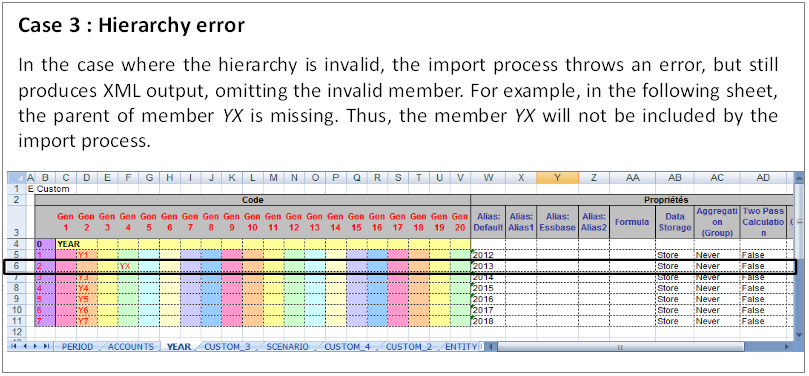
Examples of invalid spreadsheet format
Translation into Excel and XML format
Based on the input Essbase spreadsheet file, the Essbase import procedure generates an XML file with the same format used by HFM application, with following adjustments:
PRODUCT_ID is set to ESSBASE.
XML contains only Dimension. It doesn't contain any of the following tags: CURRENCIES, MISC, LANGUAGES, SCHEMA_VERSION, REPORT.
When using the Essbase export procedure in EBX®, an XML file is first generated based on HFM format. This XML file can contain the above tags, but the process to convert to an Essbase spreadsheet does not take this information into account. Then, the Essbase spreadsheet is generated automatically from this XML file.
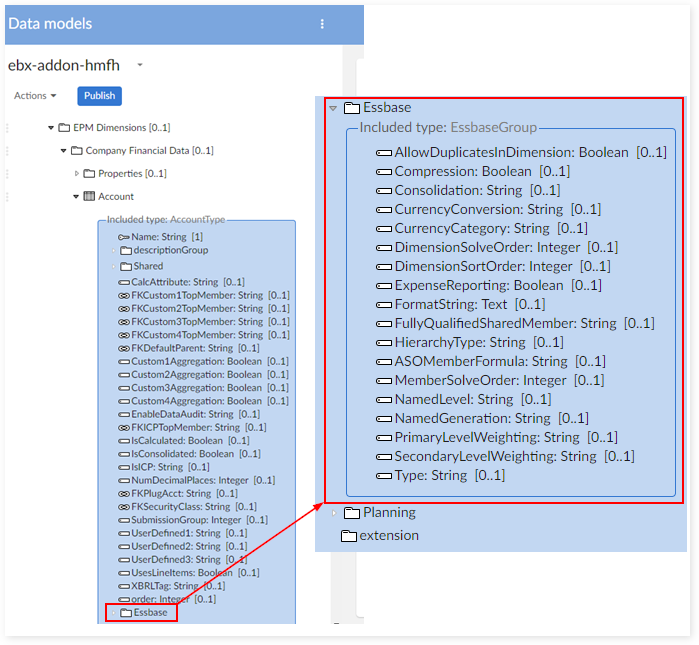
EBX® data structure for Essbase
Essbase group of fields in each dimension
For each dimension table, a group of fields is included at the end of the data structure. It contains all the Essbase fields. See the example above.
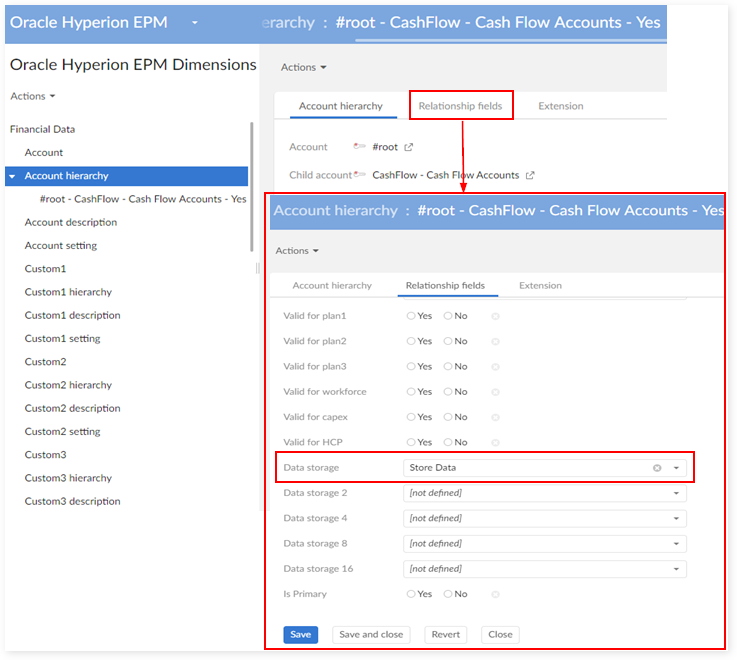
Relationship field
The field 'Data Storage' is added to each hierarchy table. Its value depends on the relation between two members. See the example above for the 'Account data' hierarchy.
Data mapping configuration for Essbase
Essbase and HFM does not share the same data mapping configuration.
In order to import data from an Essbase XML file into EBX®, a specific data mapping configuration must be enforced:
Add a new application named "ESSBASE" in 'Application'.
Add a sheet name corresponding to each dimension in the table 'Dimension'.
Add a mapping in Application > Dimension to map the dimension with the Essbase application.
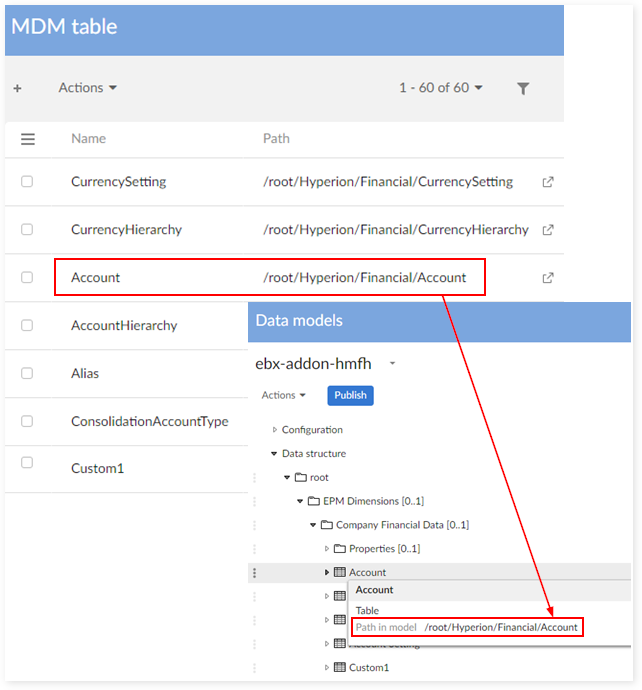
Add a data mapping to the table 'MDM table' to map the table with a path.
Add a data mapping to the table 'MDM field' to map the Essbase field with a path.
Add a data mapping to the table 'Mapping table' to map the Essbase application with the dimension table.
Add a data mapping to the table 'Mapping field' to map the Essbase application to the dimension table and the Essbase field. In this table, enter the header of each property column in the spreadsheet.
There are some fields in the add-on that must be completed:
The field 'Name' in tables 'Account', 'Custom1', 'Custom2',…
The child field in the hierarchy table of 'Account', 'Custom1', 'Custom2',…
EPMA ADS format and use
Identification of EPMA application
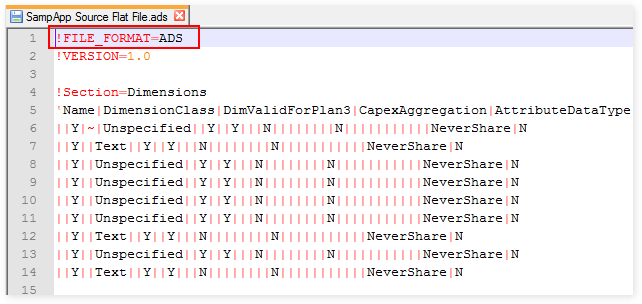
ADS structure
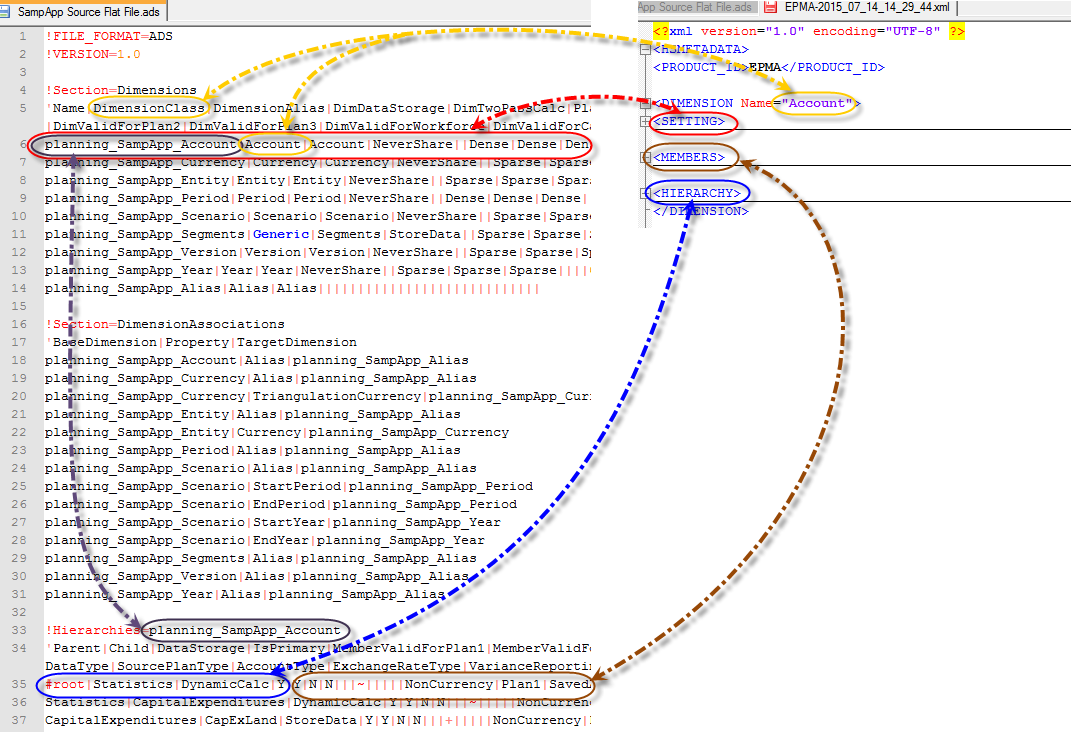
Mapping for ADS name
Dimension mapping: Depending on the DimensionClass, you can get the ADS name of the dimension in the ADS file.
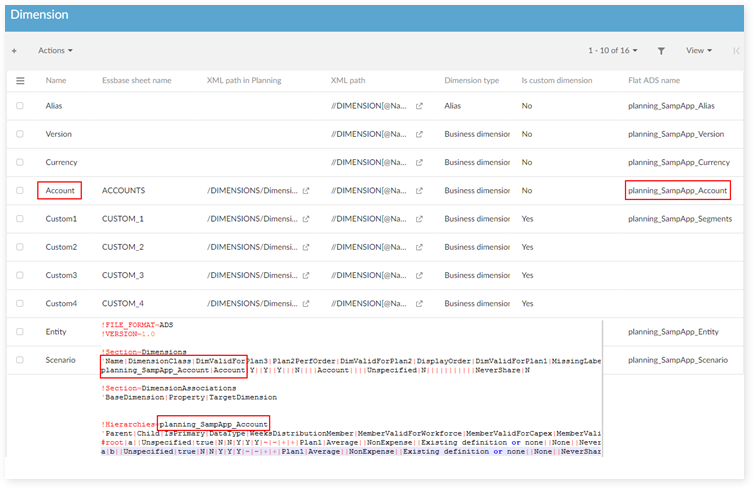
Table mapping and Field mapping: This is the same as other applications. You need to declare the ADS name for field mapping when defining the mapping field.
Mapping table: define mapping for all tables of each dimension.

Mapping field: define ADS name for all fields to import/export.

Dimension association: In version 1.6.0 of the add-on, the dimension association is imported into the 'TIBCO EBX® Add-on for Oracle Hyperion EPM' data space when importing. On export, the system automatically gets that dimension association to include in the exported ADS file.
Mapping for sections on 'Export - Preference' screen
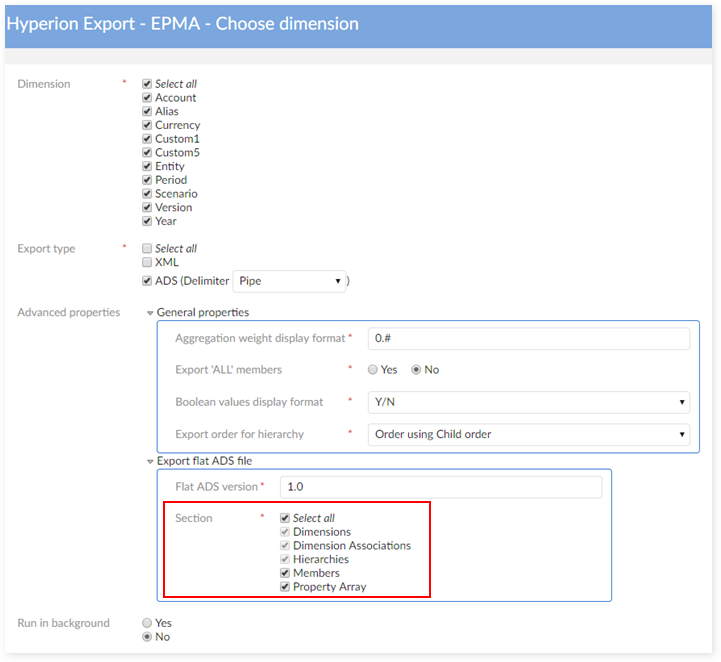
When you select more than just the default sections to export, you are automatically taken to the 'Export - Preference' screen. The following image shows selection of additional sections:
The 'Export - Preference' screen is shown below:
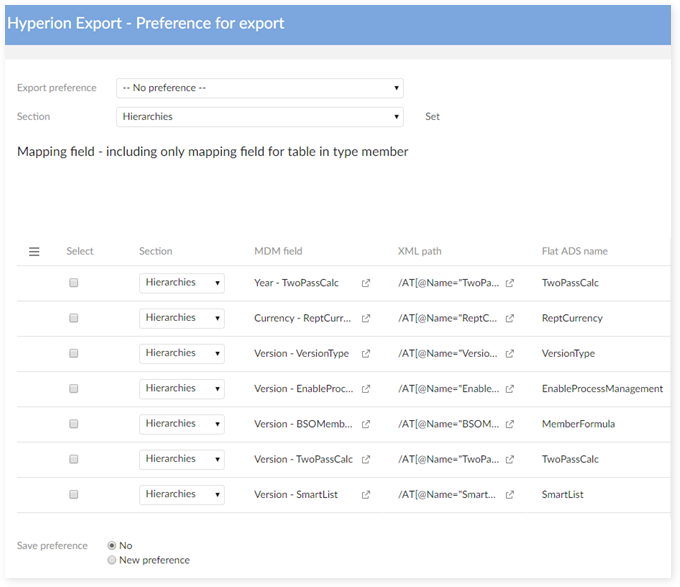
Export preference: select the preference to export. This field displays 'No preference' if this is the first export.
Section: select the section to set to the selection fields in the 'Mapping field' table. Click the 'Set' button to set the selected section for the checked fields in the 'Mapping field' table.
Mapping field: display the table of 'Mapping fields' for ADS export. This table contains only fields that are mapped for 'Mapping table' in the 'Member' type or 'Description'. The fields in types 'Name' and 'Description - Language' are also hidden in this table.
Save preference:
No: do not save the preference.
Update current preference:
Displays only when the 'Export preference' is not set to 'No preference'.
Updates the content of the currently selected preference in the TIBCO EBX® Add-on for Oracle Hyperion EPM > Preference table.
New preference:
Creates a record to store the 'Mapping field' table configuration in the 'Export - Preference' screen in the TIBCO EBX® Add-on for Oracle Hyperion EPM Preference table.
Samples
The following samples are provided with the add-on.
File | Description |
|---|---|
template-Essbase.xlsx template-Essbase.xls | Templates used when managing import and export procedures for Essbase |
hfm-example.xml | Sample of data values for HFM in XML format |
Planning-Entity-example.xlm | Sample of data values for Planning in XML format |
Administrative data
Logical data model
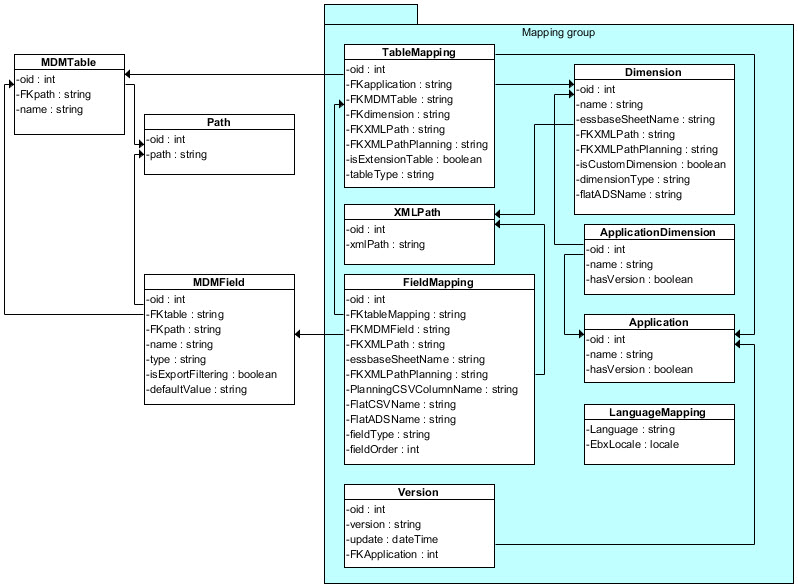
The data mapping configuration is used during the import and export procedures to drive the transformation from the source data format into target data format. The add-on uses an XLM pivot format based on the grammar of HFM XML (XML pivot).
Declaration of the MDM data structure
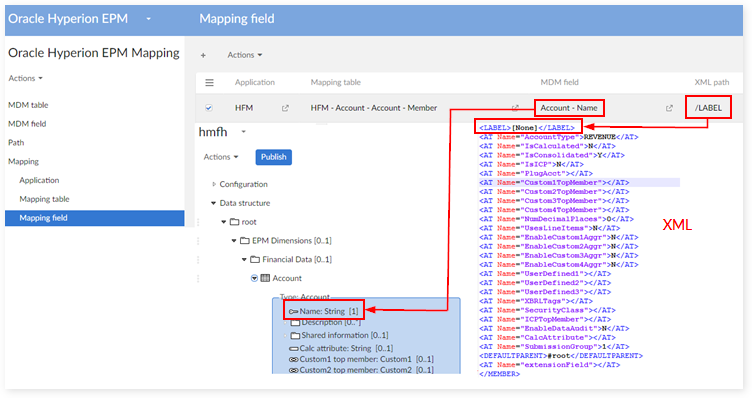
MDM table
MDM field
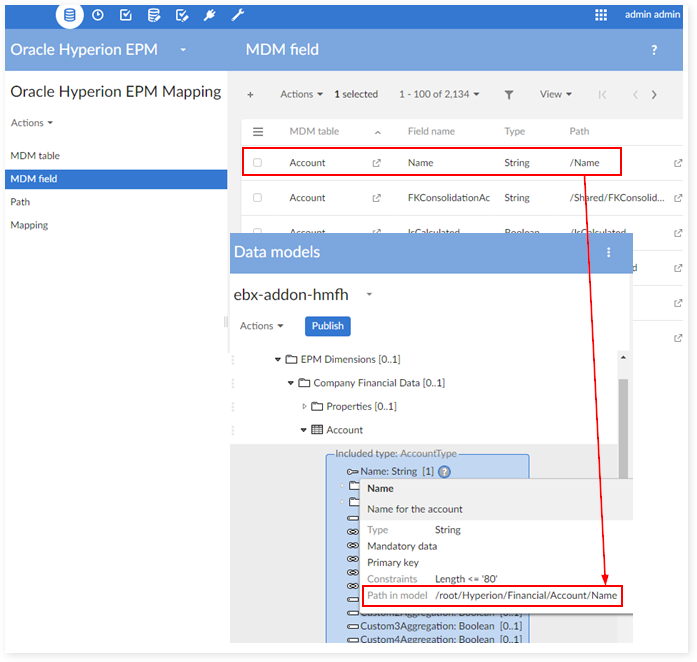
Table mapping
Applied to HFM and Essbase
A. Dimension, Table type = member
B. Hierarchy, Table type = node
Applied to Planning
A. Table type = member & node
B. Table type = DimensionSetting
Description
Table type = Description

Mapping extension
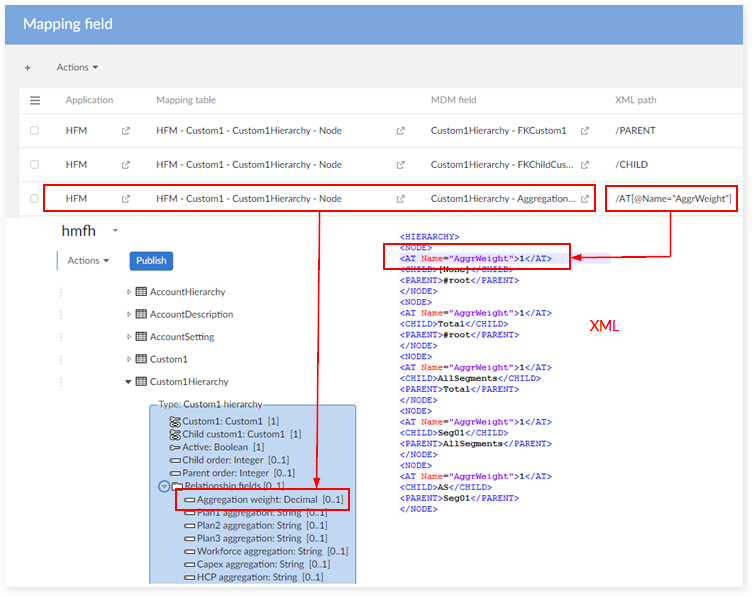
Field mapping
Regular field
Field in a hierarchy
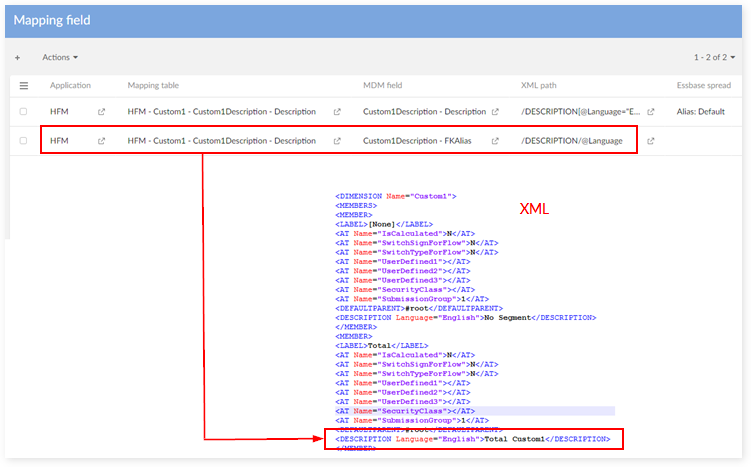
Field description
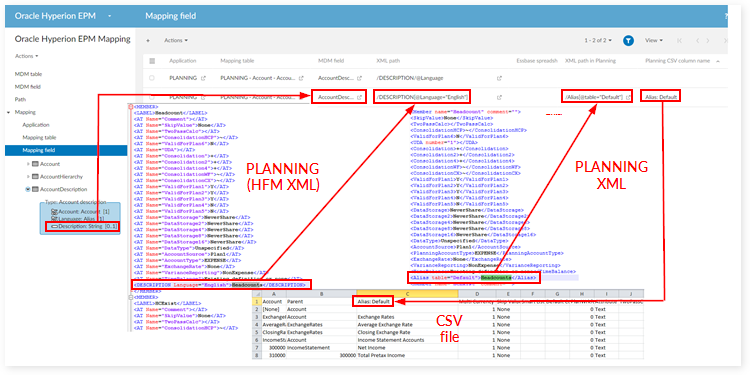
Field mapping for Planning
Dimension mapping
Language mapping
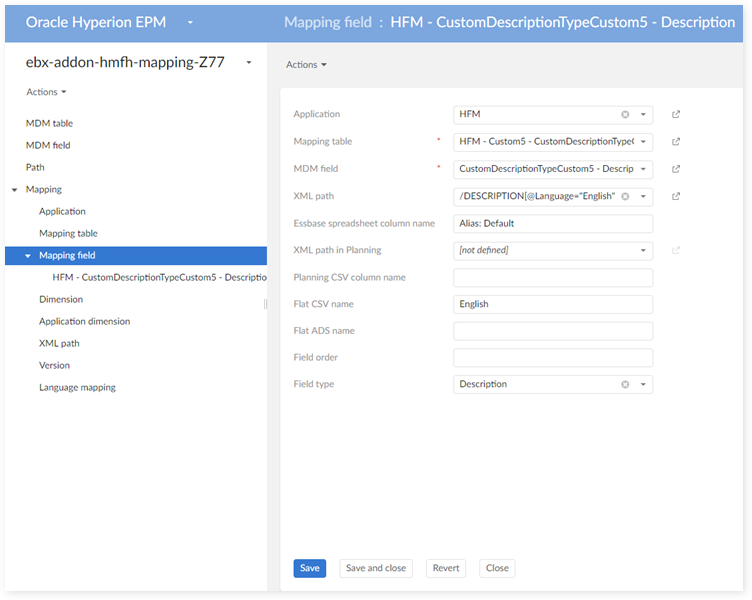
Special case - mapping "Default" language as "English":
Select the "Mapping field" table
Filter FieldType = 'Description' and change XML path value from /DESCRIPTION[@Language="English"] to /DESCRIPTION[@Language="Default"]
Select "Language Mapping":
Data mapping logging
Logging Overview
The data mapping logging is activated to track technical information on data mapping execution. When a trouble is raised during the data mapping execution, either at import or export time, then analyzing the data mapping logs is helpful to fix the issue.
This log mechanism is useful at the time when data mapping configuration must be tested. Once this configuration is validated, the log mechanism should be deactivated.
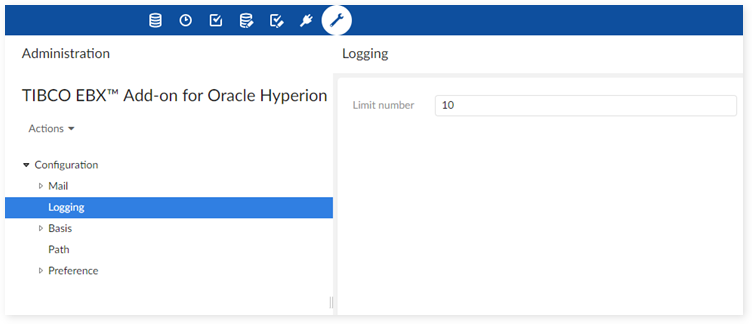
Configuration
In the administration area of EBX®, and in the Hyperion configuration, it is possible to configure the maximum number of data mapping instances to track. For example, if the 'Depth logging' property is set to '10', then the first 10 dimensions, and on each dimension the first 10 members, hierarchy nodes and settings are logged. If the limit is set to '-1' the logging is executed for the whole data.
It is recommended to set the value to '10' since the data mapping configuration is fully tested with this level of depth.
Data structure to apply the logging
The data mapping logging uses a set of tables located in the administration area of EBX®, named 'TIBCO EBX® Add-on for Oracle Hyperion EPM - Logging'.
The logging information is deleted before every new execution. This is not an audit trail that the system keeps in memory in a sustainable way. This is a technical tracking of data mapping execution that is valuable to fix issues that might appear due to wrong data mapping configuration.
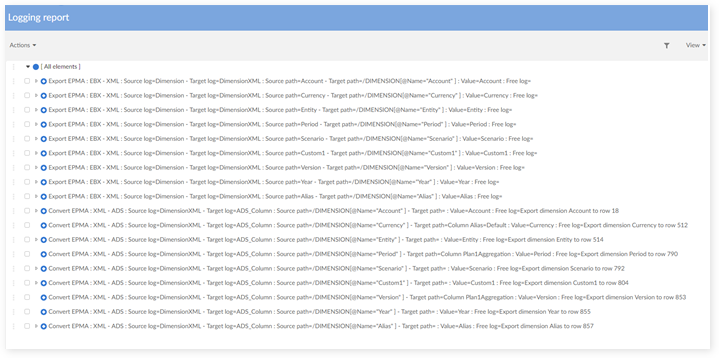
The logging report is available through a data hierarchy defined in the table 'Logging report'. The view is as follows. For each data mapping operation, a set of information is provided to track the value of the source data against its target data. A data hierarchy view is provided to facilitate the use of the logging data. For example, the parent node 'Account' is structured with as many child nodes as fields in the dimension.
Root log
This table contains general logging information.
Field name | Description |
|---|---|
Application | The current application which is being imported/exported |
Procedure | The current procedure which is running: - Convert - Import - Export |
Stage source | The current stage, link to table Stage. For example: - Source = XML, Target = EBX (import HFM xml file) - Source = EXCEL, Target = XML (convert ESSBASE spreadsheet to HFM xml) |
Stage target | |
Date | The current date time when running the service |
User | The current user who runs the service |
UUID | The uuid string to separate the current session getting from EBX® |
Dataset | The current dataset which is being imported/exported |
Data space | The current data space which is being imported/exported |
Stage
Field name | Description |
|---|---|
Type | The information to use for the source and the target in the stage: - XML - EBX® - EXCEL - CSV |
Instance
This table stores the hierarchy information for the Object (Logging report).
Field name | Description |
|---|---|
Object | Parent object |
Object child | Child object |
Object type
Field name | Description |
|---|---|
Type | The information to use for the source log and the target log in the Object: - Dimension - EBXTable - EBXField - DimensionXML - XMLTag - SpreadSheet_Sheet - SpreadSheet_Cell - CSV_Column |
Description | The description for each type |
Object (Logging report)
This table stores the detail logging data for each object (dimension, member, hierarchy, setting, field). The view 'Logging report' is configured on this table.
Field name | Description |
|---|---|
Root log | The current Root log, reference from table 'Root log' |
Source log | The current log for current stage. For example: - Stage Source = XML, Stage Target = EBX, Source log = Dimension XML, Target log = Dimension (log for the import dimension in stage import HFM xml file to EBX®) |
Target log | |
Source path | The current source path |
Target path | The current target path |
Value | The value which is being processed |
Free log | Free log |
Import and export report
Report usage and location
The import and export report is used to log information during the import and export procedures. The information is stored in a dedicated data set allowing to request and purge the logs over time. It is located in the data space 'Oracle Hyperion EPM' and the data set 'Oracle Hyperion EPM Report'.
Data architecture used to log the import and export report
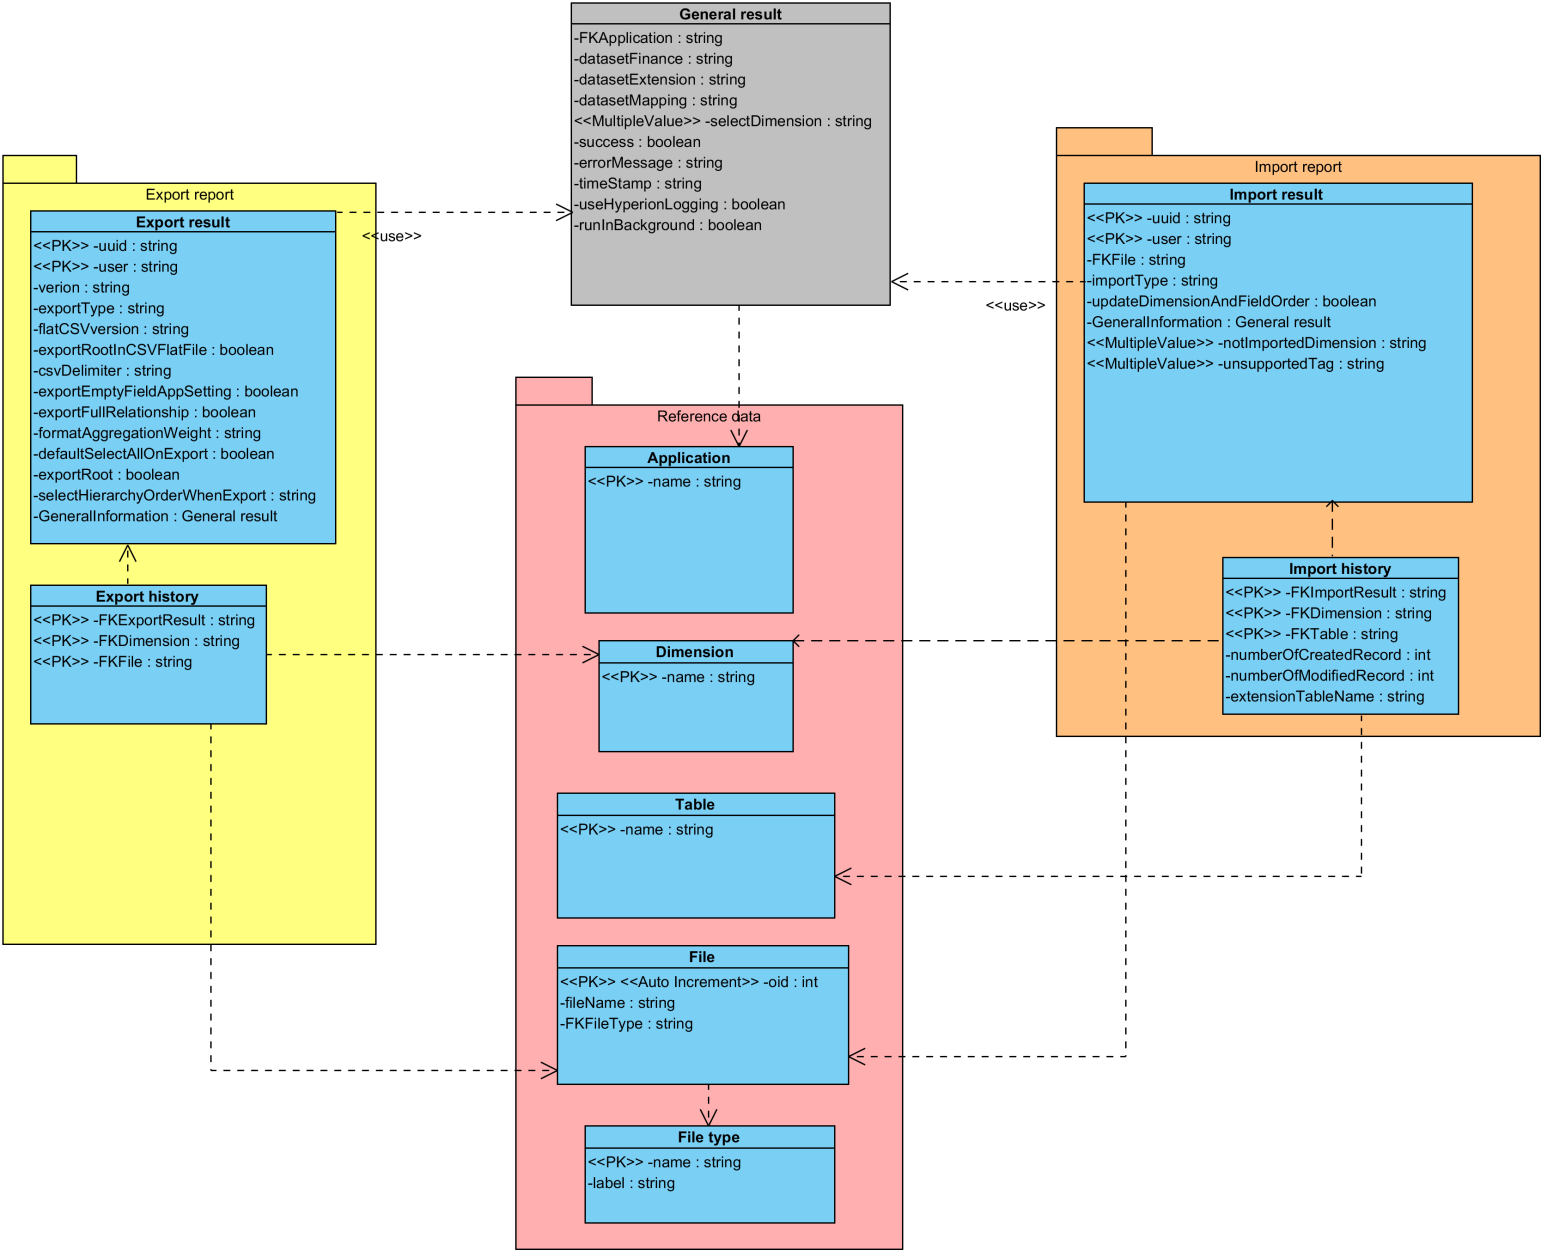
The information logged during the import and export procedures is saved though this logical data model.
Import result
The import result logs all import parameters and the execution status.
Field name | Description |
|---|---|
User | The user who execute the import procedure. |
File | The file that is imported |
File path | Path of the imported file. |
Import type | Type of the import (Eg. Delete all before import) |
Update dimension and field order | 'True': when the order of dimensions and fields is updated after the import. 'False': when the order of dimensions and fields is not updated after the import. |
General information to store some common data related to the import procedure. | |
Application | Application involved in the import procedure. |
Dataset financial | Name of the financial dataset. |
Dataset extension | Name of the extension dataset. |
Dataset mapping | Name of the mapping dataset. |
Selected dimension | List of the dimensions that are selected. |
Execution time | Execution time of the import procedure. |
CSV version | The CSV version of the exported file. |
Export type | Type of the export. |
Export root in CSV flat file | 'True': the root is exported for CSV file. 'False': the root is not exported for CSV file. |
Delimiter | Delimiter character used for exporting CSV file. |
Export empty field app setting | 'True': empty fields app setting is exported. 'False': empty fields app setting is not exported. |
Export full relationship | 'True': full relationship is exported. 'False': full relationship is not exported. |
Export #root | 'True': the '#root' is exported for HFM CSV file. 'False': the '#root' is not exported for HFM CSV file. |
Aggregation weight display format | Define the export format for the field 'AggregationWeight' in the dimension Custom. This format applies the 'Java - Decimal Format'. Value must conform to the regular expression "[-]?[0#,]+[.]?[0#]*[E]?[0]*". |
Default select all export | 'True': 'select all dimension(s)' check box is selected by default. 'False': 'select all dimension(s)' check box is not selected by default. |
Export order for hierarchy | Selection of the order management applied to the hierarchy:
|
Status | 'True': the import procedure is a success. 'False': the import procedure has failed. |
Use TIBCO EBX® Add-on for Oracle Hyperion EPM - Logging | 'True': the TIBCO EBX® Add-on for Oracle Hyperion EPM - Logging has been used. 'False': the TIBCO EBX® Add-on for Oracle Hyperion EPM - Logging has not been used. |
Run in background | 'True': the import procedure has been executed in background 'False': the import procedure has not been executed in background. |
Error message | If case the import procedure fails, then the error message is logged. |
Unsupported tag | List of XML tags that are defined in the data mapping. |
Not imported dimension | List of name of dimensions that are not imported during the procedure. |
Import history
The import history logs all detailed information of the import per dimension of the financial data model as illustrated below.
Field name | Description |
|---|---|
Import result | Link to the corresponding 'Import result' procedure. |
Dimension | Dimension name that is imported. |
Table | Table name that is imported. |
Number of created record | Number of created records after the execution of the import procedure. |
Number of modified record | Number of modified records after the execution of the import procedure. |
Extension table name | Name of extension table that is imported. |
Export result
The export result logs all export parameters and the execution status.
Field name | Description |
|---|---|
User | The user who execute the export procedure. |
Version | The version of current dimensions. |
CSV version | The CSV version of the exported file. |
Export type | Type of the export. |
Export root in CSV flat file | 'True': the root is exported for CSV file. 'False': the root is not exported for CSV file. |
Delimiter | Delimiter character used for exporting CSV file. |
Export empty field app setting | 'True': empty fields app setting is exported. 'False': empty fields app setting is not exported. |
Export full relationship | 'True': full relationship is exported. 'False': full relationship is not exported. |
Export #root | 'True': the '#root' is exported for HFM CSV file. 'False': the '#root' is not exported for HFM CSV file. |
Aggregation weight display format | Define the export format for the field 'AggregationWeight' in the dimension Custom. This format applies the 'Java - Decimal Format'. Value must conform to the regular expression "[-]?[0#,]+[.]?[0#]*[E]?[0]*". |
Default select all export | 'True': 'select all dimension(s)' check box is selected by default. 'False': 'select all dimension(s)' check box is not selected by default. |
Export order for hierarchy | Selection of the order management applied to the hierarchy:
|
General information to store some common data related to the export procedure. | |
Application | Application involved in the export procedure. |
Dataset financial | Name of the financial dataset. |
Dataset extension | Name of the extension dataset. |
Dataset mapping | Name of the mapping dataset. |
Selected dimension | List of the dimensions that are selected. |
Execution time | Execution time of the export procedure. |
Status | 'True': the export procedure is a success. 'False': the export procedure has failed. |
Use TIBCO EBX® Add-on for Oracle Hyperion EPM - Logging | 'True': the TIBCO EBX® Add-on for Oracle Hyperion EPM - Logging has been used. 'False': the TIBCO EBX® Add-on for Oracle Hyperion EPM - Logging has not been used. |
Run in background | 'True': the exoprt procedure has been executed in background 'False': the export procedure has not been executed in background. |
Error message | If case the export procedure fails, then the error message is logged. |
Export history
The export history logs all detailed information of the export per dimension of the financial data model as illustrated below.
Field name | Description |
|---|---|
Export result | Link to the corresponding 'Export result' procedure. |
Dimension | Dimension name that is exported. |
File | The file that is exported. |
Reference data
Application
Field name | Description |
|---|---|
Name | Name of the Hyperion application |
Dimension
Field name | Description |
|---|---|
Name | Name of the dimension |
Table
Field name | Description |
|---|---|
Name | Name of the table in the financial data model |
File type
Field name | Description |
|---|---|
Name | File extension (Eg. '.xml') |
Label | Label of the file extension |
File
Field name | Description |
|---|---|
Name | Name of the file that is imported or exported |
Type | The type of the file among the list provided by the table 'File type' |
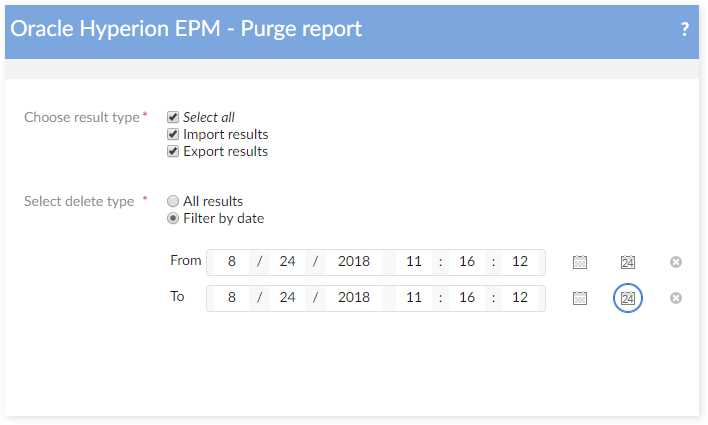
Purge of the report data
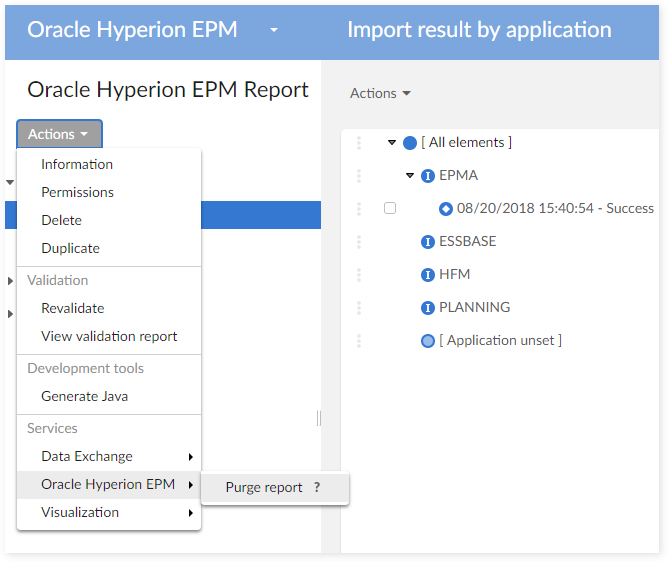
At the level of the data set 'Oracle Hyperion EPM report', the service 'Purge report' allows to remove all or part of the report data.
Migration & Back-up procedures
Migration requirements
From the version 1.0.2 of the add-on, a migration procedure is provided to facilitate the upgrades. If modifications have been done in the data mapping or in the financial data model itself, then specific steps must be achieved as explained in this appendix.
The migration procedure relies on two services:
Backup service. This service is executed on the version (n) to backup all configurations (structure, permission, reference data) and the Financial dataset. It must be executed on the old version (version n) before upgrading the add-on to the new version. This service executes the following steps:
Backup the structure and all permissions of the Financial dataset.
Backup data of all reference tables (in Reference data group).
Use the mapping dataset of version (n) to backup financial data.
Restore service. After the upgrade of the add-on to the version (n+1), the restore service is launched on this new version to restore the backup. This service executes the following steps:
Restore the structure and permission of the Financial dataset.
Restore data of all reference tables.
Use the mapping dataset of version (n+1) to restore financial data.
In order to avoid any error when using the backup and restore services, you can delete unused records on the table 'Application' (in group 'Administrative Data' on Oracle Hyperion EPM 1.0.x or in dataset mapping on Oracle Hyperion EPM 1.1.x). For example, if you don't use the application Essbase, you can delete the record 'ESSBASE' in the table 'Application' in every Oracle Hyperion EPM dataset. Then, the backup service will work and export without data related to Essbase.
Beginning in version 1.6.0 of the add-on, the migration procedure has been upgraded. The backup and restore services allows you to backup multiple data spaces. The restore service is also available to restore the backup folder from versions prior to 1.6.0.
The migration procedure does not backup and restore data in the Oracle Hyperion EPM Extension dataset. This data migration must be achieved manually with the upgrade of the add-on.
Backup
For versions prior to the 1.6.0 release
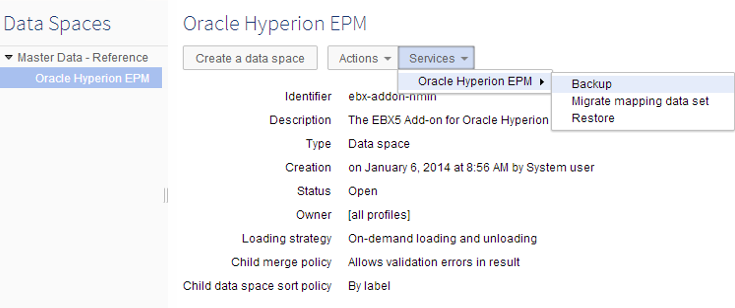
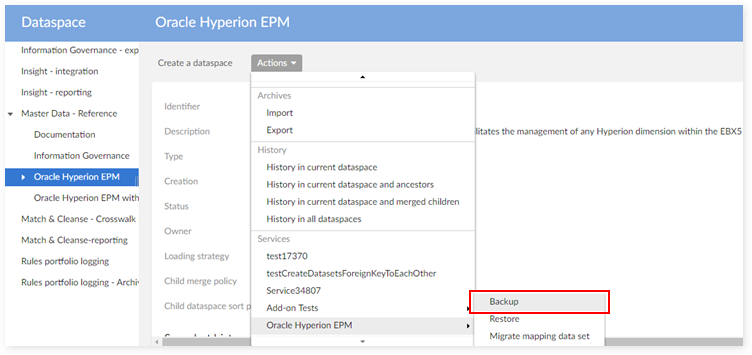
Step 1: Select a Oracle Hyperion EPM data space.
Step 2: From the 'Services' drop-down menu select 'Oracle Hyperion EPM' → 'Backup'.
Step 3: Enter a name in the 'Backup folder name' field.
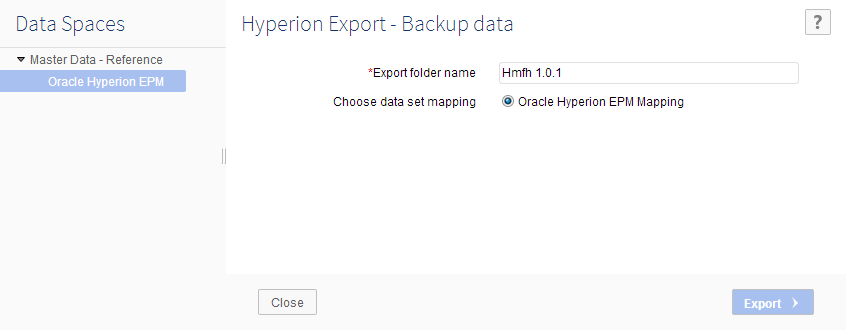
Step 4: Click the 'Export' button to backup data.
Step 5: EBX® returns the path of the backup folder on server. For example, this folder is located at {ebx.temp.directory}/ebx.platform.modules/ebx-addon-hmfh/backup ). The path returned by EBX® is ebx-addon-hmfh\backup\Hmfh1.0.1_325026.
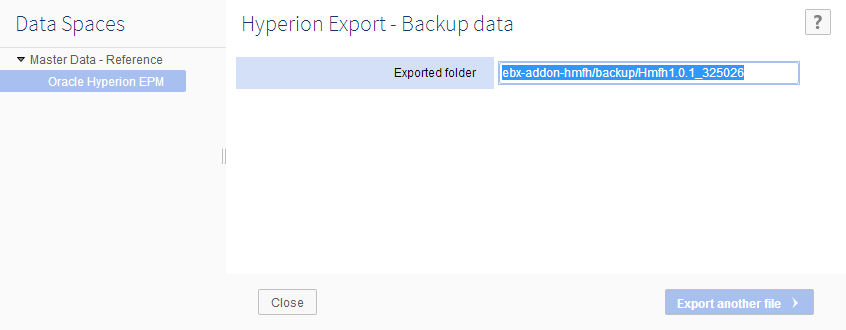
Step 6: Save the path.
From version 1.6.0
Step 1: On Dataspace level, choose one Oracle Hyperion EPM dataspace.
Step 2: Choose the service Backup.
Step 3: Enter a folder name for exporting.
Backup folder name: enter the name for backup folder.
Data spaces: select the data spaces to backup from data spaces' tree. If the children are selected, the parent is also selected.
Application: select application user want to backup.
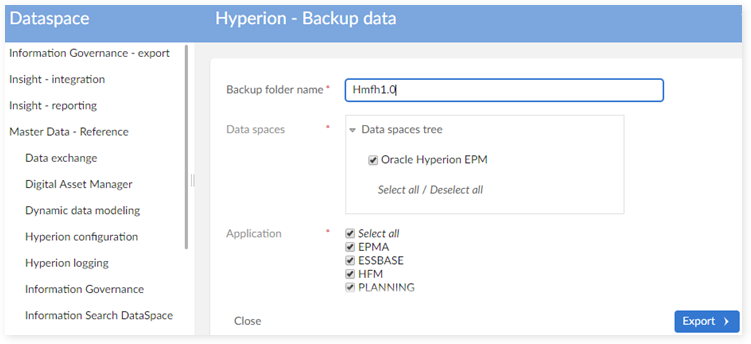
Step 4: Click the export to backup data.
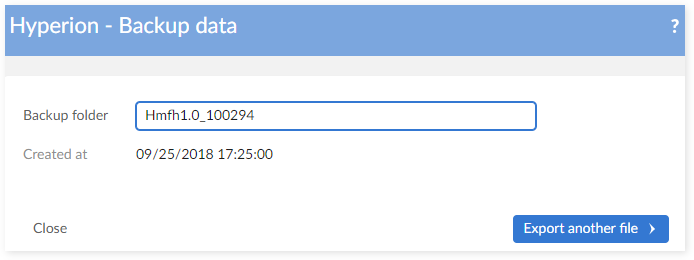
Step 5: EBX® will return the path of the backup folder on server (for example, this fold er is located at {ebx.temp.directory}/ebx.platform.modules/ebx-addon-hmfh/backup). For example: ebx-addon-hmfh\backup\Hmfh1.0.1_943079.
Step 6: Save the path.
Restore
Before version 1.6.0
Step 1: From the 'Services' drop-down menu select 'Oracle Hyperion EPM' → 'Restore'.
Step 2: Enter the path of the backup folder.
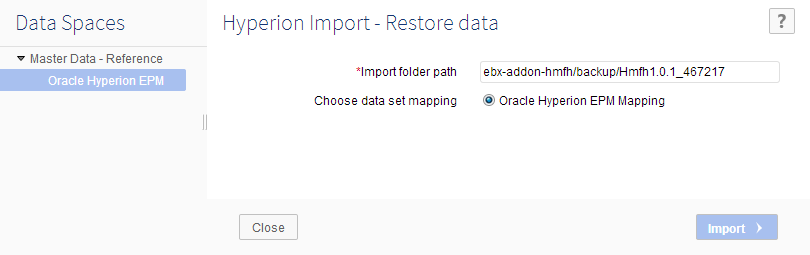
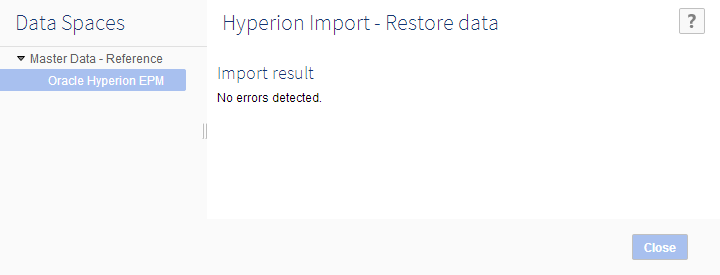
Step 3: Click the 'Import' button to restore data.
Step 4: EBX® will restore the data in the backup folder.
From version 1.6.0
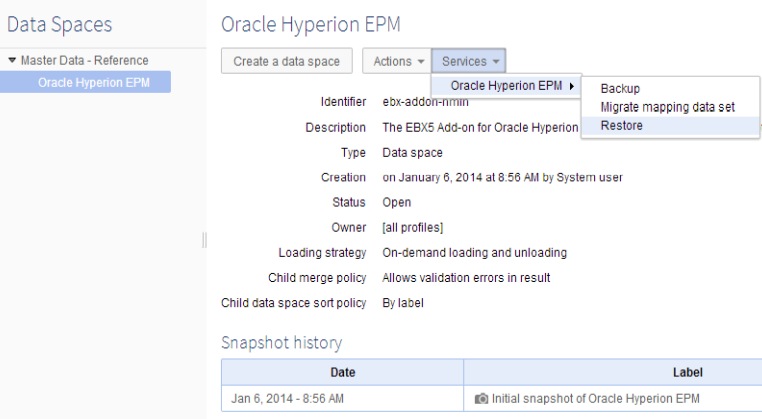
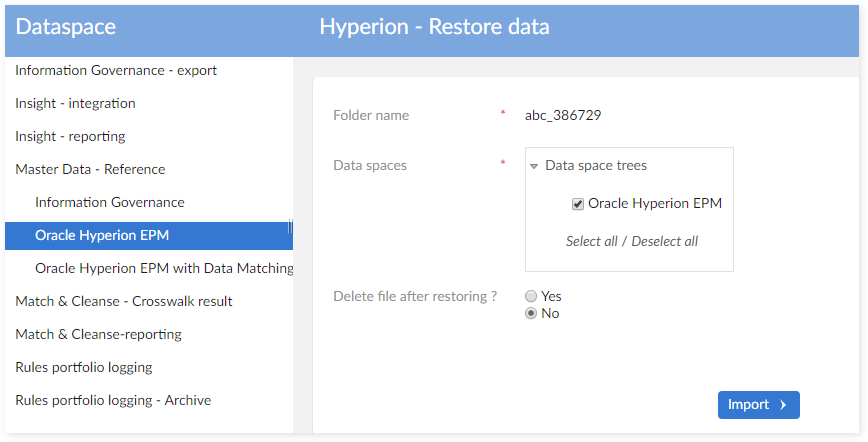
Step 1: From the 'Actions' drop-down menu select 'Oracle Hyperion EPM' → 'Restore'.
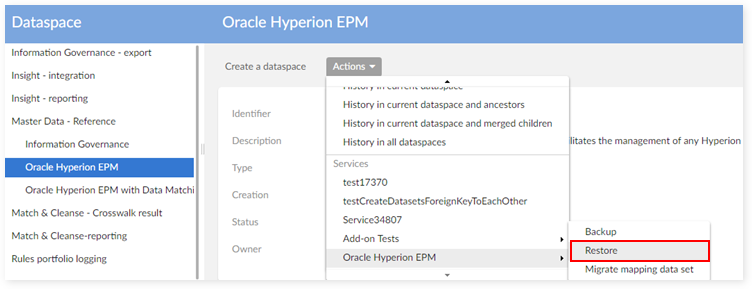
Step 2: Select folder name
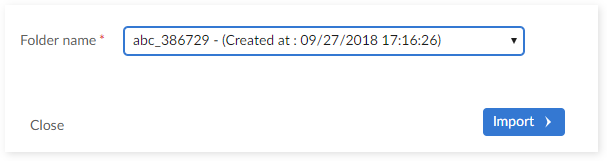
Step 3: Select data space
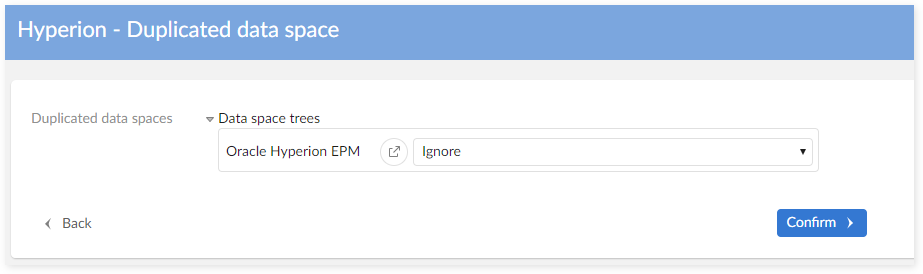
Step 4: If you select data space that exists in the system, a duplicated data space screen displays:
There are two available actions for a duplicated data space:
Ignore : Keep current data space in system and do nothing.
Replace with data space in backup folder: Delete the duplicated data space in the system and replace it with the data space in the backup folder.
Step 5: If you choose ' Replace with data space in backup folder' the system shows the warning screen to inform you that the duplicated data spaces will be erased from the EBX® system before restoring.
Step 6: Click the 'Submit' button to start the restore process.
How to upgrade version n to version n+1
Run the 'Backup' service from version n
Perform the steps outlined above in the "Backup" section to backup your data.
Upgrade to the add-on version (n + 1)
Step 1: Shut down the server. Perform a backup of the repository.
Step 2: Update the Oracle Hyperion EPM version (n) repository with the new version of add-on (n+1).
Step 3: Start EBX®.
Restore
Run the 'Migrate data set mapping' service (if needed).
Perform the steps outlined in the above "Restore" section to restore your data.
How to upgrade from one server to another
Backup
Perform the steps outlined above in the "Backup" section to backup your data.
Install the new add-on version (n+1)
Step 1: Install the new version of the add-on (n+1) on a new server.
Step 2: Start EBX®.
Restore
Step 1: On a new repository with the add-on version (n+1).
Step 2: Copy the backup folder on the server from Oracle Hyperion EPM version (n) to the compatible backup folder on the server add-on version (n+1) (using the path which was saved on the Backup).
Step 3:
Run the 'Migrate data set mapping' service (if needed).
Perform the steps outlined above in the "Restore" section to restore your data.
Special case of ugrading extra custom to version 1.6.0
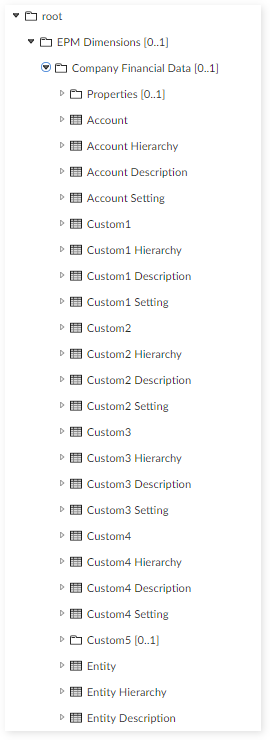
Since there are newly added tables in 1.6.0 of the add-on, you need to add new tables to a custom model before running the migration process.
The following image highlights these new tables:

Create the following tables: 'Currency hierarchy', 'Currency setting', 'Alias hierarchy', 'Alias setting', 'Version', 'Version hierarchy', 'Version setting', 'Version description' and configure their primary keys:

Name | Label | Included data models | Primary key |
|---|---|---|---|
CurrencyHierarchy | Currency Hierarchy | Currency hierarchy | /FKCurrency /FKChildCurrency /active |
CurrencySetting | Currency Setting | Currency setting | /Attributes/Name |
AliasHierarchy | Alias Hierarchy | Alias hierarchy | /FKAlias /FKChildAlias /active |
AliasSetting | Alias Setting | Alias setting | /Attributes/Name |
Version | Version | Version | /Name |
VersionHierarchy | Version Hierarchy | Version hierarchy | /FKVersion /FKChildVersion /active |
VersionSetting | Version Setting | Version setting | /Attributes/Name |
VersionDescription | Version Description | Version description | /FKVersion /FKAlias |
Publish this model and run the migration process.
Special cases in restoring
In certain situations the backup folder may contain data spaces having the same home key as the data spaces set to backup. The table below describes how to treat these cases.
No. | In system | Data space on which the restore is launched | In backup folder | Result |
|---|---|---|---|---|
1 | ebx-addon-hmfh -> A ----> B ---------> C | ebx-addon-hmfh | ebx-addon-hmfh -> A -> B ----> C ----> D ----> E | Success. Depending on the user's selection for the data space tree in backup folder, the result could be : ebx-addon-hmfh -> A ----> B --------> C --------> D --------> E |
2 | ebx-addon-hmfh -> A ----> B ---------> C | A | ebx-addon-hmfh -> A -> B ----> D ----> E ----> C | Failed. System shows error message. |
3 | Master reference -> ebx-addon-hmfh -> B -> C | ebx-addon-hmfh | ebx-addon-hmfh -> C ----> B ---------> A | Failed. System shows error message. |
Changes management
Customization options
The add-on can be customized as follows:
'Mapping dataset' to adapt the import and export data flux depending on applications used by a company. This type of change is achieved by a parametrization of the tables used for the data mapping. These tables are reference data managed by EBX®.
'Hyperion financial data structure' to add or remove data with help of the modeling function of EBX® (DMA: Data Modeler Assistant).
'Inclusion of the Hyperion data model' into a user data model to overload the default data brought by the add-on. This inclusion relies on the EBX® feature 'include' available with the DMA.
'Permission' to adapt the policies. This type of change is achieved by the permission management function brought by EBX®.
'Data views' to adapt the labels used by default. This type of change is achieved by using the EBX® data views feature.
These customizations are not mandatory. They depend on the context and needs of every company. Once changes are applied, it is necessary to keep them safe when a new version of the add-on is installed. This appendix explains, for each type of change listed below, how to upgrade the add-on without removing the changes.
Change on the mapping dataset
Case | Change applies on | Description | |
|---|---|---|---|
Value | Structure | ||
#1 | X | Value change in the mapping dataset | |
#2 | X | Data structure change in the mapping dataset | |
A user of the add-on can only change the value of the data mapping.
The changes applied on the data structure is strictly under the responsibility of TIBCO Software Inc.. A user should not change the data structure of the data mapping. This type of change is not kept when a new version of the add-on is installed.
Case #1 - Value change in the mapping dataset
#1.1 - Changes done by the user of the add-on
The following steps must be executed to keep the changes in the mapping data set and associated data:
Step 1 : On version (n), export archive for only Oracle Hyperion EPM Mapping data set to '.ebx' file (Data Spaces > Actions > Archives > Export).
Step 2 : Run Backup service (Data Spaces > Services > Backup) (see Appendix - Migration and Back-up procedures).
Step 3 : Upgrade Oracle Hyperion EPM to version (n+1).
Step 4 : Import archive file for mapping dataset by using exported '.ebx' file in step 1. It means that the mapping archive of version (n+1) is not used on this step.
Step 5 : Create a child dataset for mapping dataset. After this step, both parent mapping dataset and child mapping dataset contains the mapping data of version (n).
Step 6 : Import archive file for parent mapping data set by using archive file in Oracle Hyperion EPM version (n+1). After this step :
Parent mapping dataset contains new data mapping of Oracle Hyperion EPM version (n+1).
Child mapping data set contains old data mapping of Oracle Hyperion EPM version (n).

Step 7 : Deactivate dataset parent.
Step 8 : Optimize dataset then go to child mapping data set and get the differences from the old data mapping. The child dataset mapping contains both the modification of the user of the add-on and the new modification of Oracle Hyperion EPM version (n+1). The user can work on child dataset mapping to control all of these different.
Step 9 : Use the child dataset mapping to restore data by using the Restore service of the add-on. (Data Spaces > Services > Restore) (see Appendix - Migration and Back-up procedures).
#1.2 - Changes done by TIBCO Software Inc.
In this case, only TIBCO Software Inc. has changed the data mapping. It other words, it means that the user of the add-on still works on the default data mapping of the add-on version (n).
Then, the migration procedure is used without additional procedure (see Appendix - Migration and Back-up procedures).
Case #2 - Data structure change in the mapping dataset
The data structure of the mapping dataset can be modified by TIBCO Software Inc. only. TIBCO Software Inc. tries to ensure a forward compatibility of the user mapping dataset changes against the new data structure. In case of need, a migration procedure can be provided to realign data values with the new data structure.
Change on the Hyperion financial data structure
The Hyperion financial data structure can be modified by TIBCO Software Inc. only. The user of the add-on cannot modify this structure because every change will be lost during the installation of a new version of the add-on.
But the user of the add-on can extend the Hyperion financial data structure to link the Hyperion data with other tables.
Case | Change on the Hyperion financial data structure by | Description | |
|---|---|---|---|
User | TIBCO Software Inc. | ||
#1 | X | Modification of the Hyperion financial data structure. | |
#2 | X | Extension of the financial data structure. | |
Case #1 - Modification of the Hyperion financial data structure
This type of modification can be done by TIBCO Software Inc. only.
Case | Change on | Description | |
|---|---|---|---|
Table | Field | ||
#1.1 | X | New table. | |
#1.2 | X | Deletion of a table. | |
#1.3 | X | New field. | |
#1.4 | X | Field name change. | |
#1.5 | X | Field group owner change. | |
#1.6 | X | Change a field into a foreign key. | |
#1.7 | X | Deletion of a field. | |
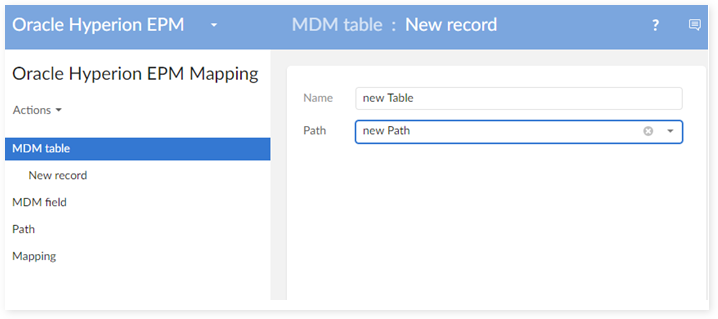
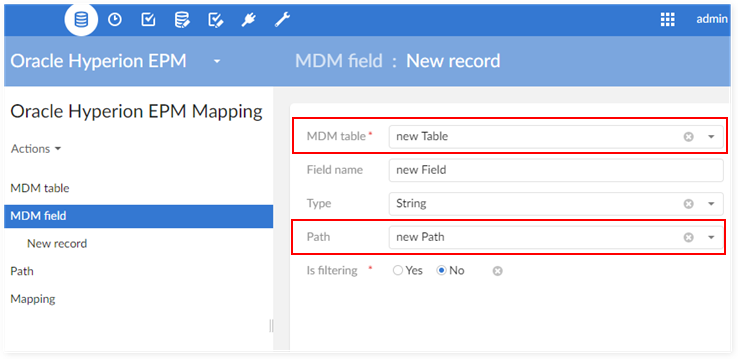
#1.1 - New table
Add the path for new table to Path table:

Register this table to the add-on by creating a new declaration in the 'MDM Table':
Register all fields of this table to the add-on by creating their reference data in the 'MDM Field' table:
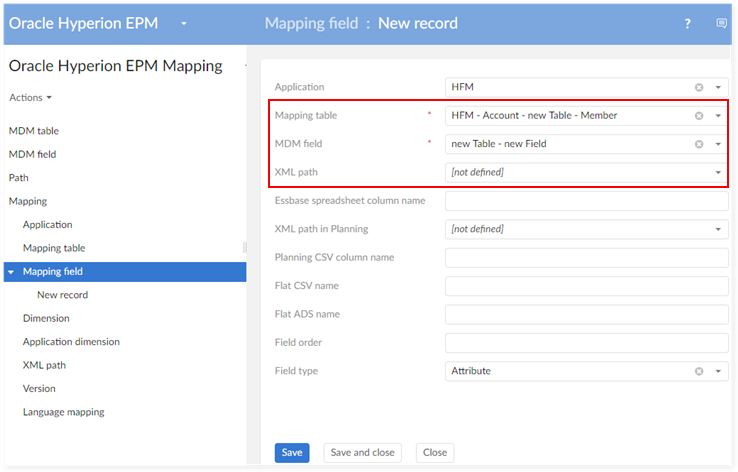
Enter the mapping declaration of the table with one application: 'Mapping Table':
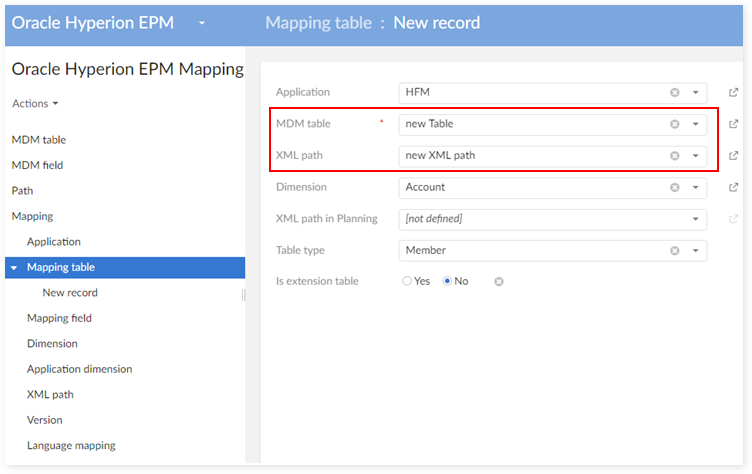
Mapping all fields (MDM Field) of this table (Mapping Table) with the fields listed below by creating new data mapping in the 'Mapping Field' table:
XML path: XML path in HFM XML file.
Essbase spreadsheet column name: Name of column in Essbase spreadsheet.
XML path in Planning: XML path in Planning XML file.
Planning CSV column name: Column name in Planning CSV file.
Flat CSV column name: Column name in HFM flat file.

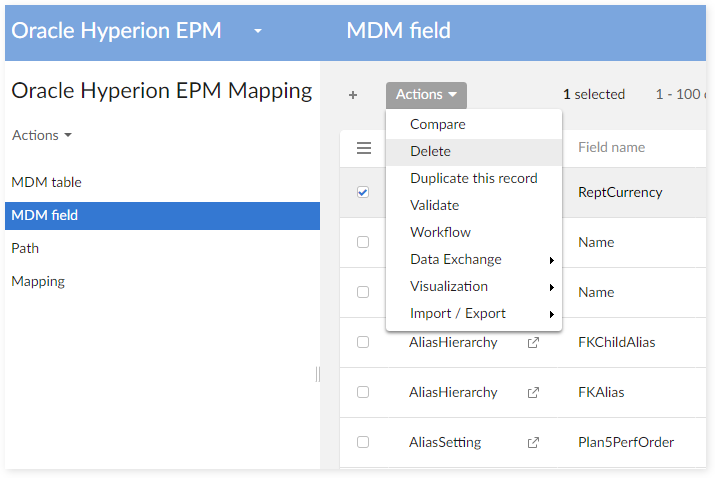
#1.2 - Deletion of a table
Delete the data related to this table on the table 'MDM Table':
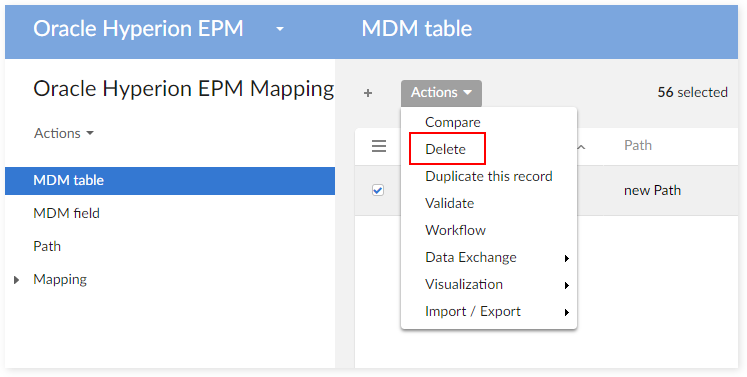
Delete the data related to this table on the table 'MDM Field':

Delete the data related to this table on the table 'Path':
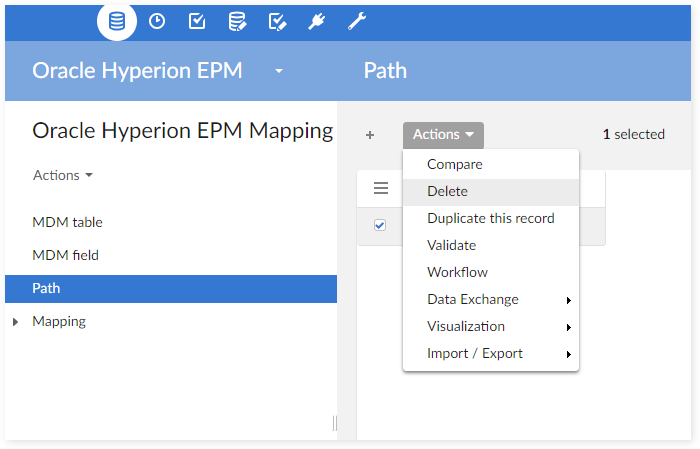
Delete its reference data on tables mapping
- 'Mapping Table'
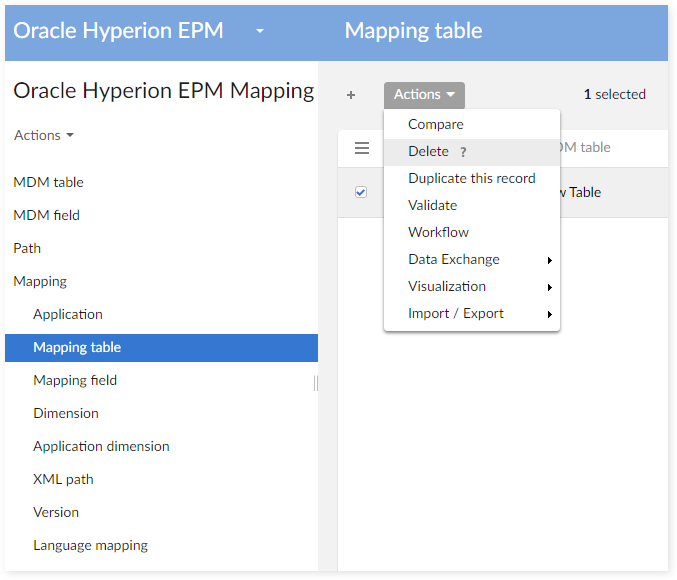
- 'Mapping Field'
#1.3 - New field
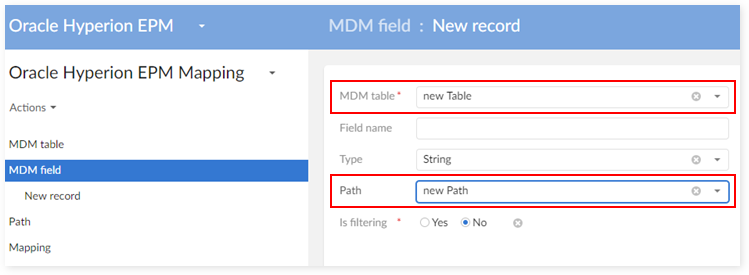
Create a new declaration on the table 'MDM Field':
Create a new mapping for the new 'MDM field':
Create a new mapping for the new 'MDM field':
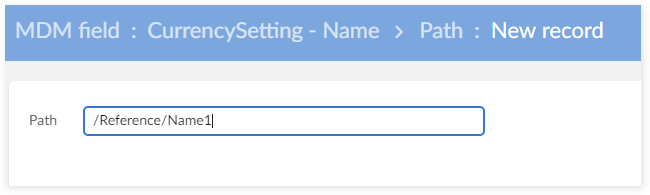
#1.4 - Field name change
Example: change field "Name" to "Name1".
Create a new path for the field Name1.
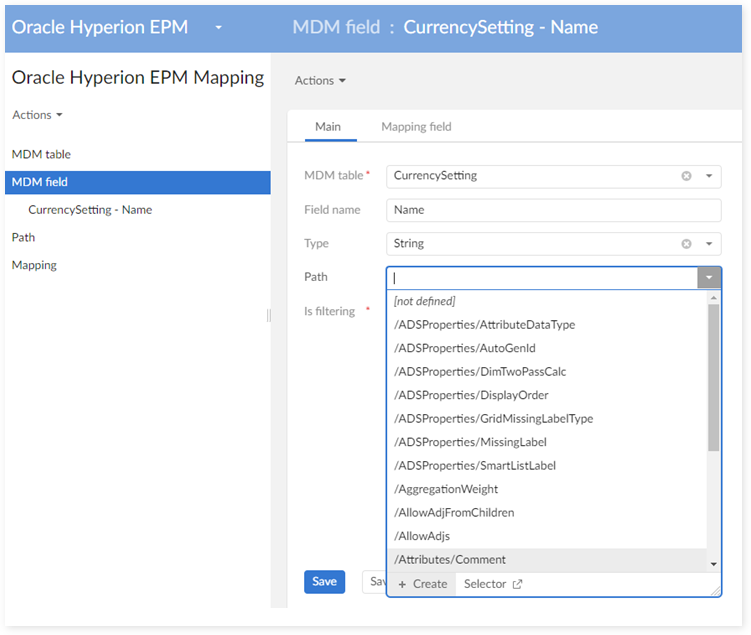

Align the corresponding data on the table 'MDM Field' (Path, Name):
.png)
#1.5 - Field group owner change
Example: move the field "Name" to the group "Reference"
Create a new path for the new field Name:
Align the corresponding data on the table 'MDM Field' (Path, Name).
_2.png)
#1.6 - Change a field into a foreign key
Align data on the table 'MDM field':

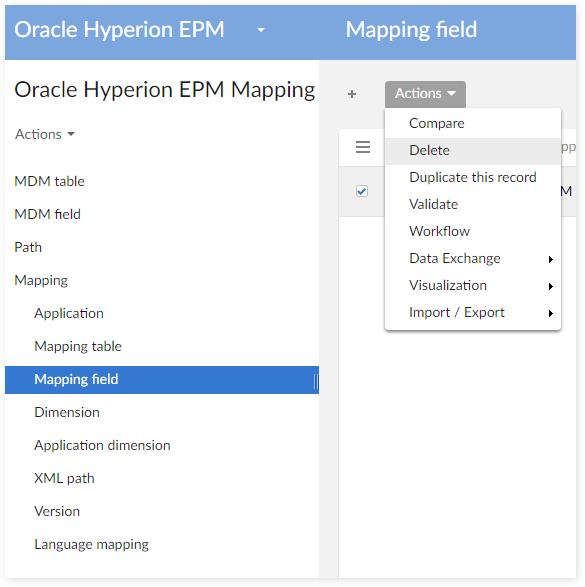
#1.7 - Deletion of a field
Example: deletion of the field "Name" in the table Account.
Delete the corresponding data on the table 'MDM Field' table:
Delete the corresponding data mapping for this MDM field in the 'Mapping Field' table:
Case #2 - Extension of the Hyperion financial data structure
Two types of extension are permitted: use of external foreign keys, use of an extension mechanism provided by the add-on.
Case | Change on | Description | ||
|---|---|---|---|---|
Structure | Permission | View | ||
#2.1 | X | Use of an external foreign key (FK) to a table in the Hyperion financial data structure | ||
#2.2 | X | Extension from the Hyperion financial data structure to another data structure | ||
#2.1 - Extension by using an external foreign key (FK)
The use of external foreign keys (FK) from a user's data model to the Hyperion financial data model is permitted. It does not entail specific procedure when upgrading the add-on.
Thus, the migration procedure can be used to keep financial data safe when a new version of the add-on is installed (see Appendix - Migration and Back-up procedures).
#2.2 - Extension by using the extended data
#2.2.1 - Description

The add-on provides a dataset for extension data which contains one extension table for each dimension. For example, the dimension 'Account' has its own extension table: 'AccountExtension'.
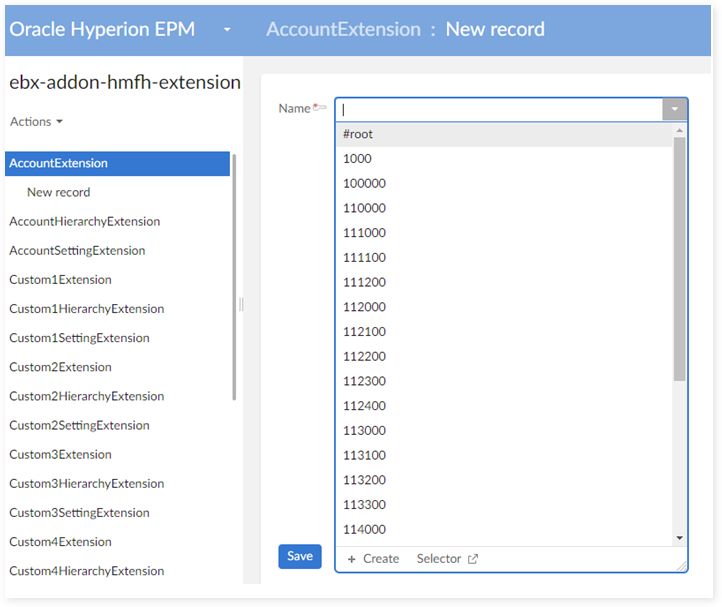
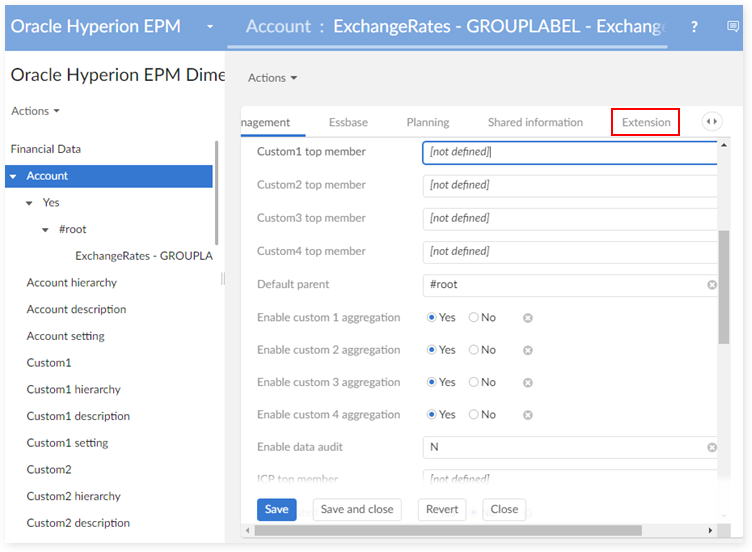
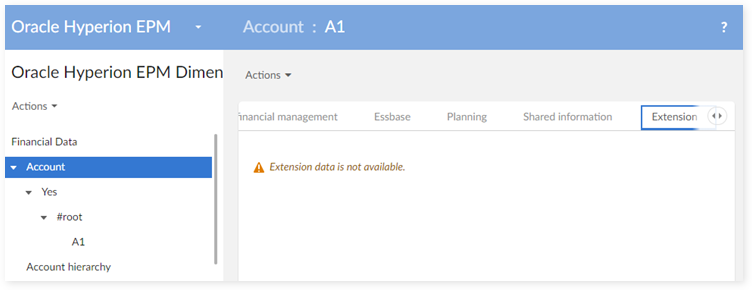
This data model is then modified to add extension fields. The end-user access the extended information from the financial dataset by using the link Extension as highlighted below (example with a record 'T1' Account).
Limitation of the extension mechanism:
The parent and children dataspaces and datasets of dataset financial use the same dataset extension.
#2.2.2 - Upgrade procedure
Once the extension mechanism is used, then the following procedure must be executed to install a new version of the add-on:
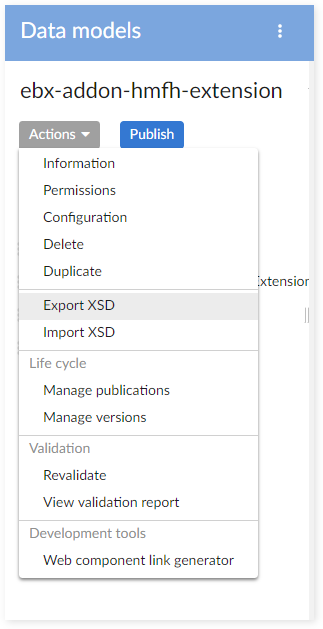
Step 1 : Export Oracle Hyperion EPM extension data model to xsd file.
Step 2 : Export Oracle Hyperion EPM extension dataset (contains data) to archive file.

Step 3 : Use Migration procedure to save financial data on Oracle Hyperion EPM dataset (see Appendix - Migration and Back-up procedures).
Step 4 : Because after upgrading Hyperion to version (n+1), the Oracle Hyperion EPM extension data model will be overwritten by the default one, the user needs to import Hyperion extension data model to xsd file which was exported on step 1 to restore the old model.
Step 5 : Import the archive file, which was exported in step 2, into the Oracle Hyperion EPM extension dataset to restore the data in this dataset.
Inclusion of the Hyperion data model
From the version 5.3.0 of EBX® it is possible to include data models into another one. You can either include the Oracle Hyperion EPM data model into a user data model or include within the Oracle Hyperion EPM data model a user data model.
Case | Change on | Description | ||
|---|---|---|---|---|
Structure | Permission | View | ||
#1 | X | Include the Hyperion data model into a user data model | ||
#2 | X | Include a user data model into the Hyperion data model | ||
Case #1 - Include the Hyperion data model into a user data model
The data model provided by the add-on relies on complex data types that can be reused to build bespoke tables by using the inclusion of types. Here is the procedure:
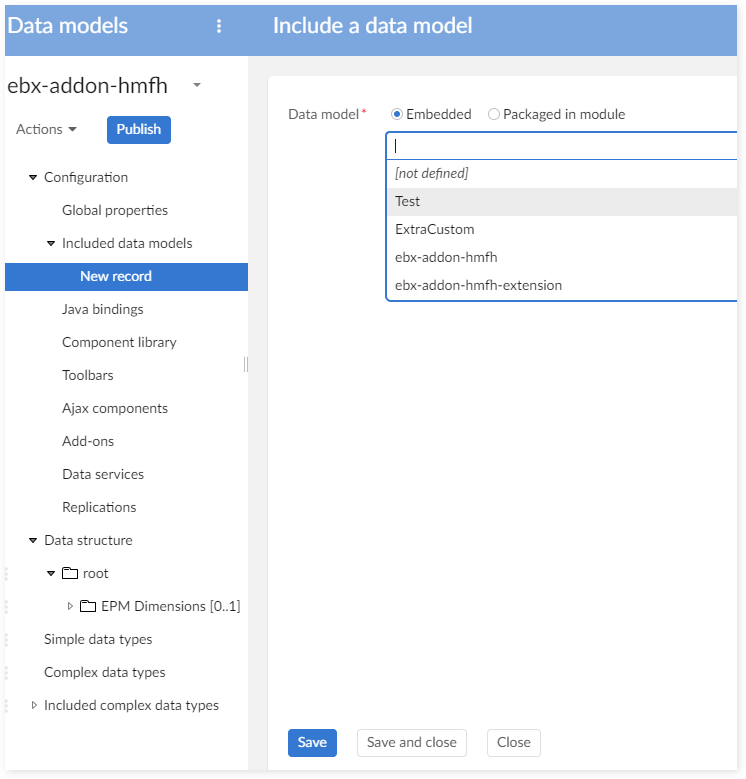
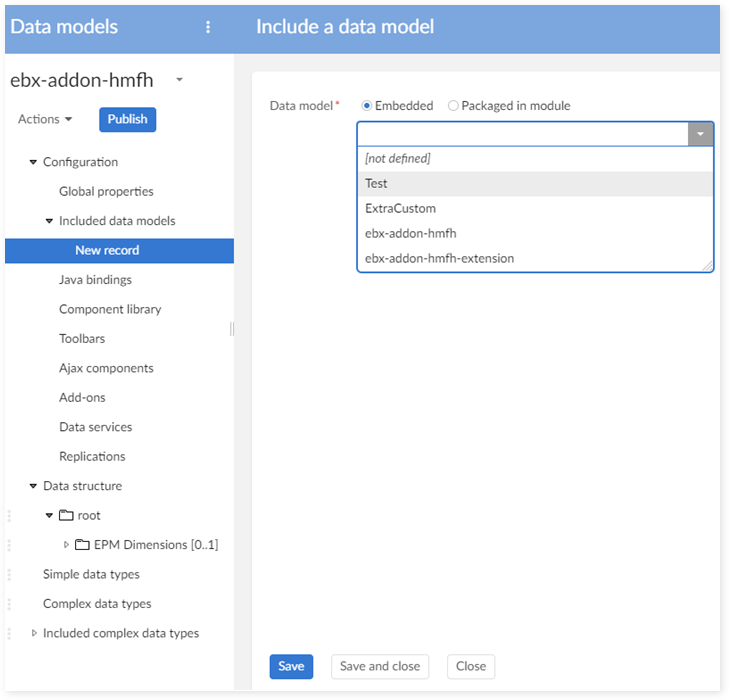
Step 1 : In the DMA (Data Model Assistant), go to Configuration > Included data models, create new record as shown below:
Step 2 : After including the Hyperion data model, all complex data types of Hyperion are included into the user's data model. Open the "Included complex data types" to check:

Step 3 : Go to Configuration > Data model properties, set value for Module name as shown below:

Step 4 : Create a new group in Data structure (for example, group Company Financial Data).
Step 5 : In order to use the service Backup/Restore of the migration procedure on this dataset, user must set information for root node to "Hyperion".
Step 6 : Create new tables for all dimensions (in the created group in step 4) by using the complex data type of Hyperion. Each dimension requires 4 tables.
For example: dimension Account require 4 tables:
Account: stores all members of the Account dimension.
AccountHierarchy: contains all relation between one member to others. The add-on uses this table to create hierarchy view for this dimension.
AccountDescription: contains all descriptions for each member.
AccountSetting: contains the dimension setting used for Planning application.
These tables must be created for all dimensions: Account, Custom1, Custom2, Custom3, Custom4, Entity, Scenario, Period, Year.
These shared tables must be created: ICP, Security Class, Currency, Currency Description, Application Setting, Consolidation Method, Consolidation Method Description, Alias.
The tables must reuse the same names and data organization (levels and sub-levels) than ones used by the add-on. All tables must be created otherwise errors could be raised either at the time of EBX® validation and/or when importing and exporting data with the add-on (data mapping concerns).
Step 7 : Create Reference Data group to store reference tables by using ReferenceDataType. This group must be located in the same model level, same group with the tables declared in the previous step.
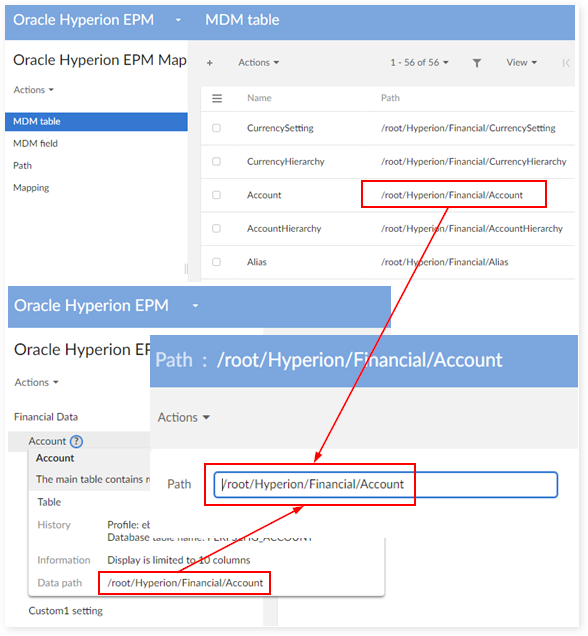
Step 8 : Go to table 'MDM Table' in the mapping dataset, change the path of each MDM table by the real path in company's financial dataset:
Impact when upgrading the version of the add-on
Because the backup and restore services brought by the migration procedure are designed to work with the default data model, the migration procedure to backup/restore data is no longer usable. When inclusion of the data model is used as explained above, data is backup and restore manually with help of this procedure:
Step 1 : Backup data in dataset manually.
Step 2 : Upgrade Oracle Hyperion EPM from version (n) to version (n+1). After the upgrade, the complex data types are automatically updated.
Step 3 : Restore data in dataset manually.
Step 4 : Follow the user guide in section 'Change on dataset mapping' to manage the changes on dataset mapping.
Case #2 - Include a user data model into the Hyperion data model
It is possible to include a user data model into the Hyperion data model directly. This inclusion is achieved by following the procedure explained below:
Step 1 : Create a data model to include to the Hyperion data model.
Step 2 : When a data model is included, EBX® will include only the complex data types, triggers and value functions. EBX® will not include tables in the data model. Then it is required to create the complex data types for the tables, the groups or the fields that will be integrated to the Hyperion data model. For example, in the following data model, a new complex data type is created and contains a new group (group1) and one field (field1):

Step 3 : Open the Hyperion data model, go to Configuration > Included data models, create new record as the following figure:
Step 4 : After including the user data model into the Hyperion data model, all complex data types are included into the Hyperion data model. To go the "Included complex data types" to check.
Step 5 : Create new tables, add new groups or add new fields into the Hyperion data model by using the included complex data types. For example, a new group in Account table is created using the complex data type in the step 2.

Step 6 : To allow the add-on to take into consideration the new tables and fields, it is required to update the data mapping with these changes (see "Change on mapping dataset"). For example, to take into account the new group and field added on step 5, a new record in table 'MDM Field' is created:

Then the data mapping for the new field is created:

Impact when upgrading the version of the add-on
Even though the inclusion of a data model into the Hyperion data model, it still remains possible to use the migration procedure:
Step 1 : Use the Backup service to backup data in financial dataset (see Appendix - Migration and Back-up procedures).
Step 2 : Upgrade the Oracle Hyperion EPM from the version (n) to the version (n+1). After upgrading, the complex data types are automatically updated.
Step 3 : Follow all steps explained in the section "How to include user data model into Hyperion data model" to re-include user's data model into Hyperion data model.
Step 4 : Use the Restore service to restore data in financial dataset (see Appendix - Migration and Back-up procedures).
Step 5 : Follow the user guide in section "Change on mapping dataset" to manage the changes on the mapping.
Changes applied on the permission
Case | Change on | Description | ||
|---|---|---|---|---|
Structure | Permission | View | ||
#1 | X | Permission change applied on a dataset | ||
#2 | X | Permission change applied on the data model | ||
Case #1 - Permission change applied on a dataset
The migration procedure can be used to backup and restore the permission on a dataset.
Case #2 - Permission change applied on the data model
The changes applied on the permission at the level of the data model are not kept when the add-on is upgraded. Theses changes must be reapplied manually after the upgrade process.
To change permission on the data model, these steps must be applied:
Step 1 : In the DMA (Data Modeler Assistant), go to Action > Permission to open the table permission for the data model.
Step 2 : Add a new record to set a new permission.
Changes applied on the data hierarchy views
The data hierarchy views' labels provided by the add-on should not be changed directly. When such changes are needed, it is recommended to duplicate the data hierarchy views and then applied the changes on these news views.
When upgrading from the version (n) to the version (n+1), it is possible to export bespoke views from version (n), then importing them into the version (n+1).
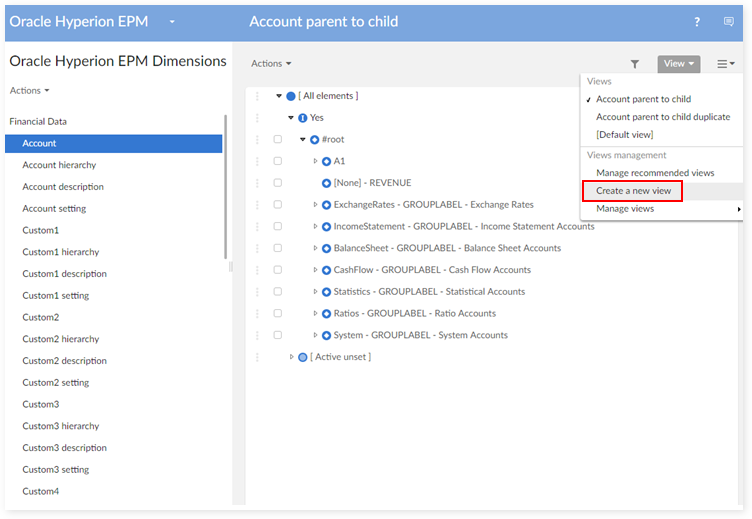
Duplication of a view
Step 1 : Select the duplicate service on the view.
Step 2 : Set a new name for the duplicated view.

Step 3 : Set a new label for the duplicated view.

Export and import the views
Step 1 : Go to Administration > Views configuration.
Step 2 : Find the view with help of its documentation, then export/import it.

Create the views manually
When the Hyperion data model is included into a user data model, the predefined views brought by the add-on must be created manually. The procedure is described below.
#1. Data hierarchy view
A hierarchy view is used for each dimension in order to manage the members through a parent and child relationship. For example, create the hierarchy view for the Account dimension:
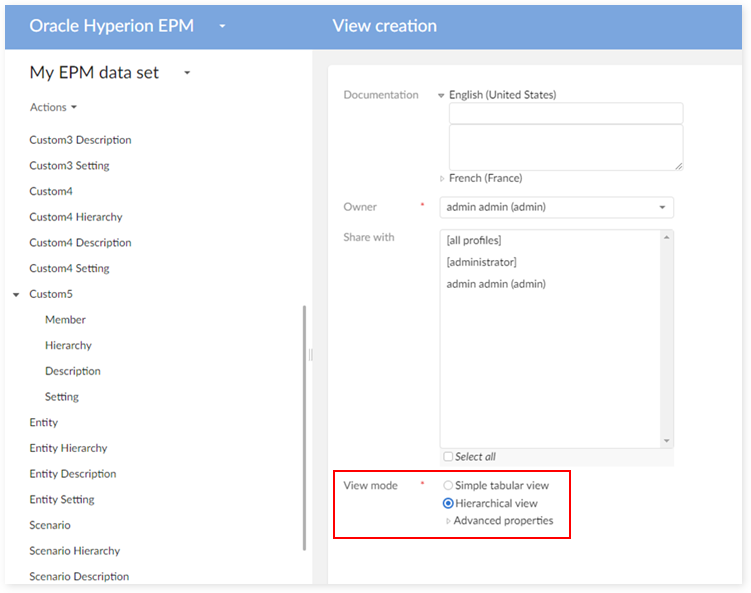
Step 1 : Go to the Account table, choose View > Create a new custom view.
Step 2 : Enter the view name, owner and set view mode to Hierarchy view.
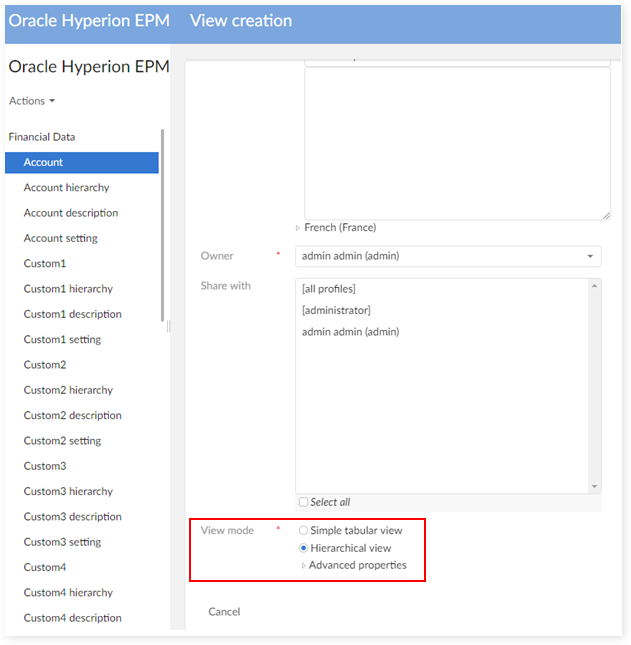
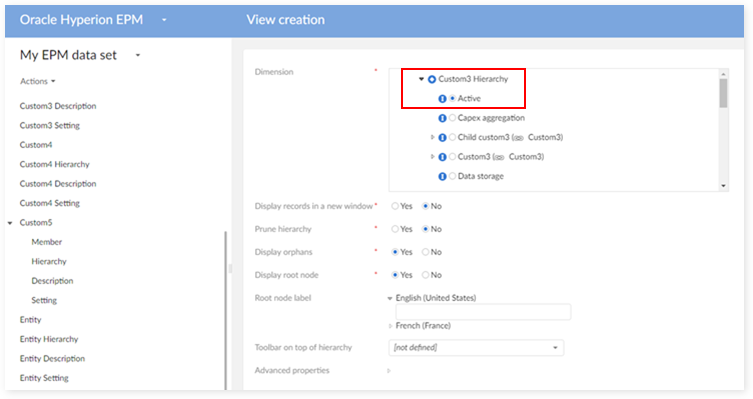
Step 3 : On the 'Dimension' field, select Active to classify member by active value.

Step 4 : Enter a label for the view and select Child order as Ordering node.

Step 5 : Click on Create and apply button to create the view.
#2. The view used to display the active relationships
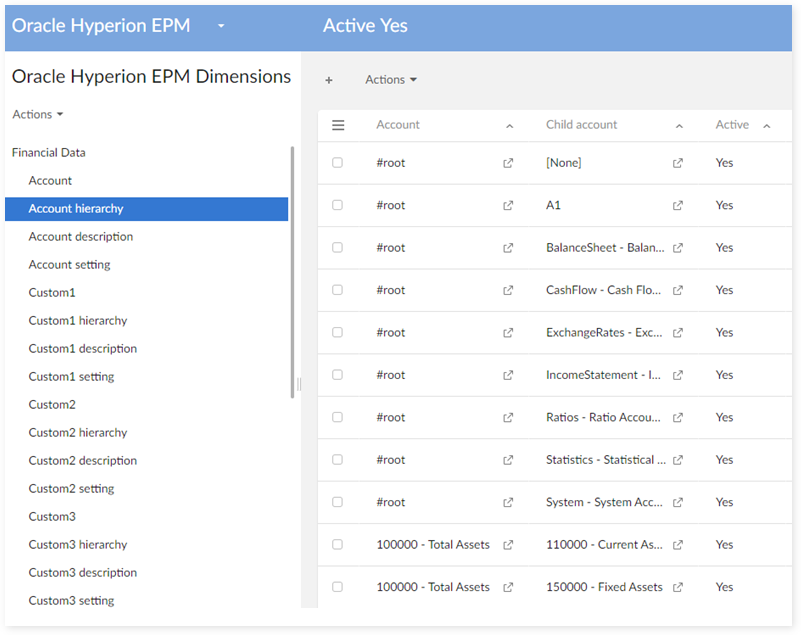
The active view is used on each table hierarchy for displaying only records which has 'active' value Yes or No. For example, create the view 'Active yes' for the Account hierarchy:
Step 1 : Go to Account Hierarchy table, choose View > Create a new custom view.
Step 2 : Enter the view name, owner and set view mode to Simple tabular view.
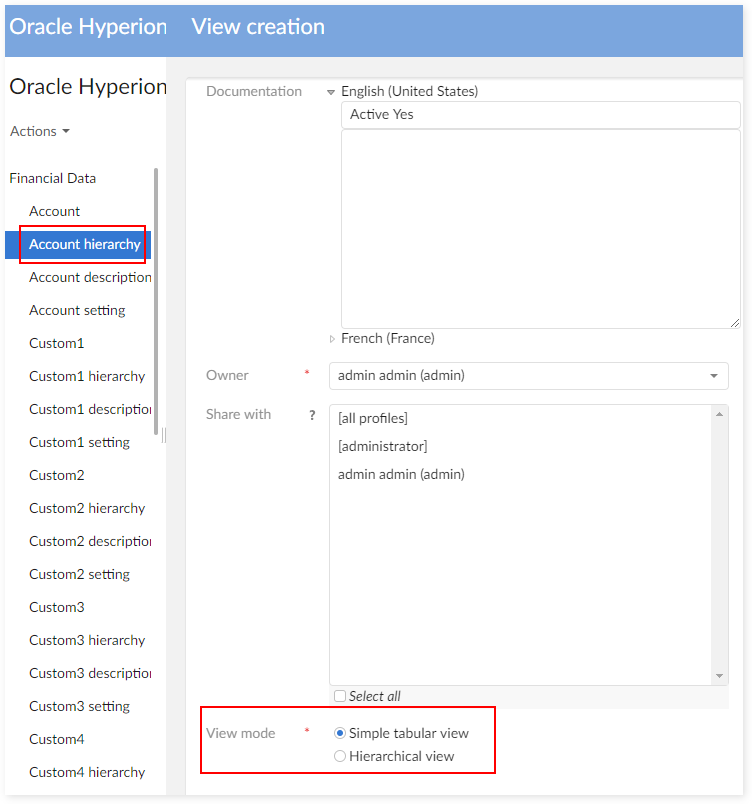
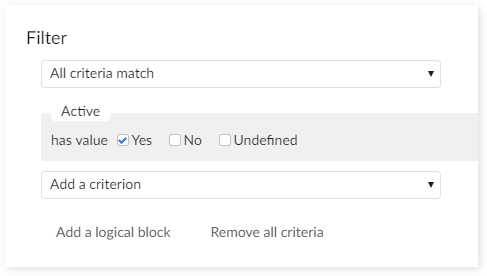
Step 3 : On Columns field, select column to display. And then, on Filter field, add new criterion.

Step 4 : Select Field 'Active', Operator '=', Value 'Yes'.
Step 5 : Click on Create and apply button to create the view.
Adding custom dimension
From the EBX® Add-on for Oracle Hyperion EPM 1.5.0 version, it is possible to add any bespoke custom dimension. The process to configure a new custom dimension is described below.
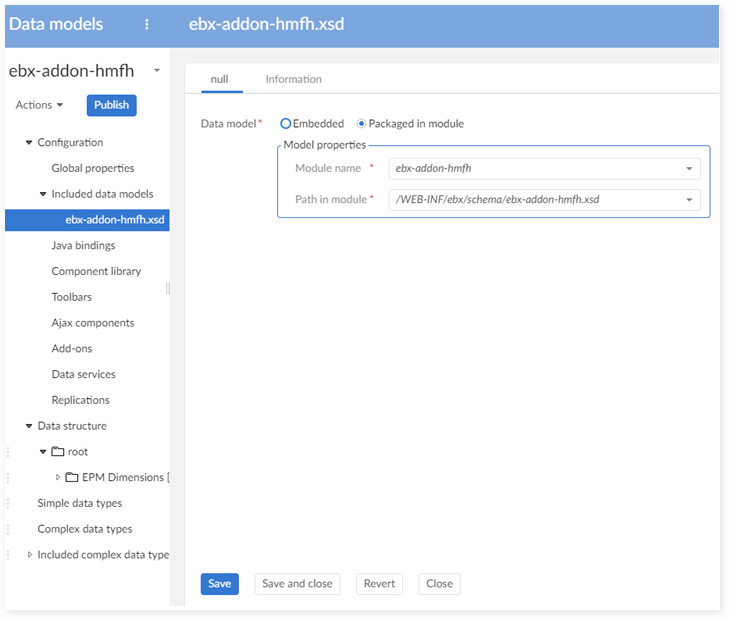
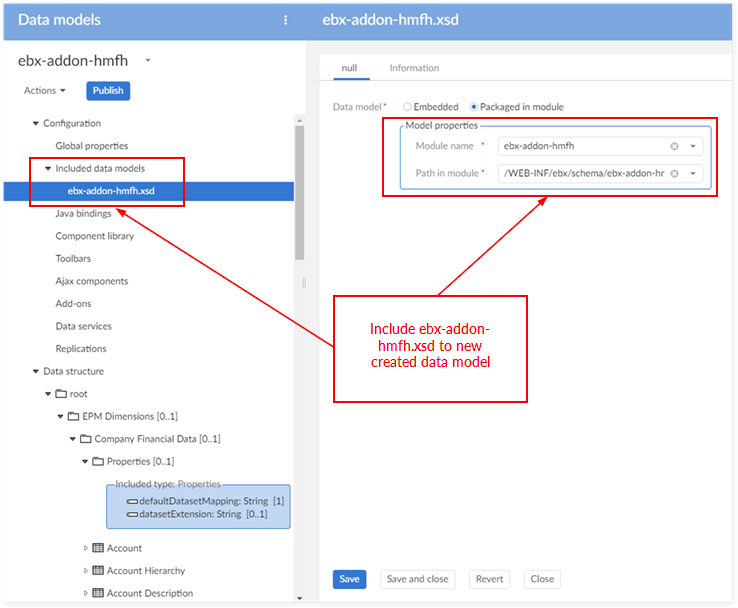
To create an extension model, create a new data model and import the 'includedHyperion.xsd' file. The model populates with Oracle Hyperion EPM dimension tables. After importing, you can publish the model to add any bespoke custom dimension.
Step 1: create a new data model and include the 'ebx-addon-hmfh.xsd data model'.
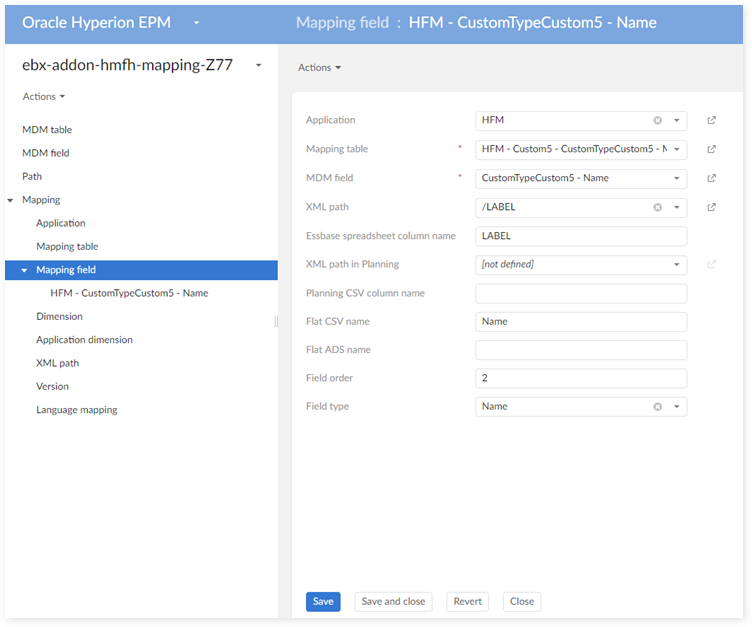
Step 2: add a new custom dimension, for instance 'Custom 5' of data type 'Custom'
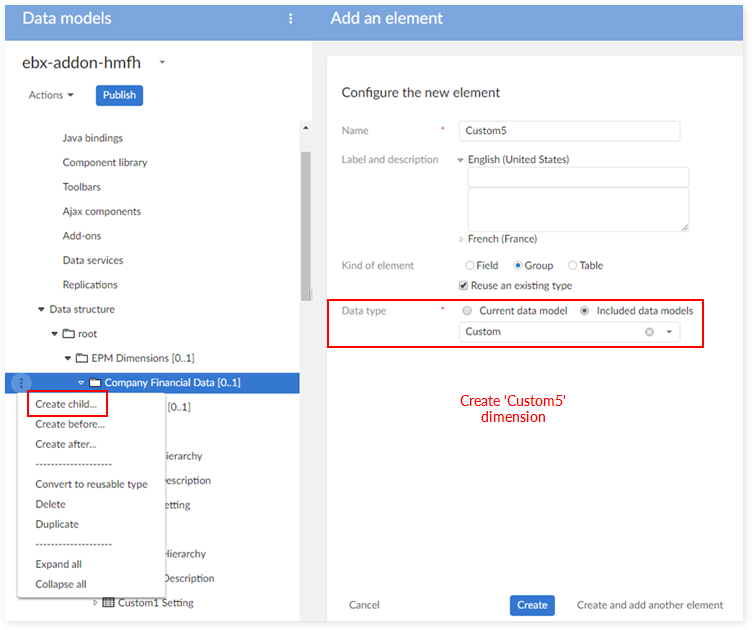
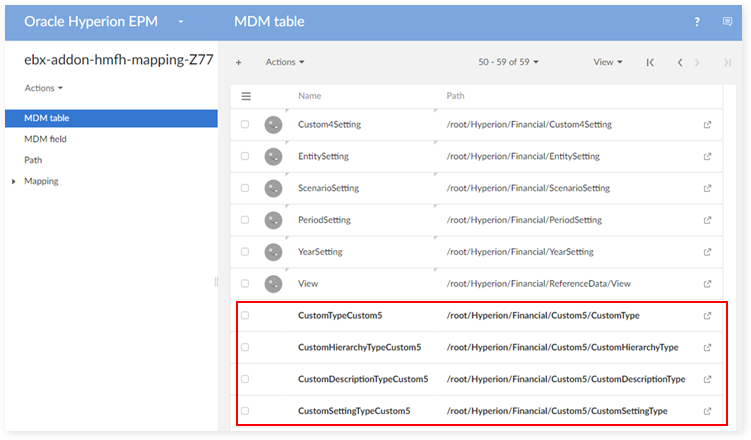
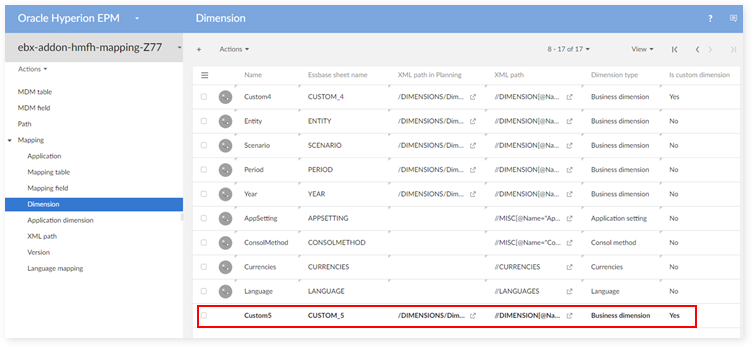
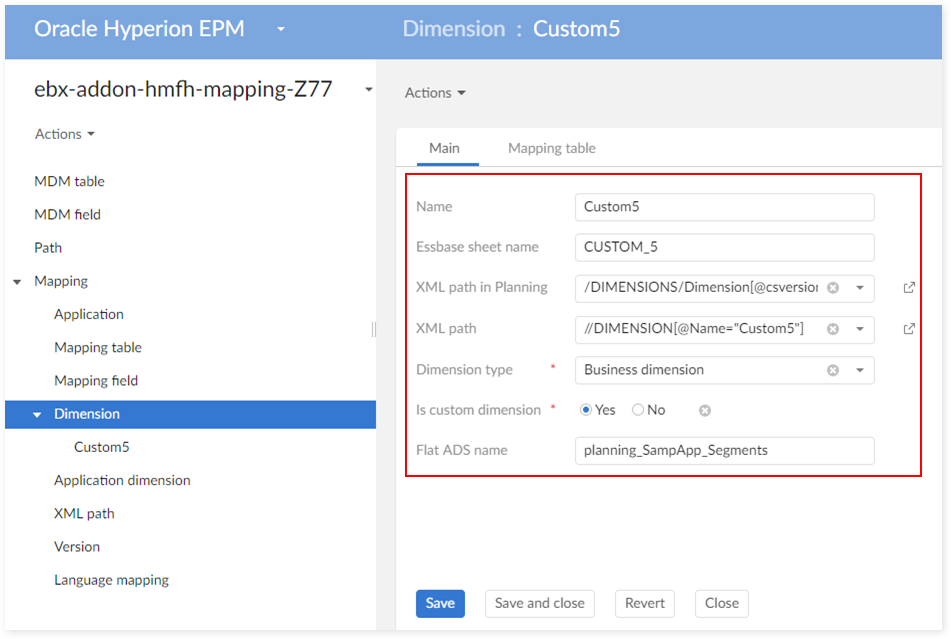
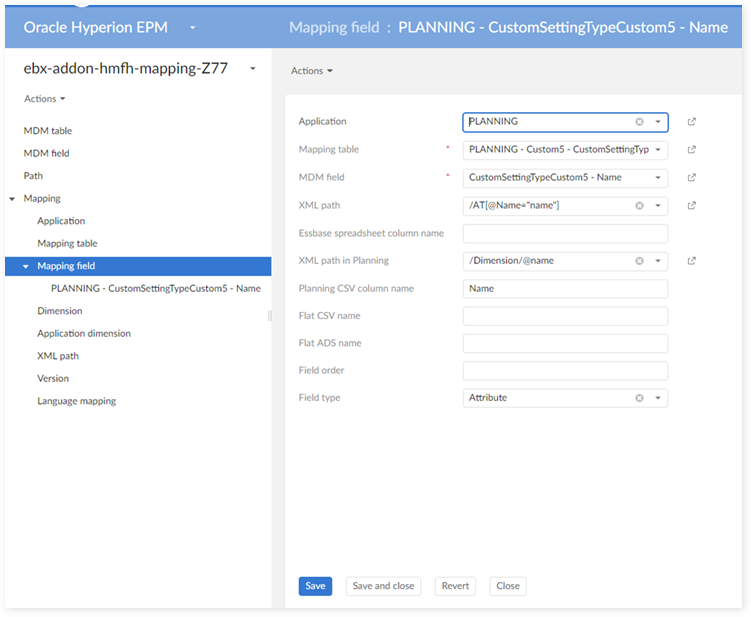
Step 3: data mapping configuration
In the 'MDM Table' table:
In the 'MDM Field' table:

In the 'Dimension' table:
In the 'Mapping table' table:
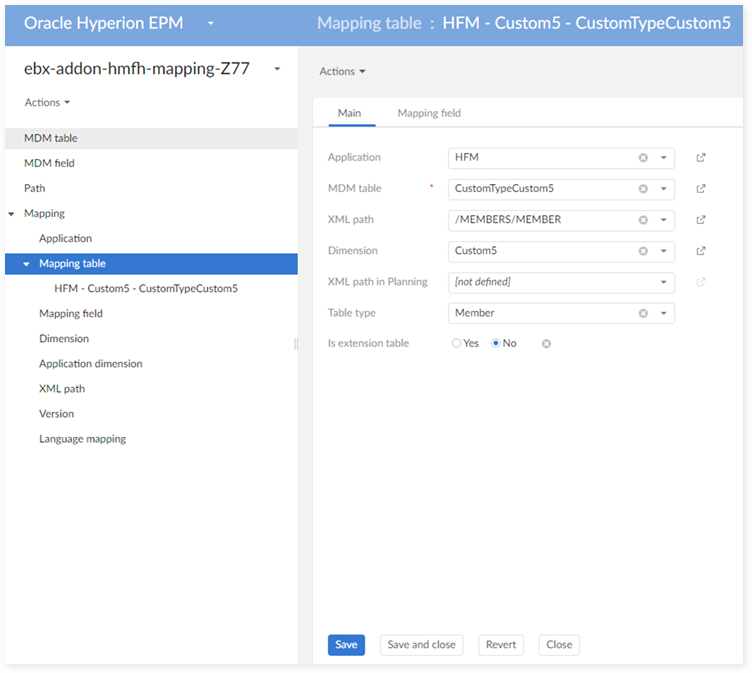
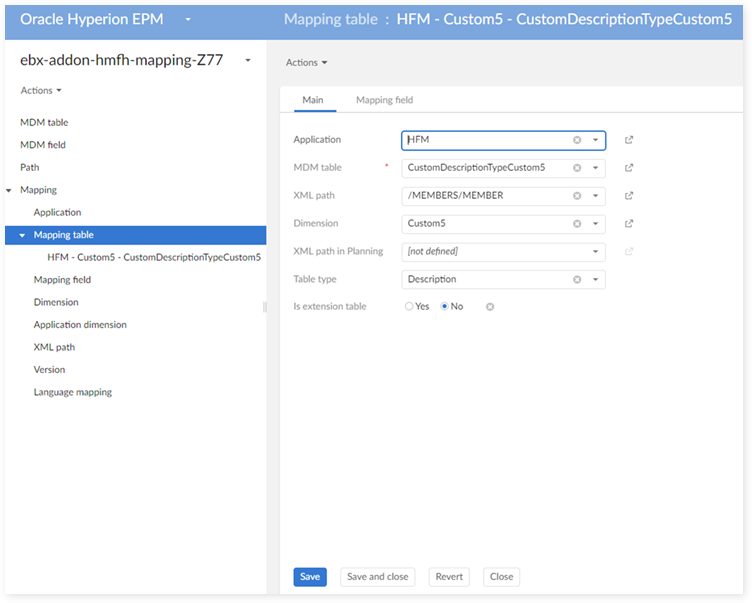
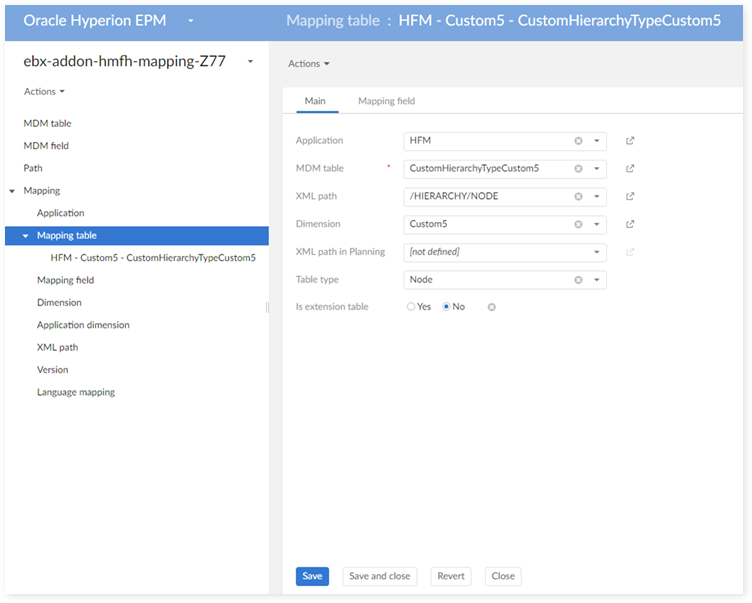
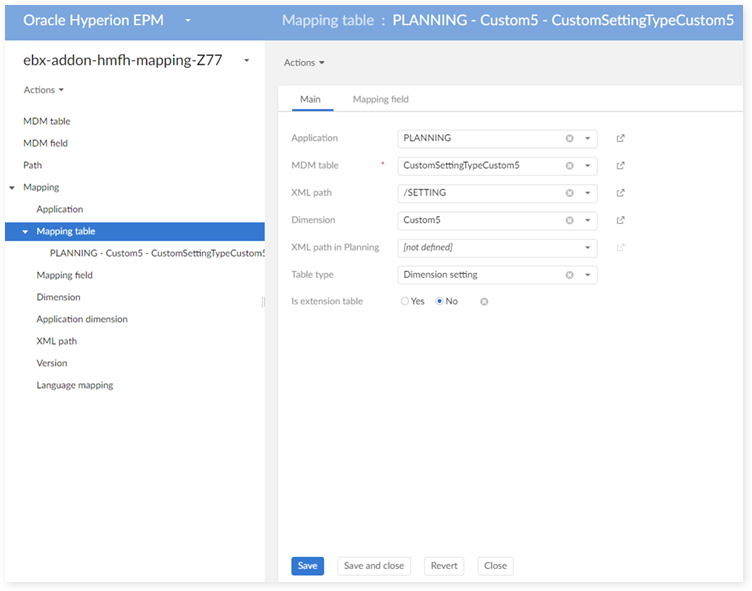
In the 'Mapping field' table:

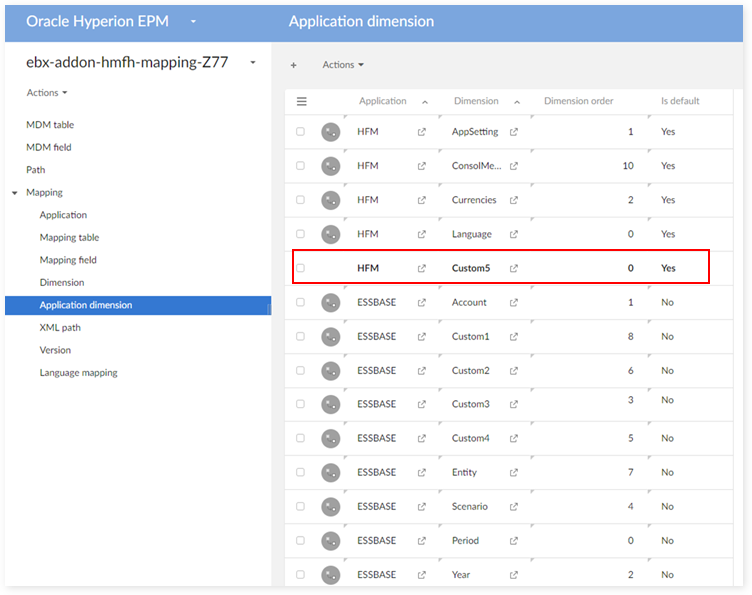
In the 'Application dimension' table:

Step 4: create Data Hierarchy view

Extension
This feature allows you to add additional fields to Oracle Hyperion EPM dimension tables. Even though the add-on integrates the data model, you can create an extension model, add a data set based on this model and perform a couple of mapping tasks to enable import/export of extension data. The following sections describe this process
Create an extension model
To create an extension model, create a new data model and import the 'sampleExtensionTemplate.xsd' file. The model populates with extension tables for each Oracle Hyperion EPM Dimensions data set table. After importing, you can publish the model and create a data set.

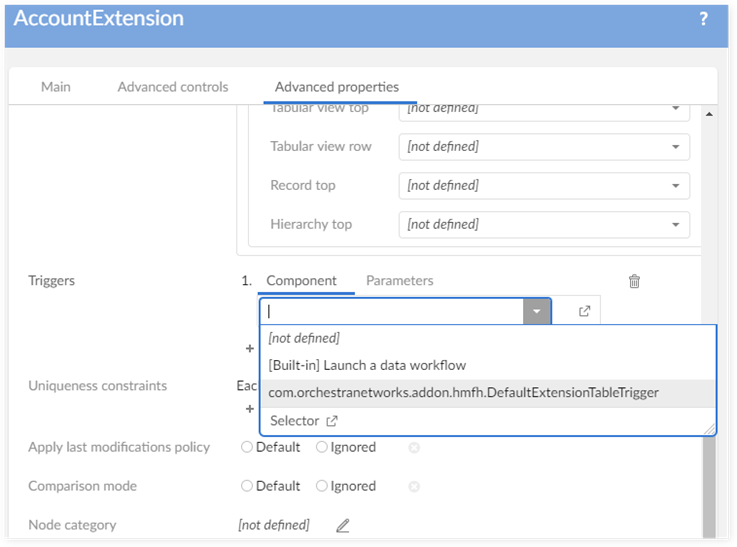
The 'com.orchestranetworks.addon.hmfh.DefaultExtensionTableTrigger' is provided for every extension table. This trigger automatically fills the primary key for an extension record when displaying in the 'Extension' tab.
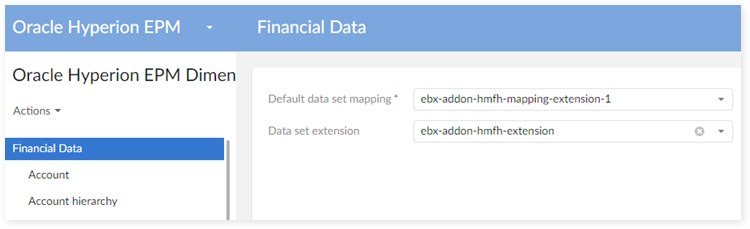
As shown below on the working dimensions data set, set the 'Data set extension' property to the extension data set you just created.
Each record now contains a new tab for the extension data:
In order to work with the extension data on this tab, you will need to add the necessary mapping in the mapping data set. The following section describes how to define the 'Default data set mapping'.
Mapping for extension model
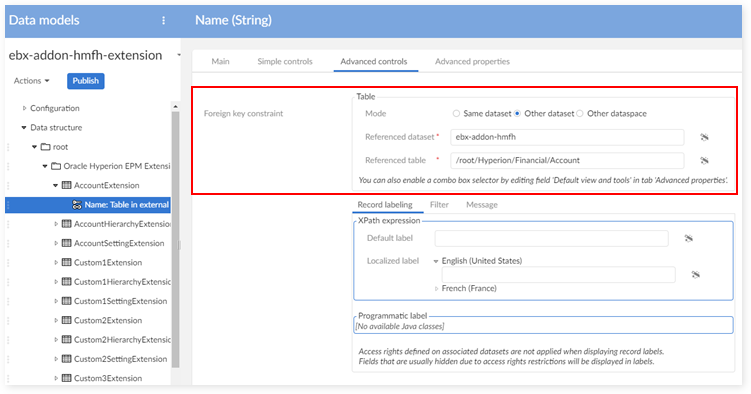
Mapping for extension tables
Firstly, you'll need to create extension data on the 'MDM table' table. As a best practice, you may want to apply the same naming convention used by the corresponding table in the data model. As shown below, you can use the path from the model for the MDM table.
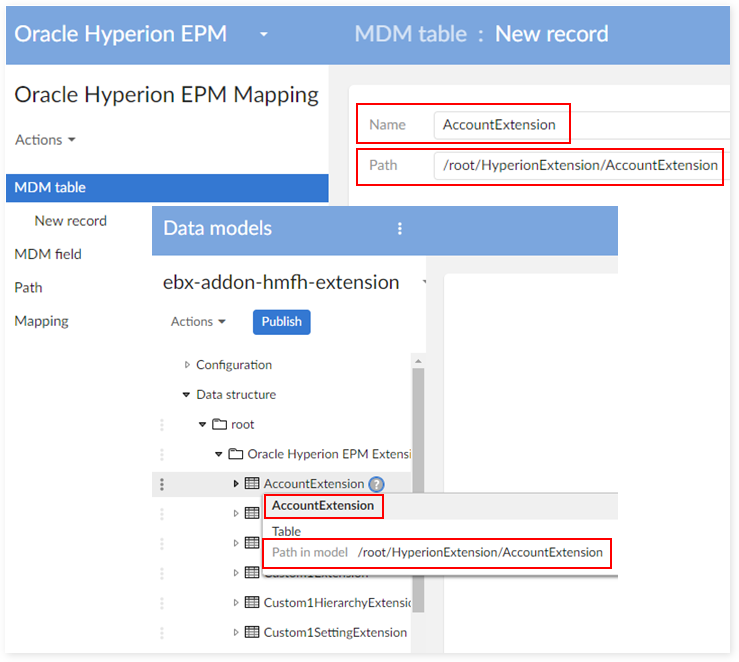
From the record detail page, you can create a 'Mapping table' for the extension table:


The value of 'Table type' and 'XML path' should be the same as the table for which you want to create the extension. For example, the 'AccountExtension' table extends the 'Account' table. So, 'Table type' and 'XML path' should be set to the same values used in the 'Account' table.
After you create the mapping data, you can use the 'Extension' tab to access the extension data.

Mapping for extension fields
In order to import/export extension data, you must define mapping data for extension fields.
You can create mapping data for extension fields from an 'MDM table' record in the mapping data set:
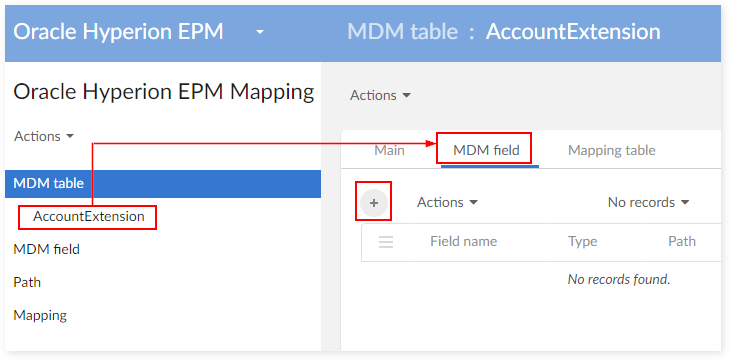
The field name and data type should be similar with those used in the data model.
The path for the MDM field can come from the extension model.

On the newly created MDM field record, create a new mapping field record, as shown below:

The XML path for the extension fields can be the same as normal attribute.

After you save and close, you can export/import the extension data using the Oracle Hyperion EPM services.
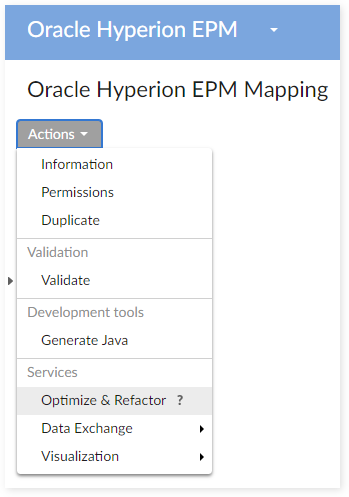
Integration with TIBCO EBX® Match and Cleanse Add-on
Configuration
In the configuration tab, the property 'Use TIBCO EBX® Match and Cleanse Add-on' must be set to 'True'. If the EBX® Match and Cleanse Add-on is not installed on your environment then it is no longer possible to configure this property.

Don't forget to import the archives for EBX Match and Cleanse Add-on before working on EPM-Matching data set. The two archives are also provided as a default configuration for EPM-Matching data set:
ebx-addon-hmfh-matching-configuration.ebx
ebx-addon-hmfh-include-daqa.ebx
Data transfer to the datasets using the EBX Match and Cleanse Add-on and opposite direction
When the 'Use TIBCO EBX® Match and Cleanse Add-on' configuration is activated, then the data space 'Oracle Hyperion EPM with Match and Cleanse Add-on metadata' is created automatically. It is used to receive the financial data from the originate data space in order to apply the cleansing and matching operations.
The data transfer from the financial data space to one use for the EBX Match and Cleanse Add-on is performed through the service 'Copy to use TIBCO EBX™ Match and Cleanse Add-on' at the level of the data set 'Oracle Hyperion EPM Dimensions'. After the execution of this process, it is possible to transfer the data into the initial data space with the service 'Copy to remove TIBCO EBX™ Match and Cleanse Add-on' at the level of the data set 'Oracle Hyperion EPM Dimensions' of the data space used for the EBX Match and Cleanse Add-on.
Service 'Copy to use TIBCO EBX® Match and Cleanse Add-on'

When the property 'Create target data space' is set to 'True', then it becomes possible to enter the name of a new target data space that will be created under the selected data space.

After the selection of the target data space, it is needed to decide how the data transfer is performed when it already exists data for the underlying data sets.

Integration with TIBCO EBX® Rules Portfolio Add-on
Migration from Hyperion rules to EBX® Rules Portfolio Add-on
Before the version 1.5.0, the data set 'Hyperion rules portfolio' was used for storing the rules configuration. From the version 1.5.0, this portfolio has been transferred into the EBX Rule Portfolio Add-on. The rules configuration is now stored in the data set 'Rules portfolio', and the former data set 'Hyperion rules portfolio' is no longer used.
When upgrading EBX® Add-on for Oracle Hyperion EPM to the version 1.5.0, it is needed to execute the migration procedure as described below. It transfers the rules configuration from the 'Hyperion rules portfolio' data set to the 'Rules portfolio' data set. The former 'Hyperion rules portfolio' data set is then deleted.
Configuration
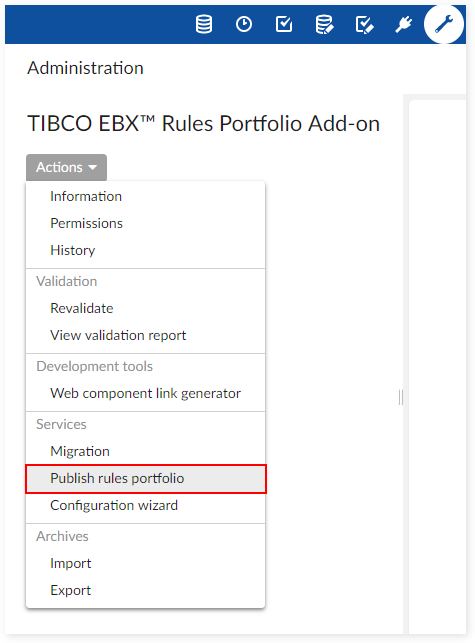
Be sure the EBX Rules Portfolio Add-on is installed and publish any rules using the 'Publish rules portfolio' service. This service is located under Administration > TIBCO EBX® Rules Portfolio Add-on > Actions.
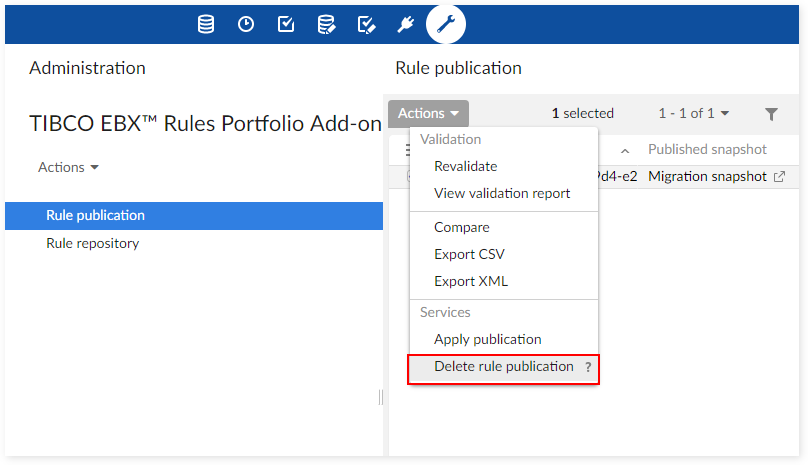
If you don't want to use all the created rules, rule publications can be deleted from Administration > TIBCO EBX® Rules Portfolio Add-on - Production > Rule publication > Actions.
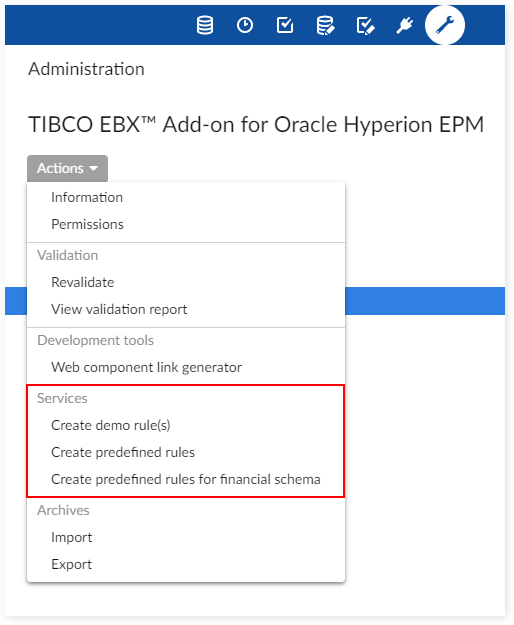
Creation of pre-defined rules
The three services shown in the following image allow you to create sample rules and generate predefined financial data rules. The use of these rules are not mandatory as you can use the EBX Rules Portfolio Add-on to create custom business and permission rules. See that add-on's documentation for more information.
Sample rules portfolio
No | D.E.C. | Rule Type | Name | Description |
|---|---|---|---|---|
1 | Account | Automated rule | For accounts, if Data Type is set to any value except Currency, you must set Exchange Rate Type to None | When create/modify account, if DataType is set to any value except Currency then the ExchangeRateType will be set to 'None' |
2 | Account | Automated rule | When create new account, automatically create new Custom4 member with the same name under "Source" | When create new account, automatically create new Custom4 member with the same name under "Source" |
3 | Account | Automated rule | If AccountType is REVENUE and "Submission group" not equal to 1 then automatically set "Submission group" to 1 | If AccountType is REVENUE and "Submission group" not equal to 1 then automatically set "Submission group" to 1 |
4 | Account | Manual validation rule | Only base-level accounts can be calculated | Only base account (account which doesn't have any child) can have IsCalculate = 'Y'. |
5 | Account | Manual validation rule | Account description must be defined | Account must have at least 1 description which not empty |
6 | Account | Table set rule | All account must be descendant of #root | If an account isn't descendant of #root then automatically put it under #root |
7 | Account | Validation rule | If account is intercompany account then the plug account must be defined. | If IsICP = 'Y' then the field PlugAccount must be defined. |
8 | Account | Table set rule | If AccountType is REVENUE then "Submission group" must be 1 | If AccountType is REVENUE then "Submission group" must be 1 |
9 | Custom1 | Table set rule | Custom1 having name starts with 'TX' must be child of 'TAXES' | Custom1 having name starts with 'TX' must be child of 'TAXES' |
10 | Custom2 | Manual validation rule | Descendance of Non_Prod_types must have description starts with "Non_Prod" | If a custom2 member is descendant of "Non_Prod_types" then it's description must start with "Non_Prod" |
11 | Custom3 Hierarchy | Validation rule | Child of PORTLAND must having name ends with "Portland" | Descendance of PORTLAND must having name ends with "Portland" |
12 | Entity | Validation rule | Entity default currency must be defined | Field Currency in Entity must be defined. |
Financial rules portfolio
Rule type | Rule name |
|---|---|
Automated rule | Rule 01: Custom3 needs to be created in source |
Automated rule | Rule 02: Entity must have parent 'APMMCONTRIB' |
Automated rule | Rule 02: Entity must have parent 'APMMCONTRIBDKK' |
Automated rule | Rule 03: An entity should be in APMTOWN |
Manual validation rule | Rule 04: Account end with C should be set IsCalculated as 'Yes' |
Validation rule | Rule 05: Account Description must be unique |
Validation rule | Rule 06: TopMember level of parent account should lower than or equal to TopMember level of child account |
Validation rule | Rule 06: TopMember level of parent account should lower than or equal to TopMember level of child account - Update |
Manual validation rule | Rule 08: New validation account should be placed both in ValidsubX and in ValidationX |
Manual validation rule | Rule 09: Custom1 member must has child which matches regular expression |
Automated rule | Rule 10: The activity should be also placed in Custom2 under ICBASS |
Automated rule | Rule 11: If entity has userdefined1 marked with X-CloA, X-CloE or X-CloI, change description to "CLOSED:" + entity description |
Manual validation rule | Rule 12: The description of entity, which has userdefined1 with format X-CloA, X-CloE or X-CloI, must start with "CLOSED:" |
Validation rule | Rule 13: Value of field "Plug account" must end with "P" |
Validation rule | Rule 14: When account end with '9', value of field IsICP should be "Y" or "R" |
Validation rule | Rule 15: When account end with '9', field ICP Top Member should be defined |
Validation rule | Rule 16: All accounts descendants of 1_PL should start with 1 |
Validation rule | Rule 17: All accounts descendants of 2_ASSETS should start with 2 |
Validation rule | Rule 18: All accounts descendants of 3_LIABILITIES should start with 3 |
Manual validation rule | Rule 19: Base accounts should also exist under 1_PL_ML |
Manual validation rule | Rule 19: Base accounts in Helios data set should exist under 1_PL |
Manual validation rule | Rule 20: Account type of descendants of 1_PL should be REVENUE |
Validation rule | Rule 20: Account type of descendants of 1_PL should be REVENUE |
Validation rule | Rule 20: The value of field "Account type" of 1_PL and its descendants member should be REVENUE |
Manual validation rule | Rule 21: Account type of descendants of 2_ASSETS should be ASSET |
Validation rule | Rule 21: Account type of descendants of 2_ASSETS should be ASSET |
Validation rule | Rule 21: The value of field "Account type" of 2_ASSETS and its descendants member should be ASSET |
Manual validation rule | Rule 22: Account type of descendants of 3_LIABILITIES should be LIABILITY |
Validation rule | Rule 22: Account type of descendants of 3_LIABILITIES should be LIABILITY |
Validation rule | Rule 22: The value of field "Account type" of 3_LIABILITIES and its descendants member should be LIABILITY |
Validation rule | Rule 24: [Update] Field "Enable Custom X Aggregation" of all accounts descendants of 1_PL or 2_BS should be YES |
Validation rule | Rule 24: Field "Enable Custom X Aggregation" of all accounts descendants of 1_PL or 2_BS should be YES |
Validation rule | Rule 25: [Update] Custom1 Top member must be defined |
Validation rule | Rule 25: Custom1 Top member must be defined |
Manual validation rule | Rule 26: Account ends with T but not start with 'TE' must have children. |
Validation rule | Rule 27: [Update] Custom3 Top member must be defined |
Validation rule | Rule 27: Custom3 Top member must be defined |
Automated rule | Rule 28: Field Enable Data Audit of account must be set as FALSE |
Manual validation rule | Rule 29: Account description must be defined |
Automated rule | Rule 30: Field Security Class of entity should be set as "E-" + entity name |
Manual validation rule | Rule 31: Base members should be present as descendant of BASS, TotAct, HSF |
Automated rule | Rule 32: Field Security Class of all custom1 which is descendant of parent with 3 character, should be set as "C1-" + name of 3 character parent name |
Automated rule | Rule 33: Automatically set "Exchange rate type" to None |
Validation rule | Rule 34: If account is intercompany account then the plug account must be defined. |
Validation rule | Rule 35: Entity default currency must be defined |
Rules for financial schema
No | D.E.C. | Rule Type | Name | Description |
|---|---|---|---|---|
1 | Account | Manual validation rule | IsCalculated field must be defined in Account table | Requires the Account table's IsCalculated field to have a value. |
2 | Custom1 | Manual validation rule | IsCalculated field must be defined in Custom1 table | Requires the Custom1 table's IsCalculated field to have a value. |
3 | Custom2 | Manual validation rule | IsCalculated field must be defined in Custom2 table | Requires the Custom2 table's IsCalculated field to have a value. |
4 | Custom3 | Manual validation rule | IsCalculated field must be defined in Custom3 table | Requires the Custom3 table's IsCalculated field to have a value. |
5 | Custom4 | Manual validation rule | IsCalculated must be defined in Custom4 table | Requires the Custom4 table's IsCalculated field to have a value. |
6 | Custom1 | Manual validation rule | SwitchSignForFlow field must be defined in Custom1 table | Requires the Custom1 table's SwitchSignForFlow field to have a value. |
7 | Custom2 | Manual validation rule | SwitchSignForFlow field must be defined in Custom2 table | Requires the Custom2 table's SwitchSignForFlow field to have a value. |
8 | Custom3 | Manual validation rule | SwitchSignForFlow field must be defined in Custom3 table | Requires the Custom3 table's SwitchSignForFlow field to have a value. |
9 | Custom4 | Manual validation rule | SwitchSignForFlow field must be defined in Custom4 table | Requires the Custom4 table's SwitchSignForFlow field to have a value. |
10 | Custom1 | Manual validation rule | SwitchTypeForFlow field must be defined in Custom1 table | Requires the Custom1 table's SwitchTypeForFlow field to have a value. |
11 | Custom2 | Manual validation rule | SwitchTypeForFlow field must be defined in Custom2 table | Requires the Custom2 table's SwitchTypeForFlow field to have a value. |
12 | Custom3 | Manual validation rule | SwitchTypeForFlow field must be defined in Custom3 table | Requires the Custom3 table's SwitchTypeForFlow field to have a value. |
13 | Custom4 | Manual validation rule | SwitchTypeForFlow field must be defined in Custom4 table | Requires the Custom4 table's SwitchTypeForFlow field to have a value. |
14 | Custom1 hierarchy | Automated rule | Set default value for AggregationWeight field in Custom1 hierarchy table | Sets the default value for the AggregationWeight field in the Custom1 hierarchy table. |
15 | Custom2 hierarchy | Automated rule | Set default value for AggregationWeight field in Custom2 hierarchy table | Sets the default value for the AggregationWeight field in the Custom2 hierarchy table. |
16 | Custom3 hierarchy | Automated rule | Set default value for AggregationWeight field in Custom3 hierarchy table | Sets the default value for the AggregationWeight field in the Custom3 hierarchy table. |
17 | Custom4 hierarchy | Automated rule | Set default value for AggregationWeight field in Custom4 hierarchy table | Sets the default value for the AggregationWeight field in the Custom4 hierarchy table. |
Known limitations
Error management
When using the add-on export and import procedures on a data set containing a significant number of integrity errors (more than ~100), the add-on cannot fix these errors automatically. It is recommended to fix them in EBX® before using the Hyperion import and export procedures.
Migration procedures
Actions on duplicated data sets when restoring are not supported.
There is not an option to decide whether to restore, or backup data set mappings.
Tracking restore traceability is not supported.