Import and export procedures
- Data formats
- Information order when exporting data
- Import procedure
- Choose data set mapping
- Import with deletion or not
- Update dimension and field order
- Using TIBCO EBX® Add-on for Oracle Hyperion EPM - Logging
- Automatic Hyperion application detection
- Selecting a dimension for the EBX® hierarchical view
- Choose delimiter (for ADS only)
- Action for import missing value
- Run in background
- Import result
- Export procedure
- Import and export when using extension data models
- Export from multiple nodes on the hierarchy view
Data formats
This table highlights the different formats of data accepted for import and export procedures.
Application | Procedure (format) | Source -> Target |
|---|---|---|
HFM | Import (XML, XLSX) | XML (id=hfm)-> EBX® XLS/XLSX->XML (id=hfm)->EBX® |
Export (XML, XLSX, CSV) | EBX®-> XML (id=hfm) EBX®-> XML (id=hfm)->XLSX EBX®-> XML (id=hfm)-> CSV | |
Essbase | Import (XML, XLSX) | XML (id=essbase)->EBX® XLS/XLSX->XML (id=essbase)->EBX® |
Export (XML, XLSX) | EBX®->XML (id=essbase) EBX®->XML (id=essbase)-> XLSX | |
Planning | Import (XML) | XML (planning) -> XML (id=planning)->EBX® |
Export (XML, CSV) | EBX® -> XML (id=planning) -> XML(planning) EBX® -> XML (id=planning) -> CSV(planning) | |
EPMA | Import (XML, ADS) | XML (id=epma) -> EBX® ADS -> XML (id=epma) -> EBX® |
Export (XML, ADS) | EBX® -> XML (id=epma) EBX® -> XML (id=epma) -> ADS |
Note: XML (id= application code ) is the HFM XML data schema that the add-on reuses as an internal pivot format.
Information order when exporting data
With Hyperion products, it is important to ensure that order of information in export file follows some key principles that are described in this section.
Nodes hierarchy order
The order of nodes in the EBX® data hierarchies follows one kept during the import procedure. The order in the export file follows one of the data hierarchy.
Dimensions and fields order
The order of dimensions and fields are saved in the dataset mapping information during the import procedure: see 'Mapping field' and 'Application dimension' tables, fields 'Dimension order' and ' Field order' respectively.
The order generated by the export procedure follows the order saved during the import. Consequently, the dataset used to get the data mapping configuration during the import time should be the same of one used at export time.
When the order value is 'null' for a field, it means that the field is located at the end of the list. For example, the fields 'Default parent' and 'Description' are systematically located in last position.
Records order
The order of fields and dimensions are saved in the dataset mapping information during the import procedure.
The export order is built by following the nodes data hierarchy order.
Example:
In EBX® data hierarchy for Account dimension:
LEGAL
AE07
AE0700
AE08
AE0800
AE0700
Then the order of members in the XML export file is as follows:
1. LEGAL
2. AE07
3. AE0700
4. AE08
5. AE0800
The duplicate one 'AE0700' is put only one time in the XML export file.
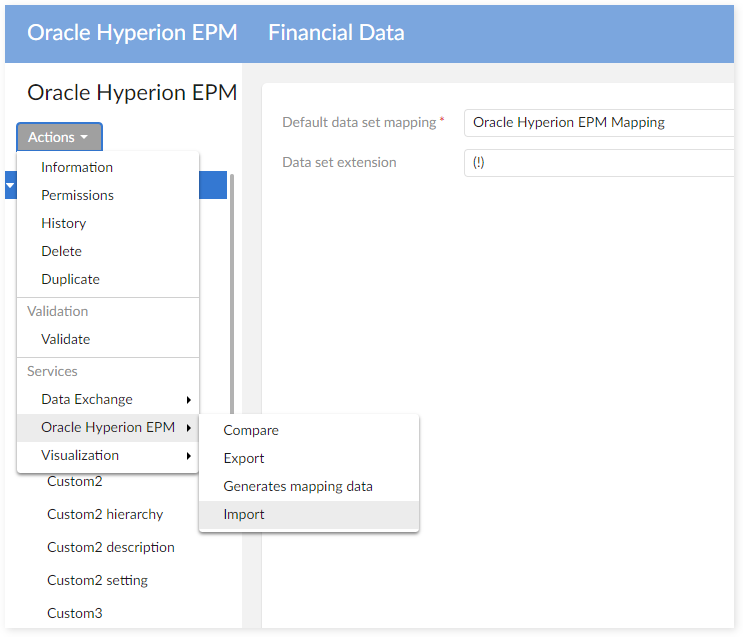
Import procedure
This procedure imports data from a Hyperion application into the EBX® repository.
In the user interface, it can be accessed from the navigation pane by selecting Oracle Hyperion EPM then using the Services menu.
Choose data set mapping
Select the dataset to use for the data mapping configuration. It is possible to configure different data mappings and then selecting one when importing data.
The add-on automatically ignores this step if there is only one dataset mapping.
Import with deletion or not
The following options are available when importing data from Hyperion into the EBX® repository:
Import : does not delete existing data. Only create and update operations are enforced against the current EBX® repository.
Delete all before import : EBX® tables related to dimension with relations are cleaned before importing data. It means that those tables are not removed: ICP, Security Class, Currency, View, Alias.
Update dimension and field order
When importing data, you can decide to keep the ordering of dimensions and fields based on the imported file and reuse this order when re-exporting the file. This information is stored as the field 'Field order' in the table 'Mapping Field' and the field 'Dimension order' in the table 'Application Dimension' in the Administrative Data domain.
These fields can be manually changed to set a different order for an exported file. During normal use of the add-on, this modification is not required. In most situations, the order of dimensions and fields provided by the imported file can be reused for the exported file.
Using TIBCO EBX® Add-on for Oracle Hyperion EPM - Logging
When this option is activated, the add-on logs the data mapping execution to facilitate debugging operations when data mapping configuration is on failure ( see Appendix - Data mapping logging).
Automatic Hyperion application detection
After selecting the file to import, the system automatically identifies the source Hyperion application. If this identification fails, the import procedure stops. This could occur if the application header in the file is not an expected application name, the XML encoding is incorrect, or the Excel file is not recognized.
Selecting a dimension for the EBX® hierarchical view
Based on the Hyperion application detected, the add-on displays all possible dimensions that can be imported. One or multiple dimensions may be selected. Special dimensions that are driven by the main dimensions are not displayed, but are managed automatically by the add-on. This is the case for the dimensions ICP, Security Class, Currency, View, Alias.
Choose delimiter (for ADS only)
This option only displays when importing an ADS file. In version 1.6.0 only the pipe ( | ) delimiter is supported.
Action for import missing value
When importing data to EBX®, missing values can be managed in different ways. The possible choices are displayed depending on the 'Action for import missing value' configuration in the 'TIBCO EBX® Add-on for Oracle Hyperion EPM' data space (located in the EBX® Administration tab).
Run in background
The option 'Run in background' allows to launch the import procedure in asynchronous mode. The user is notified by email with the result as highlighted below.
Please refer to the installation section to get further information about email configuration.
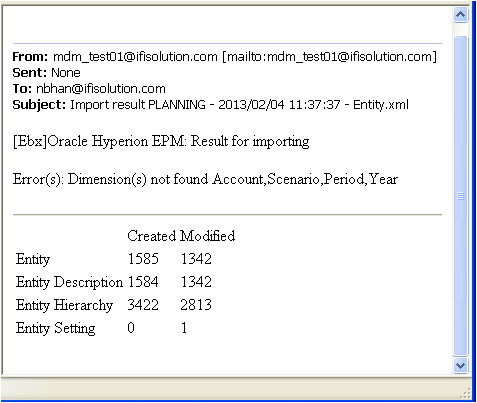
Import result
After running an import, a report UI is provided showing the number of creations and updated records for each table. The full import result is saved in a dedicated data set named 'Oracle Hyperion EPM Report'.
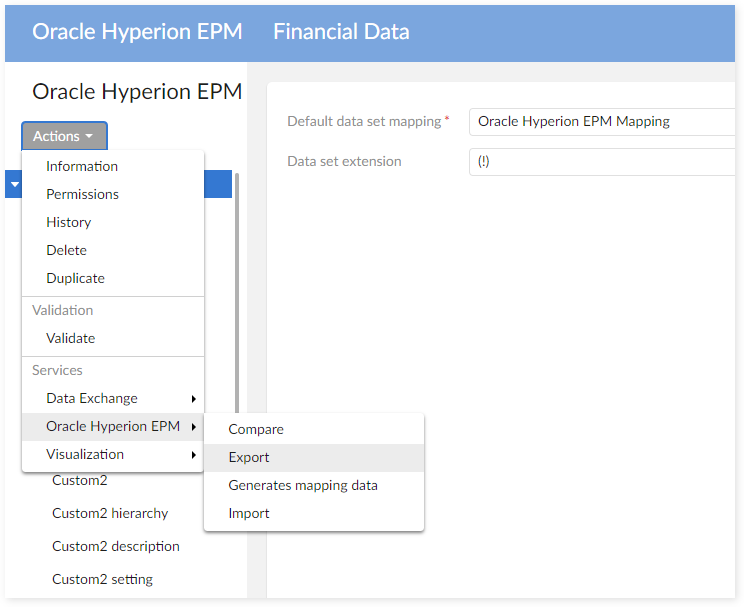
Export procedure
This procedure exports data from the EBX® repository into Hyperion applications.
In the user interface, it can be accessed from the navigation pane by selecting Oracle Hyperion EPM then using the Services menu.
Choose data set mapping
Select the dataset to use for the data mapping configuration. It is possible to configure different data mappings and then selecting one when exporting data.
The add-on automatically ignores this step if there is only one dataset mapping.
Export type
The following options are available when exporting from the EBX® repository into Hyperion:
Export: export all data.
Export with filtering: export all data except fields that have an 'is filtering' value of 'true' in the table 'MDM field' of the Administrative Data domain. The following fields cannot be filtered: primary key (name), default parent, description.
Using TIBCO EBX® Add-on for Oracle Hyperion EPM - Logging
When this option is activated, the add-on logs the data mapping execution to facilitate debugging operations when data mapping configuration is on failure (see Appendix - Data mapping logging).
Hyperion application selection
The user selects one Hyperion application at a time for which to perform an export. When selecting an application, such as HFM or Essbase, the user can choose which dimensions of the application to export to.
When several export file formats are possible for a given application, the user can select one or multiple targeted formats. The file formats that can be exported to depend on the destination application.
Advanced properties
The available choices depend on how the 'TIBCO EBX® Add-on for Oracle Hyperion EPM' data space (located under the 'Administration' tab) is configured. Default values are retrieved from this configuration.
When you use the ADS export, specific choices are available to drive data mapping:
Flat ADS version: sets the ADS file version (default value '1.0').
Selection of the sections to export into the ADS file. Three mandatory sections are systematically selected and cannot be removed: 'Dimensions', 'DimensionAssociations', and 'Hierarchies'. The 'Members' and 'PropertyArray' sections are optional.
When you select one or more additional sections and click 'Export', the system moves to the 'Export - Preference' screen (see details in Appendix - Migration and Back-up procedures). This screen allows you to set the compatible section for fields collected from the 'Mapping field' table in the 'Oracle Hyperion EPM Mapping' data set. These fields are the fields mapped for 'Member' and 'Description' tables. The fields with the field types 'Name' or 'Description - Language' are not displayed in this list.
Run in background
The option 'Run in background' allows to launch the export procedure in asynchronous mode. The user is notified by email with the result (see figure below).
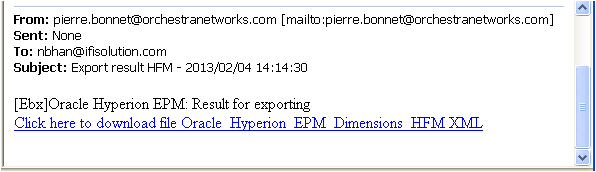
Please refer to the installation section to get more information about email addresses configuration.
Export result file
For each application selected for export, a downloadable f ile is generated using the naming convention "<data set name>-< applicationName>-<date>-<time> ".
For the Essbase application, only the dimensions themselves are exported. Other tables related to the configuration, such as 'Currency', 'Appsettting', and 'Consolmethod' are not exported because the Excel template does not handle them. The ability to export these tables may be added in future releases of the add-on.
The full export result is saved in a dedicated data set named 'Oracle Hyperion EPM Report'.
Import and export when using extension data models
Configuring a mapping extension
Step 1 : Create a new data set corresponding to your extended data model. This model must declare the tables and foreign keys that allow the system to integrate it with the core EPM financial data. Please refer to the 'sampleExtensionTemplate.xsd' sample.
For example, the 'Account' dimension can be extended by three tables in the extended data set: 'Account extension', 'Account hierarchy extension' and 'Account setting extension'.
A table used as an extension must have an atomic primary key that is configured as a foreign key. The foreign key points to the related main table in the financial data set.
The extended data set could be any data set in the 'EBX® Add-on for Oracle Hyperion EPM' data space except any previously created by the add-on: 'Oracle Hyperion EPM Dimensions', 'Oracle Hyperion EPM Mapping' and 'Oracle Hyperion EPM Report' and their potential children.
Data model extension is possible for the 'Member', 'Hierarchy' and 'Setting' tables. The 'Description' table cannot be extended.
Special notation: | |
|---|---|
| The extended data set cannot be configured to link to a dedicated Oracle Hyperion EPM financial data set. The link is declared in your extended data set at the modeling level. If you need to handle different extended data sets to different Oracle Hyperion EPM financial data set, you must duplicate the data model and configure the foreign keys accordingly. In such case, you will no longer benefit from the inheritance features for the extended data model. |
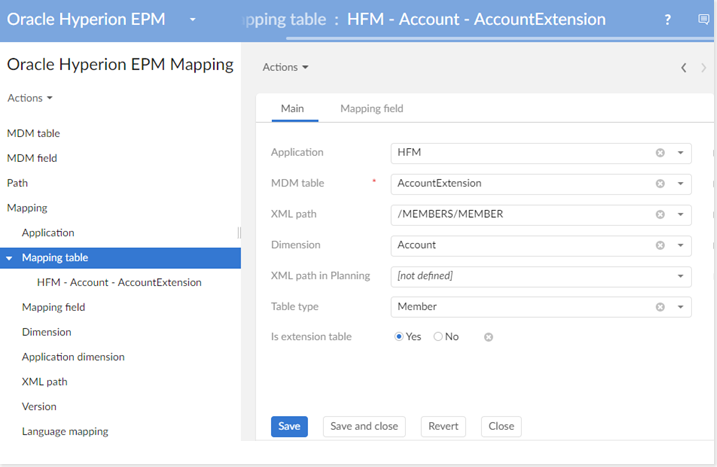
Step 2: Configure the MDM table(s) and MDM field(s) in the Oracle Hyperion EPM Mapping as illustrated in the following figure.


Step 3 : Configure the data mapping.
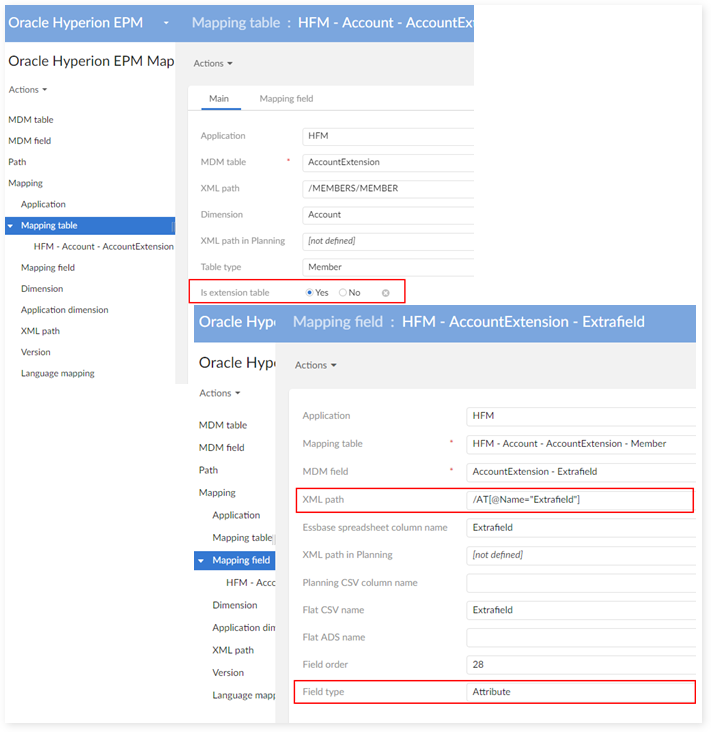
Import file when using extension data models
In order to import a file containing extended information, it is necessary to enrich the 'Mapping table' with the configuration of the extended tables and fields. The property 'Is Extension Table' is then set to 'True'.
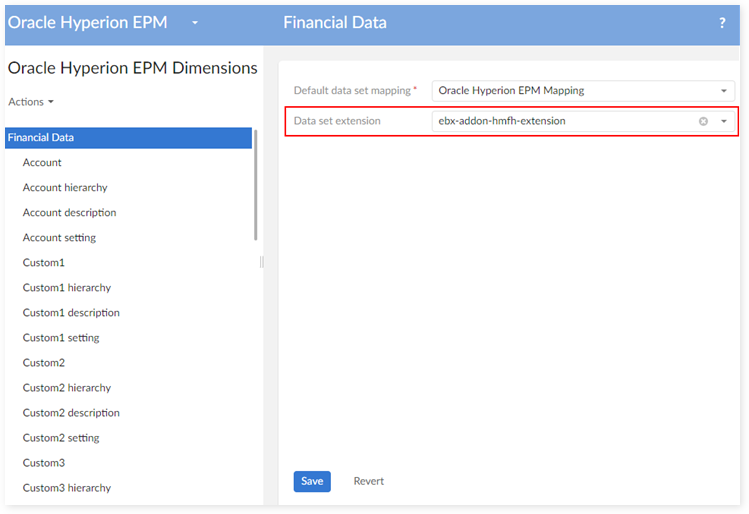
In the properties available at the level of the 'Financial data' group, the 'Data set extension' is selected to import the data related to the extended tables and fields.
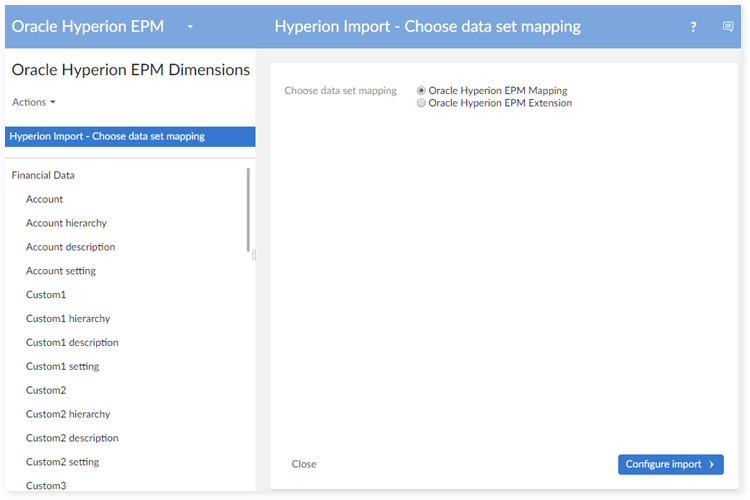
During the import procedure, select the data set mapping that contains the mapping for the extended tables and fields, as illustrated below:
Export file when using extension data models
During the export procedure, the selected 'Data set extension' is used. As explained for the import procedure (see previous section), it is defined as a property at the level of the 'Financial data' group.
If the 'Data set extension' is 'not defined' then the export of extended tables and fields is not applied.
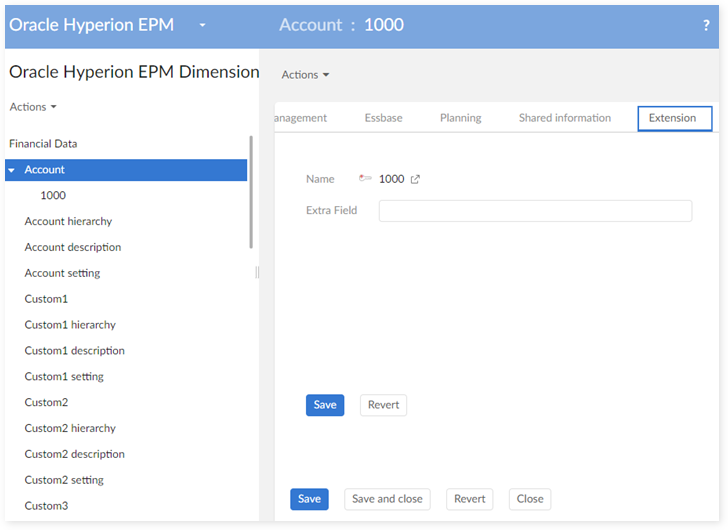
Displaying extension information
The extension data is displayed through the 'Extension' tab as illustrated below.
Special notation key: | |
|---|---|
| The ability to change the 'Extension' tab label is not yet implemented. |
Export from multiple nodes on the hierarchy view
Overview
This service allows user to export only nodes that they had selected themselves, instead of all nodes or all child of selected nodes.
The add-on only permits export of selected nodes. Additionally, records without relationships cannot be exported. When you try to run the service on these type of records, the following error message displays as below.

Export nodes
Navigate to the Account table under the Oracle Hyperion EPM Dimensions data set, select the desired records (except those in the 'Active unset' group).
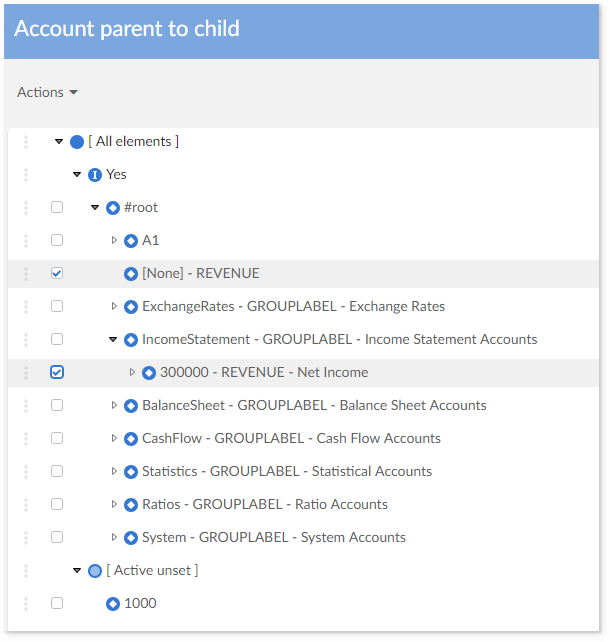
From the 'Actions' menu, run the 'Export from selected nodes' service. The system will display the 'Hyperion Export - Choose data set mapping' screen.

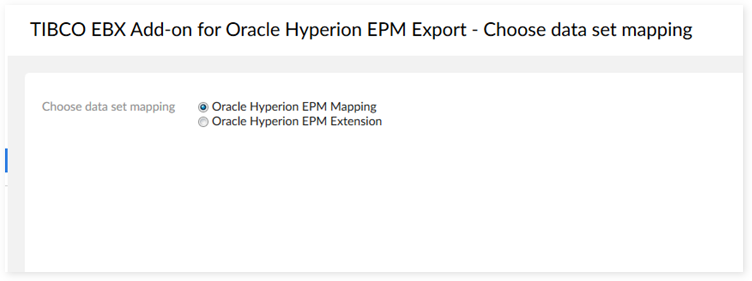
Select the data set mapping that contains the mapping data you would like to use for this export procedure, then click on the 'Configure export' button.
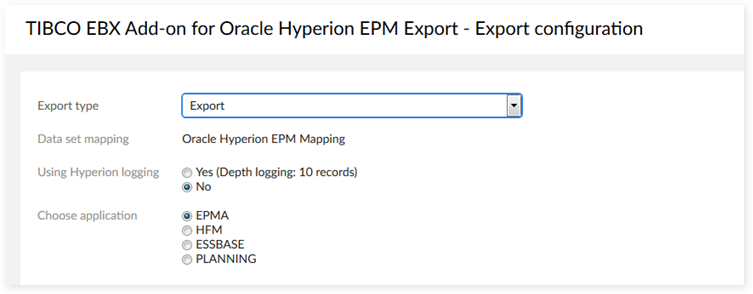
On the Export configuration page, select one application, then click on the 'Dimension' button.
The system will display the Choose dimension page. On this screen, you can select file types and customize information necessary for each type. After that, click on the 'Export' button.
The service executes and returns the Export result to allow you to download your exported files.