User interface overview
EBX® view
The default EBX® view includes three columns that display information specific to the add-on for every table record under add-on control. These three columns are State, Cluster and Cleansing.
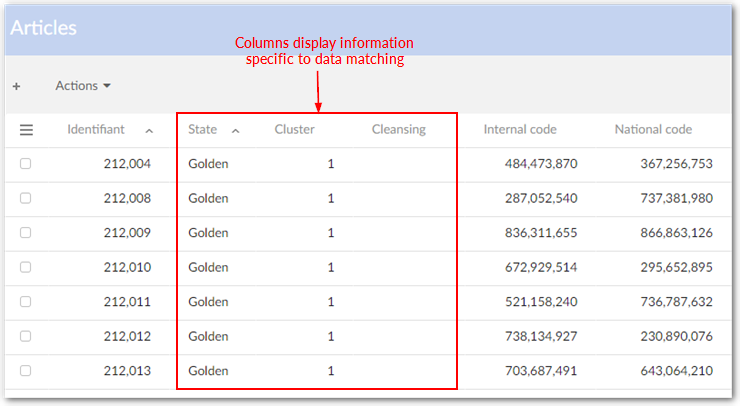
By filtering the view, it is possible to hide data and/or display specific record states, such as showing golden records only.

Accessing data quality views
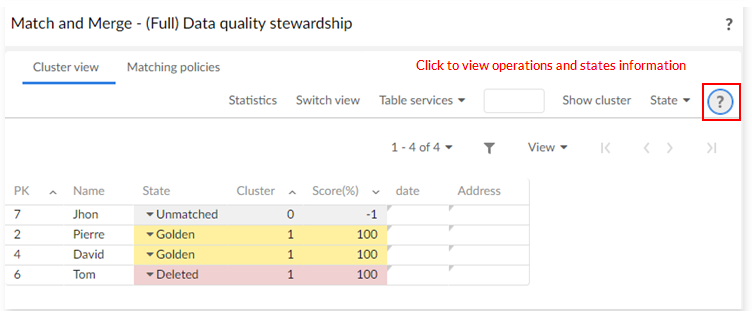
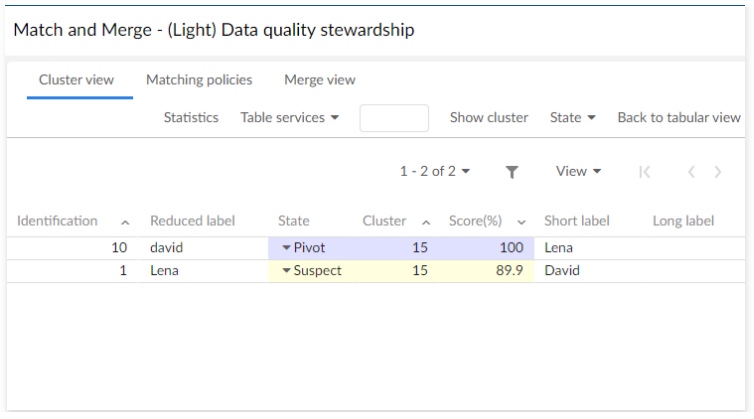
You use the Data quality stewardship service to access the light and full matching views. The view that displays depends on whether you have one, or no records selected. With a single active selection, the add-on displays (Light) Data quality stewardship view. When you do not have an active selection, the (Full) Data quality stewardship view displays.
To access the stewardship views, open the table's Actions menu and select Match and Merge > Data quality stewardship. The following images provide examples of both views:
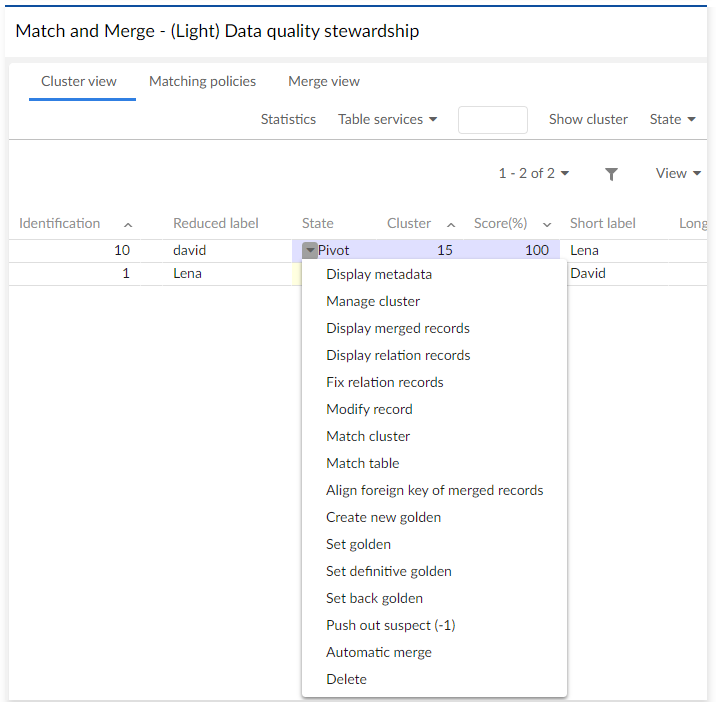
The light view is shown below:

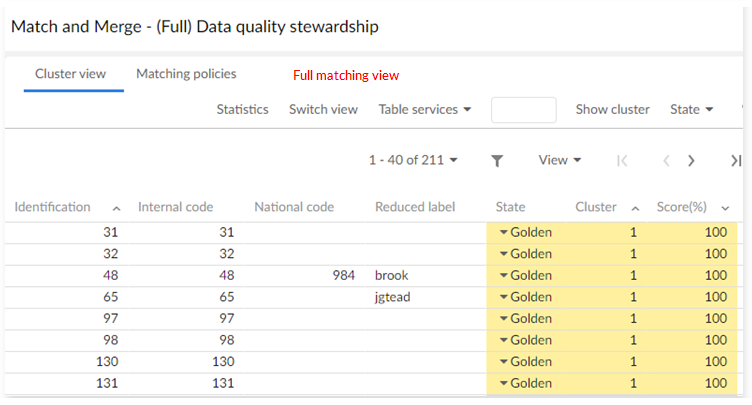
The full view is shown below:
Usability improvement
To enhance the add-on's response time, you can use one of the following options:
Choose the number of records displayed
Switch to light view instead of full view
Number of records displayed

In matching views, the number of records shown in the lists can be adapted to improve response time. If the execution platform and/or network are limited, decreasing the number of records (In case of network issue, it is also recommended to use a zip protocol to convey EBX® pages—HTML, scripts, etc.) shown can improve response time.
Switch to the light view
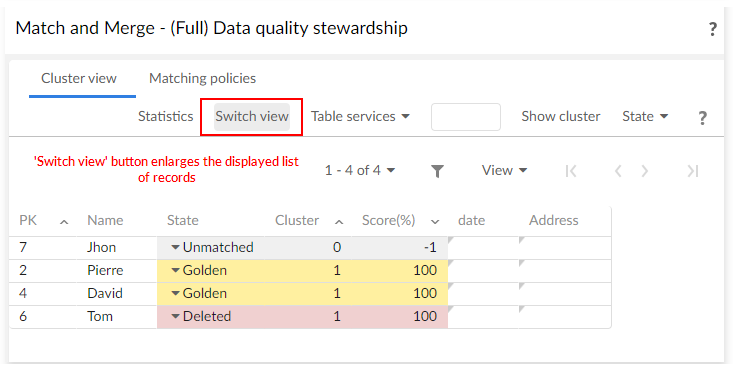
When you are in the full-view, you can use the Switch view button at any time to enlarge the displayed list of records.
Query optimization
Special notation: | |
|---|---|
| To guarantee better response time when displaying list of records that are sorted by clusters and scores, it is important to declare the right indexes on the table under add-on control. Please refer to the Installation and first configuration section for more detail. |
Online help
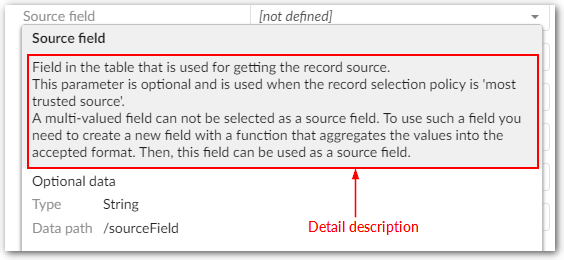
You can access context sensitive online help by clicking the ? icon next to UI components (as shown below), or by clicking the question mark icon in the top-right corner of the page.
Table

Field
Matching metadata
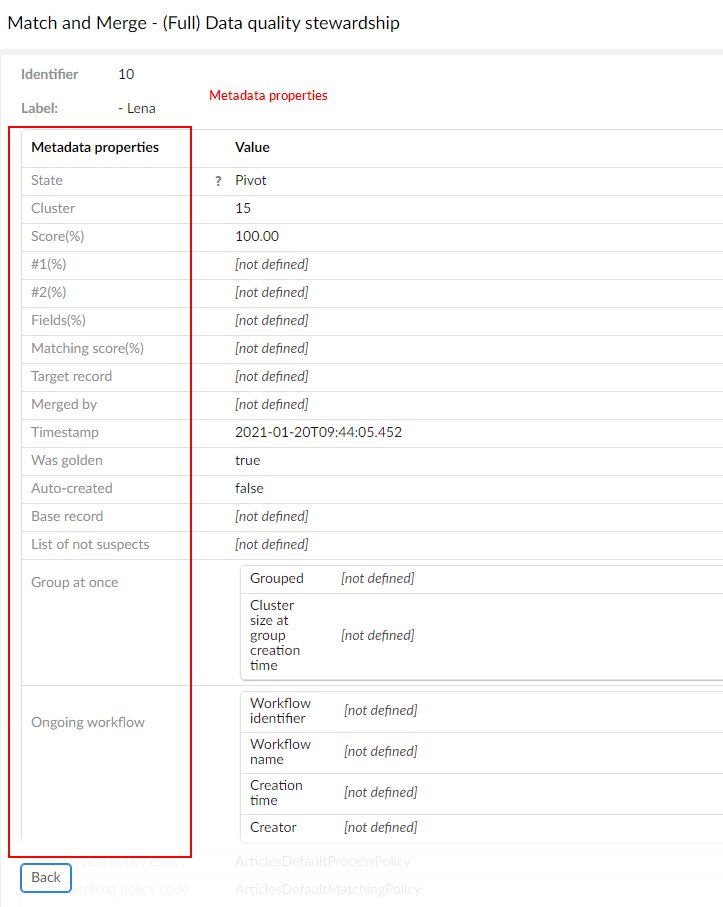
Invoking the Display metadata operation (through the stewardship light, full-view, and through the display metadata in tabular view) on a record opens a window that shows the record metadata values (tool tips are available to get help). This is illustrated below.
As an alternative to using the cluster view, you can display a table's metadata using an add-on service available in the tabular view. This service is available when a table has TIBCO EBX® Match and Merge Add-on metadata and displays when you select Actions → Match and Merge.
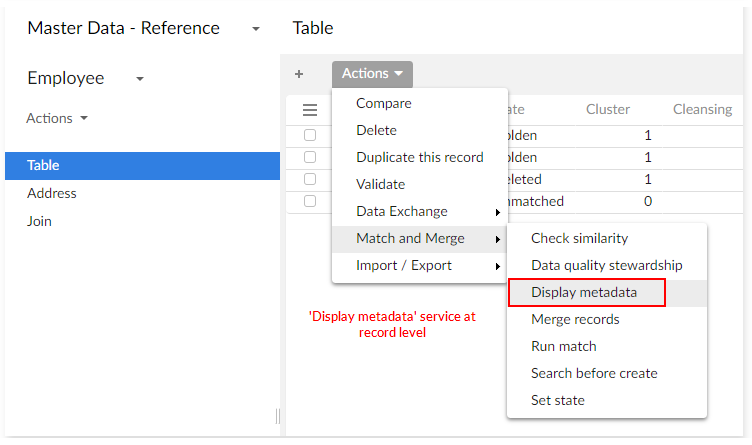
The Display metadata service presents full matching and cleansing metadata. This is exactly what would be shown when accessing this service from Cluster view.
When using the Display metadata service accessed when viewing a table in the standard tabular view, the Matching metadata and Cleansing metadata are shown in distinct tabs. They are displayed in separate windows in the cluster view.
Additional metadata on a record
In the EBX® Match and Merge Add-on views, you can display additional matching metadata for a record by setting the focus on the State and Cleansing fields. Available matching data is highlighted in Matching Metadata section.
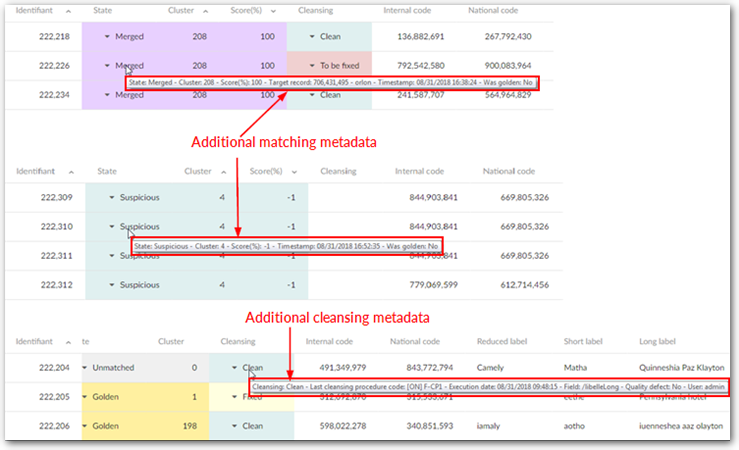
The Target record references the record that benefited from the merge.
When a record is under workflow control, the following additional data is displayed: workflow name, creation time and creator.
Operations and states
For a description of operations available on each state, you can click the question mark button at the top-right corner of Cluster view to access Matching Operations applied to a single record in the user guide.

Light matching view
The light matching view displays records contained in a cluster. Every record offers a pop-up menu with available matching operations.
The record's matching score displays alongside the state and the cluster identifier.
The Table services menu button offers matching operations that can apply to the table (all records). The Search menu button allows you to search records based on matching policies. This button is not displayed when there are no matching policies defined and if a matching field is not a type of string/text.
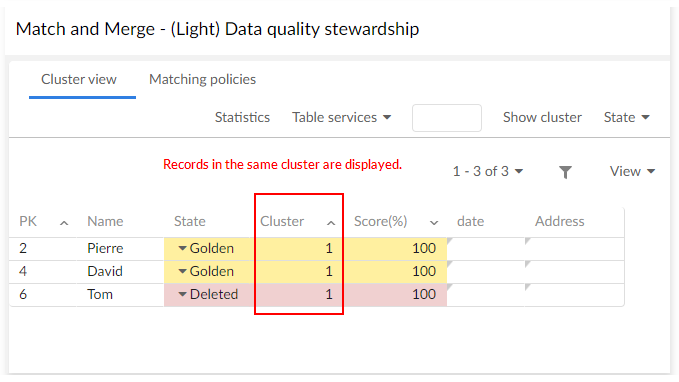
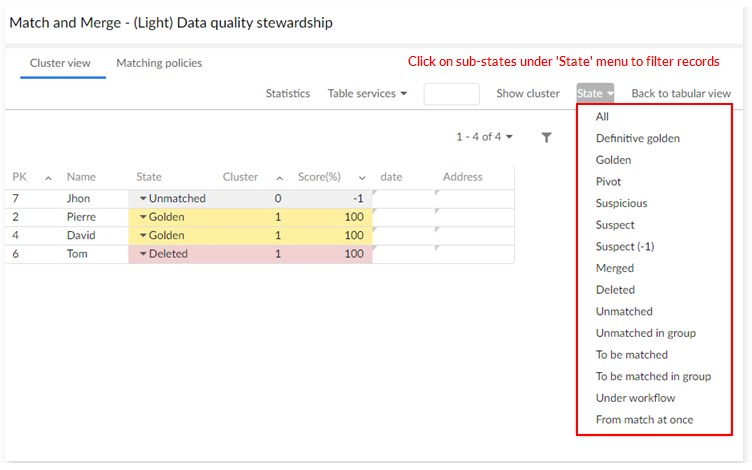
You can filter records by their current matching state using the State menu button. This button is also used to get records related to sub-states, such as Under workflow and From match at once.
The Under workflow filter gives all records that are under the control of a workflow.
The From match at once filter gives all records where the latest modification has been done with a match at once operation (an operation applied to a set of records).
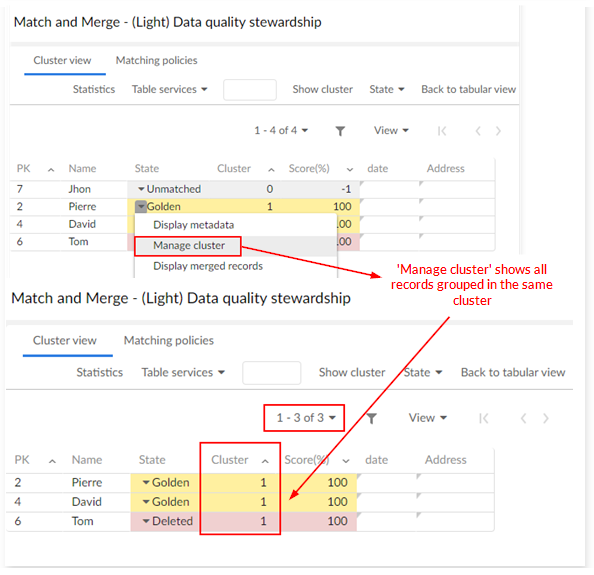
From the list of records, using the Manage cluster operation opens all the records that are grouped in the cluster.
User services views
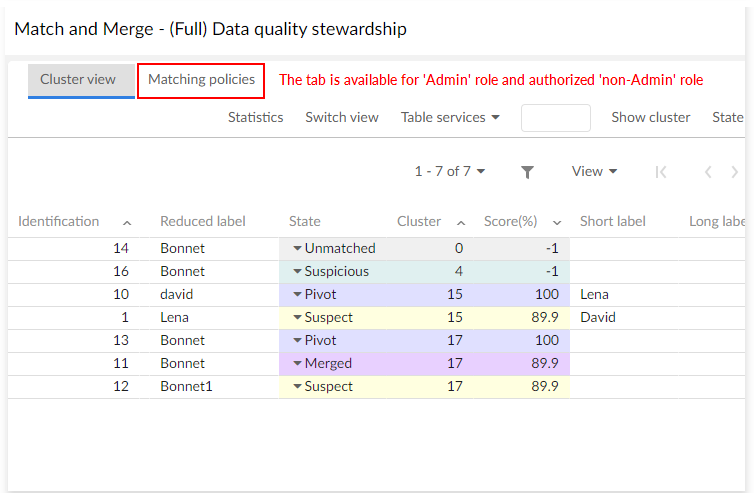
Full matching view
The full matching view is divided into two areas. The first area (top) displays a cluster's records or query results (Search and State menu buttons).
The second area (bottom) displays the cluster in which the last matching operation has been executed by the add-on.
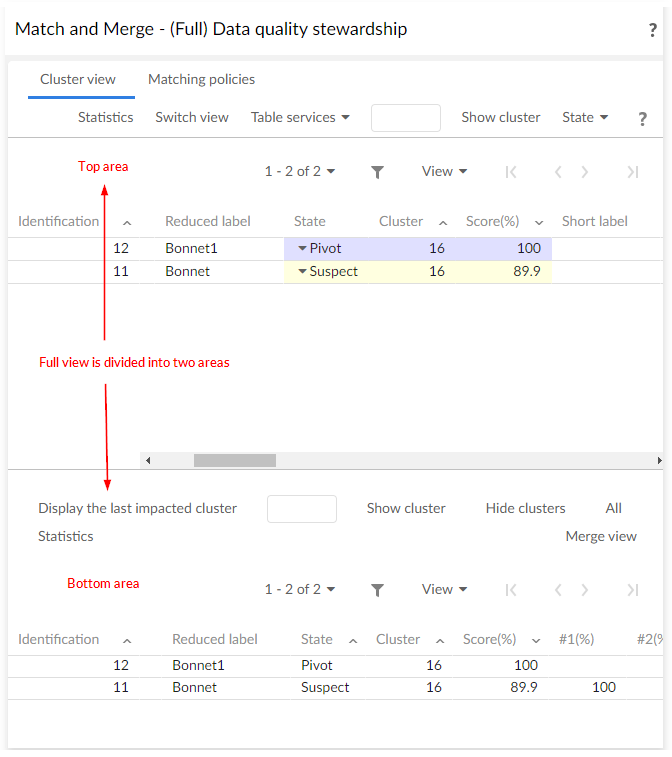
This second area is cumulative, meaning that it is possible to display as many clusters as needed. Only the first area holds the pop-up menu with matching operations and the Table services menu button that contains operations that can be applied to the table. The second area is used to display information and is helpful for analysis work.
Additional information displayed in the second includes: score of the first algorithm '#1(%)', score of the second algorithm '#2(%)', target record (used for merged record to keep a link to the record benefiting of the merge), timestamp of last modification and was golden (life cycle of golden records over time).
Special notation: | |
|---|---|
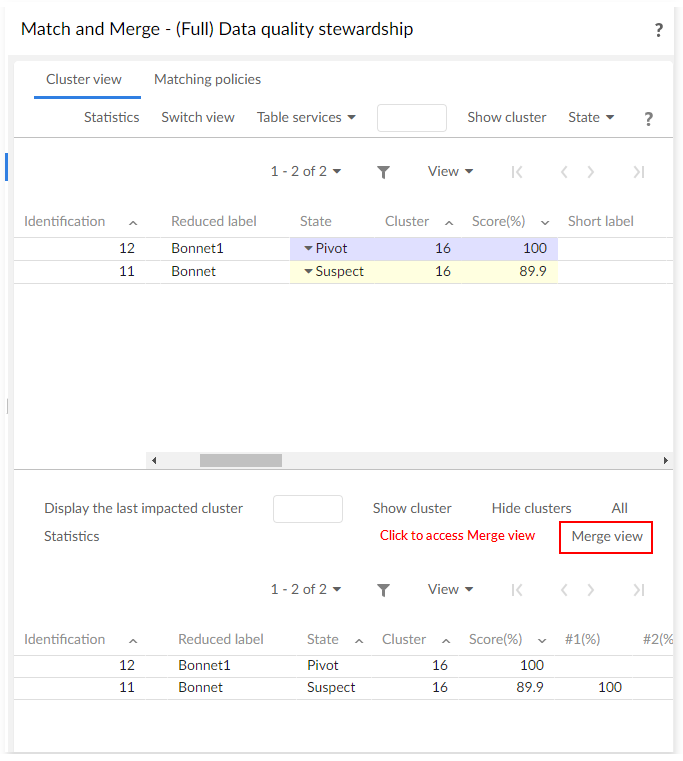
| To access to the merge UI, a cluster containing a pivot record must be displayed in the second area. Note: only one cluster must be displayed to allow the merge. The 'Show cluster' operation enables you to display the desired cluster. The 'Hide clusters' button can be used to clear this second area at any time. |
The Merge view button appears on the right side below the first frame of the user interface (next figure).
When using the magnifying glass and applied EBX® search filters on the table, you may want to first use the Switch view button to display the first UI area in full page mode. This type of EBX® search is different from the matching view Search menu button. This button simulates matching policy execution by matching fields, relying on matching algorithms and matching fields of the current configuration.
Matching view
Even when you hide DaqaMetaData in Default view and tool, the two columns Score and Cluster still can be seen in Matching view.
Statistics view
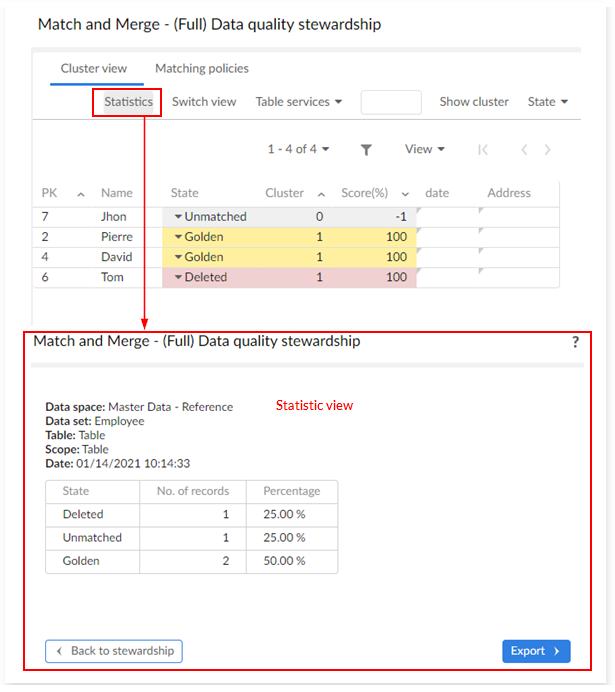
The Statistics button in matching views allows you to view matching statistics and export them to an excel file.
About the Merge view
The Merge view allows you to combine values from records to create a golden record. The number of steps required to complete the process depends on your data structure. The merge process may impact data not directly involved in the merge due to foreign key relationships to other tables. You will be given the opportunity to address each one of these dependencies.
Available actions and view concepts are discussed further in the following headings:
Merge view actions presents an overview of the view's interface.
Steps to merge records walks you through a basic merge scenario to create a golden record.
Relationship dependencies describes how the merge view handles certain foreign key relationships.
Merge view actions
Interaction with the Merge view falls into two basic categories—navigation and value selection. The add-on automatically guides you forward in the merge process, but at times you may need to return to a previous step. Selecting values to merge is pretty straightforward, but there are a couple of available options to help the process along.
See the following headings for more details on these subjects:
Merge view navigation
Navigation in the Merge view is fairly intuitive. The upper-left section of the view contains a dropdown list of all steps required to complete the current merge operation. The bottom of the page includes Next and Back buttons to navigate one step at a time. Depending on your data structure, a merge may involve many steps. This is where the dropdown list provides an advantage by allowing you to jump back to any previously completed step.
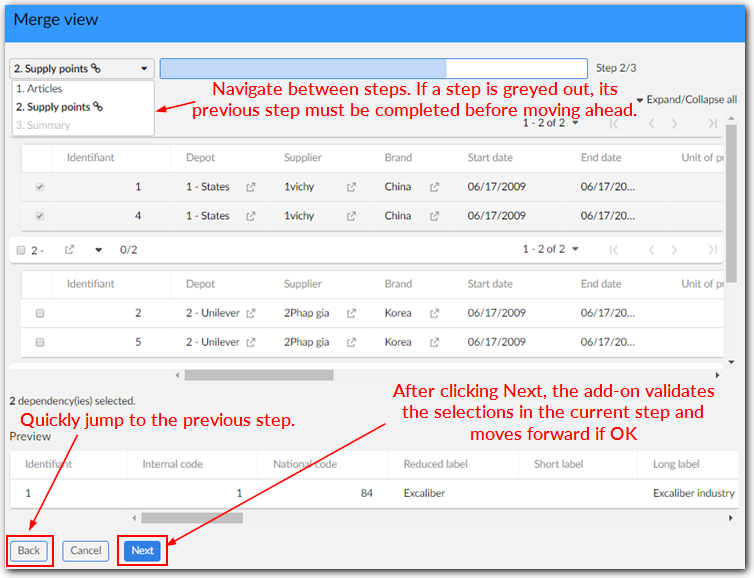
You have the ability to preview a record by hovering over its primary key field and clicking the ![]() icon. You can lock columns which allows you to scroll through others while still viewing the locked column. Click the
icon. You can lock columns which allows you to scroll through others while still viewing the locked column. Click the ![]() icon when hovering over a column's title. Locked columns stack left to right after the primary key column. Additionally, horizontal scrolling is synchronized so that you can see the same information in both tables at the same time.
icon when hovering over a column's title. Locked columns stack left to right after the primary key column. Additionally, horizontal scrolling is synchronized so that you can see the same information in both tables at the same time.
Value selection
Selecting values to merge happens in the following ways:
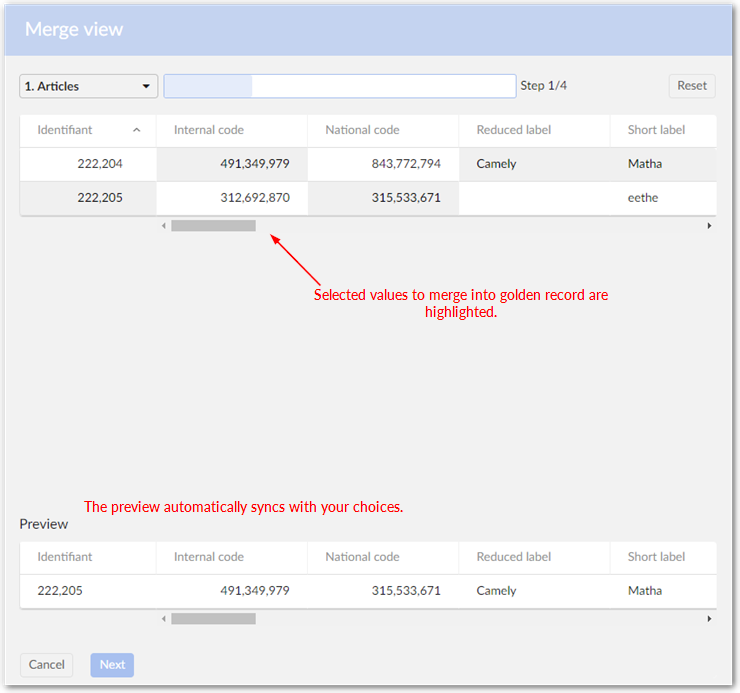
Selecting field values: Click a field to select its value for inclusion in the golden record. If you click the first field of a record, the entire record gets selected. You may want to perform this step first to provide a reference record that will be displayed in the preview section. All subsequent selections are reflected in the preview record at the bottom of the page.
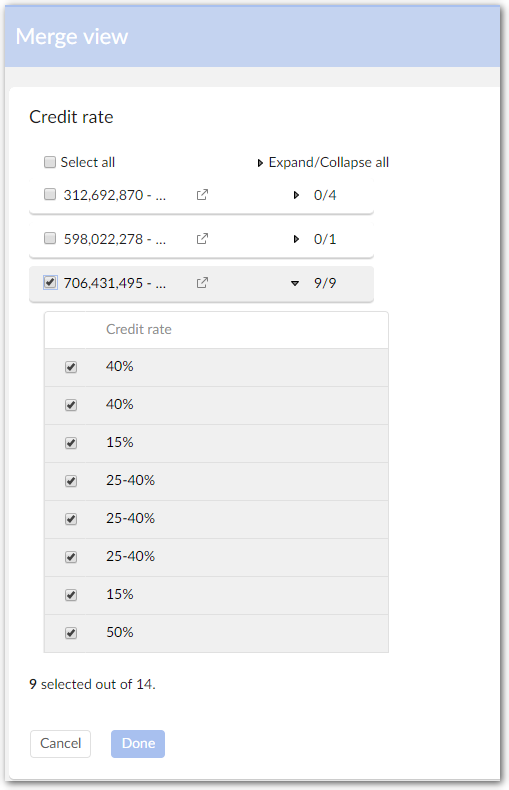
Selecting list values: Some fields, such as enumerations and groups, can contain a list of values. You have control over which of these values are included in the merge. To choose the values, click the field's
 icon and select the desired values. The counter shows how many of the possible values are included.
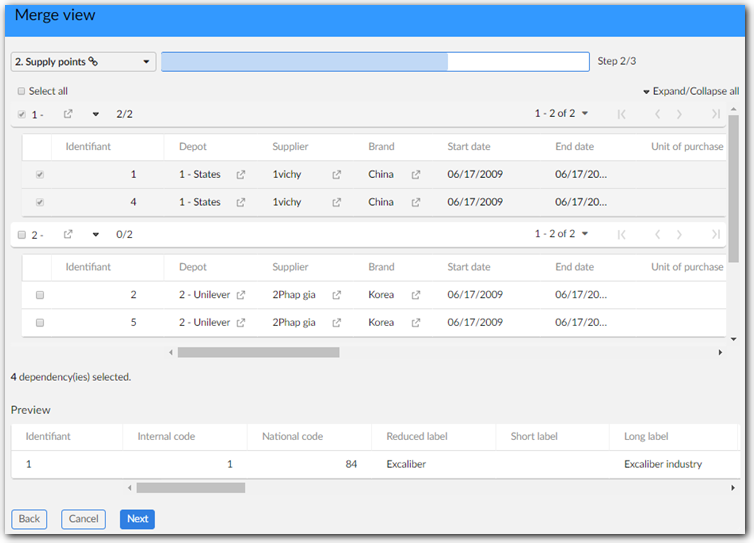
Selecting dependencies: After completing the first page in the Merge view, you will be guided through choosing which dependencies (from related tables) are included in the merge. The add-on presents a different page for each dependency. See Relationship dependencies for more information on dependencies.
Note
The ability to select field values may depend on your level of permissions. For example, if you are not permitted to modify a specific field and an administrator has enabled the Apply EBX® permission on merge view property, the add-on will automatically set the fields value based on the Pivot record.
Steps to merge records
When merging records, you select the field values you want to include in the new golden record. The first page in the view allows you to select values. Each additional page will allow you to manage how the merge will impact related tables. The number of pages required to complete the merge process can vary depending on your data structure and configuration settings.
Note
The merge process can be interrupted depending on whether the Check null input is active. This option is set at the data model level and determines whether a constraint is placed on empty or null field values. When this option is not enabled, the add-on displays a warning message and allows you to complete the merge operation. However, if this option is enabled the add-on prompts you to input a value for required fields.
To begin the merge process:
Access the merge view in one of the following ways:
When viewing a table: Select the records to include in the merge and from the actions menu choose Match and Merge > Merge records.

After stewardship:
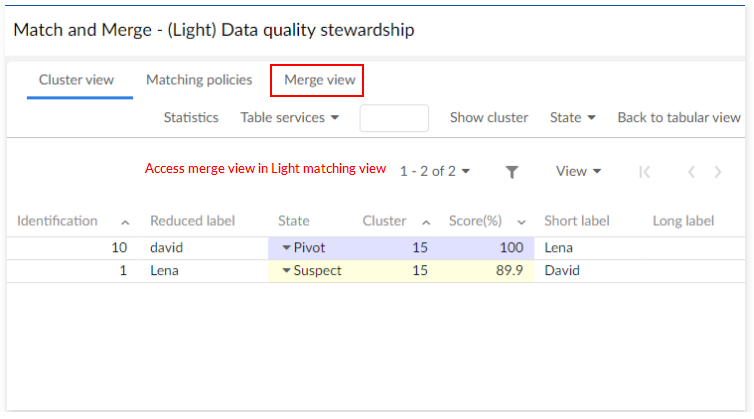
After inline matching.
Click to select the fields you want to merge into the golden record. Clicking a record's primary key selects the entire record. You may want to select the most accurate record first to act as a baseline. Then you can fine tune values by selecting other fields. The choices you make are reflected by the preview at the bottom of the page. Once satisfied, click Next.
Note
The ability to change the pivot record by selecting its primary key depends on the process policy settings configured by an administrator.
This step depends on your data structure and configuration settings:
If this merge will not impact other tables, or your configuration is set to ignore relationship dependencies, the add-on presents you with the Summary page. See the next step for more information.
If other tables can be impacted by this merge, you are presented with a page to select the relationships to update. The values from the pivot record are selected automatically when entering the Merge view after stewardship. If you do not have sufficient permissions to display the dependency, the add-on automatically makes the selection based on the pivot record.
If your process policy has the Make definitive golden and Make golden options enabled, this step displays and allows you to set the merged record to golden, or definitive golden. A golden record can be used in future matching operations, whereas a definitive golden record will not be used.
When you reach the Summary step, the add-on provides you an overview of what the merged record will look like. Click Merge to complete the process, or use the navigation dropdown to access previous steps to make changes.
Relationship dependencies
A merge operation can impact related table records. Depending on data structure and add-on configuration, new records may be created, or existing fields updated. When many dependencies exist, the add-on allows you to specify the number dependencies that display on the current page. If you navigate between pages, the add-on remembers any existing selections.
Administrators can configure the following merge behaviors that affect related records:
Allow users to manually update.
Enable the add-on to automatically update.
Ignore relationships altogether.
Relationship tab
The Table configuration's Relationship tab displays information about tables related to a configured table. Administrators can set whether the relationship is used in merge operations.
The following table describes the Relationship tab's properties and options:
Property | Description |
|---|---|
Relationship code | Any naming convention without white spaces. |
Relationship name | The relationship name is automatically derived from the label of the related table. |
Relationship management | Manual: Each relationship needs to be selected manually during the merge process. Automatic: Relationships will be automatically selected based on the pivot. None: No relationships are selected. |
Limitations
The add-on can only lookup relationships that exist within the current data model. Additionally, the add-on cannot update dependent records in the current data model when the related record's primary key includes the foreign key of a merged record. Other relationships are updated automatically based on any selected pivot record.
Simple matching view
The simple matching view allows you to manage suspicious records and provides specific operations to accomplish this:
Make definitive golden,
Make golden,
Delete,
and stewardship execution when the merge process is needed (merge view)—namely, Run stewardship on suspicious and Run stewardship on pivot.
The suspicious records are created when add-on configuration is based on one of these use cases:
Simple matching view by using a workflow. At submit time, if the record is suspicious, then a workflow is launched. In this case the Simple matching user task holds the parameters that can be used to configure the simple matching view and the merge view.
Simple matching view at the submit time. At submit time, if the record is suspicious, then the simple matching view is automatically opened. In this case option configuration for the simple matching view and the merge view is done in the add-on configuration itself (EBX® administration area).
Simple matching view when the 'Match suspicious' operation is executed. This operation is available in the light and full matching view. In this case option configuration for the simple matching view and the merge view is done in the data matching configuration itself (EBX® administration area).
Stewardship actions available on simple matching:
Actions | Definition |
|---|---|
Run stewardship on suspicious | Launches the 'Merge view'. When no auto-created record exists, the Suspicious record becomes the Pivot and survivorship rules are applied. If an auto-created record exists, it is prioritized to become the pivot and survivorship rules are applied. |
Run stewardship on defined pivot | Launches the merge view. A record marked as Pivot becomes the Pivot. Suspicious records are matched against the Pivot and the add-on computes new scores of Suspicious records. The 'Merge view' only displays Pivot and Suspicious records. Survivorship rules are not applied. Note that this service does not display when the Suspicious record is auto-created. |
Run stewardship on best record | Launches the 'Merge view'. A record marked as the best record becomes the Pivot. All potential duplicate records are matched against the Pivot. The add-on computes new scores and survivorship rules are not applied. Note that the add-on determines the best record using the configured survivorship function, but auto-created records are given the highest priority. |
Reset pivot selection | Removes records' 'Pivot' designation. |
In the screen below, the simple matching view displays the suspicious record and offers three actions:
Make golden (suspicious becomes golden directly without any merge),
Delete (logical deletion)
and run Stewardship actions.
This example does not show all options such as Make definitive golden.
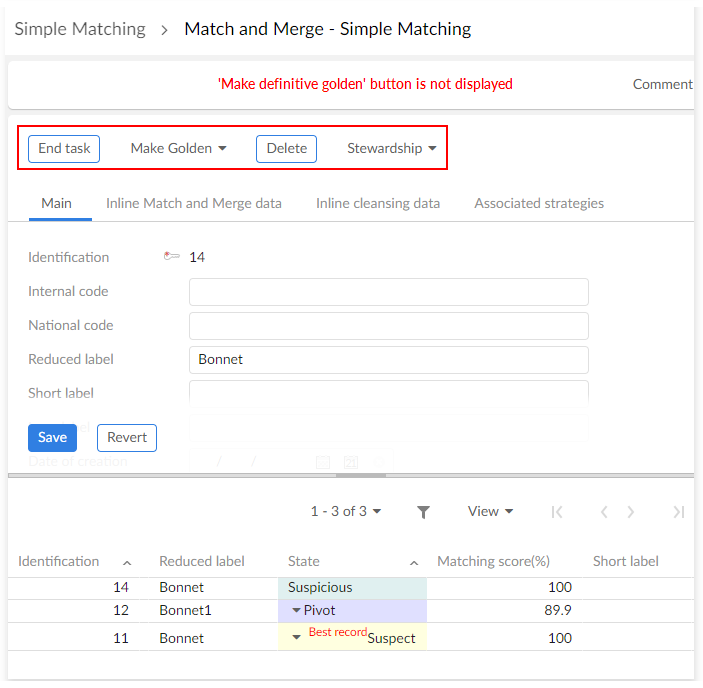
Depending on the configuration, it is possible to offer different modes for stewardship execution either on the suspicious record, on Best record directly or on the selected pivot record.

Here is an example with the Run stewardship on Suspicous option configured.
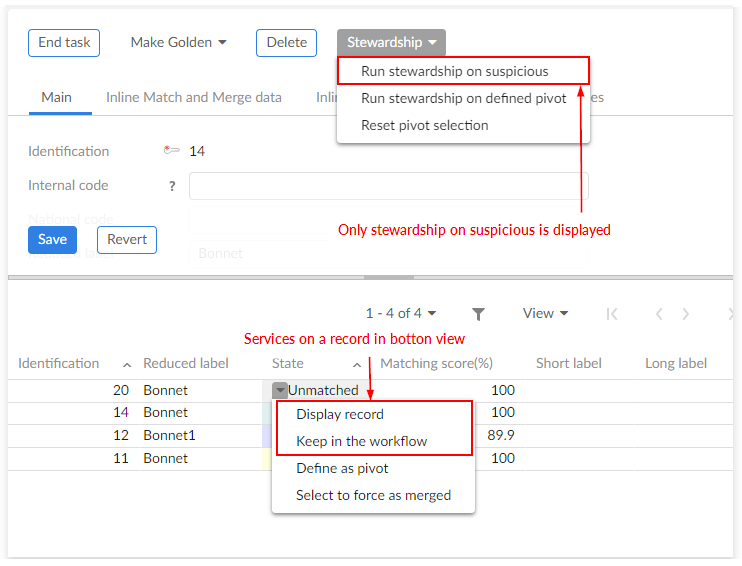
Operations to a single record:
Keep in the workflow - allows you to select one to many records to keep in the workflow context. Then, the next user tasks in this workflow can use these selected records depending on the functional needs.
Define as pivot - allows you to select a record to use as the pivot record.
Display record - displays record in a pop-up screen.
Select to force as merged - marks the current record as Merged
Special notation: | |
|---|---|
| The 'Match table' and 'Match cluster' operations still generate suspect, golden, pivot and merged records even when the simple matching mode is activated. |
Policies view
By default, only administrators can access the Policies view tab. However, they can set permissions to allow other users to access this view. This view displays the current process policy and matching policy used by the add-on. Even though the matching configuration is achieved through the EBX® Admin area, this view is helpful to get direct information about the process and matching policies that are being executed.
Special notation: | |
|---|---|
| Policies view in consultation mode only. Policies view in restricted modification mode. |
Scores view
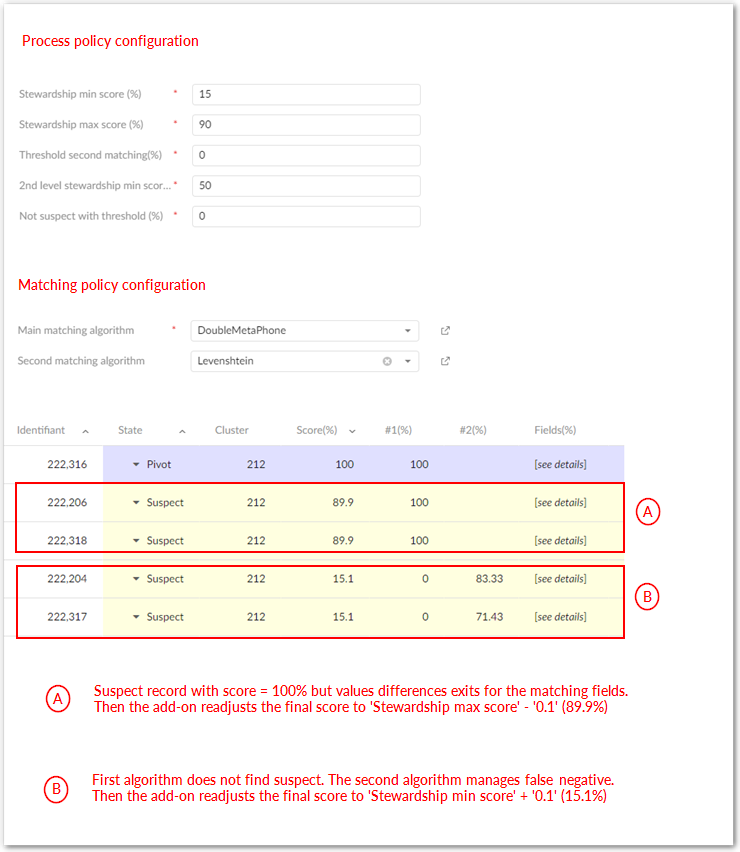
Three scores are displayed as follows:
#1(%) is the score computed by the first matching algorithm.
#2(%) is the score computed by the second matching algorithm when it is configured.
Score(%) is the score readjusted by the add-on to deal with false negative records.
The rules applied by the add-on to readjust the scores are as follows:
If (# 1 = 100 %) but matching fields values are not fully identical then Score = Stewardship max score - 0.1.
If (#1 < stewardship min score) and no second algorithm then no readjusting of the Score occurs.
When the second algorithm is applied:
If (#2 >= 2 nd level stewardship min score) then Score #2 is persisted and Score = stewardship min score + 0.1.
If (#2 < '2 nd level stewardship min score') then no readjusting of the Score occurs.
