Use case
- Overview of use cases
- Use case: Preventing record deletion when relationships exist
- Use case: Preventing a field from exceeding a value and auto-correcting
- Use case: Check empty field with predefined assertion rules and the execution condition
- Use case: Set table permisison for a specific user using predefined assertion rules and execution conditions
- Use case: Finding an existing Java implementation
- Use case: Using the wizard to configure a rule
Overview of use cases
This section contains use cases that demonstrate how the EBX® Rules Portfolio Add-on can meet the following business requirements:
Prevent deletion of records that have a child relationship, or an association to a record from another table.
Ensure that a field's value does not exceed a specified number and if it does, auto-correct the value.
The examples in this section do not show the Java code used for rule implementation. However, it does include add-on specific scripting language examples where applicable. See the add-on's Java API documentation, if you would like more information on coding your own Java implementation classes.
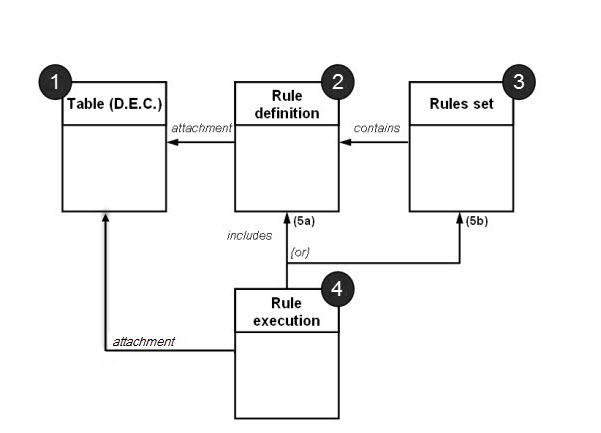
The diagram below outlines the rule creation process. A 'Rule execution' declares information about the rule such as the event on which the rule executes, a validity date range or any other context required for rule execution. A 'Rules set' allows you to declare multiple rules and attach them to a definition.
Use case: Preventing record deletion when relationships exist
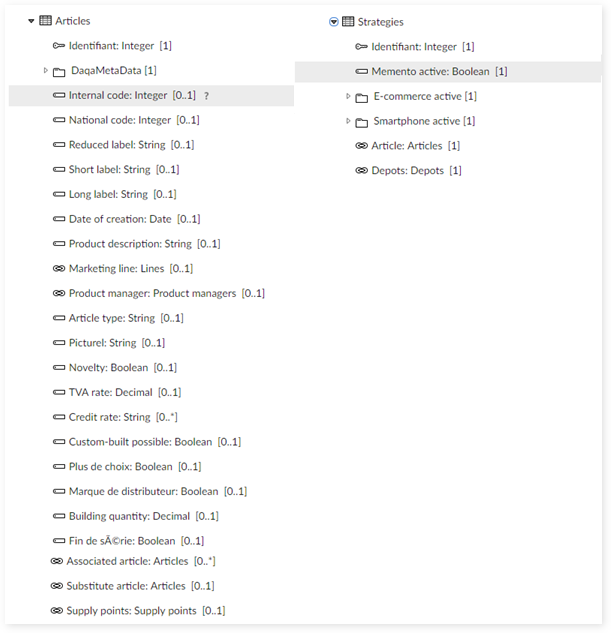
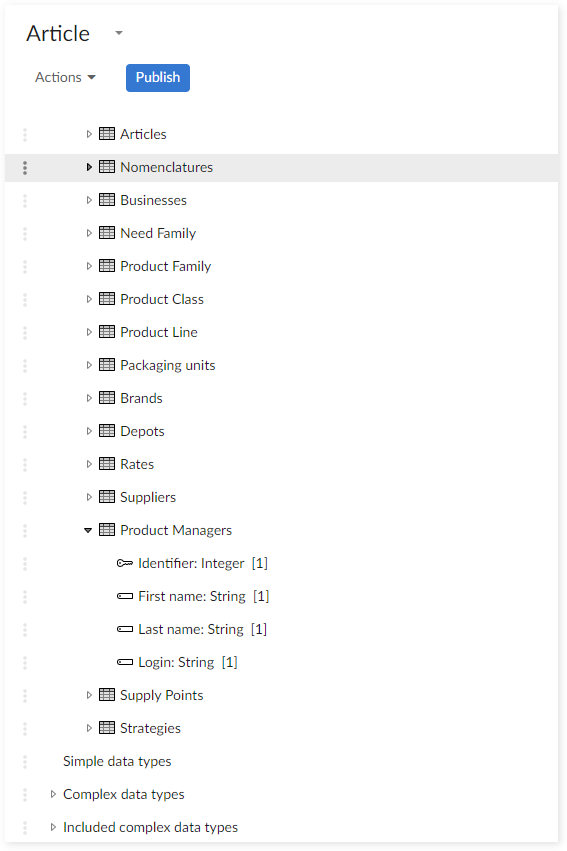
This use case uses the 'Article' data model (shown below) and demonstrates how you can prevent users from deleting a record when:
A record has a child.
A record has an association to a record in another table.

In this case, the rule's business logic relates to the 'Articles' and 'Strategies' tables.
Configuring the data model
Complete the following steps to prepare the data model for rule execution:
Add the classes shown in the following table to the data model's 'Configuration' → 'Component library'. These classes call the EBX® Rules Portfolio Add-on.
Class | Description |
|---|---|
com.orchestranetworks.addon.rpfl.DefaultTableTrigger | Enables use of validation and automated rules. |
com.orchestranetworks.addon.rpfl.DefaultConstraintOnTable | Enables manual validation rules. |
com.orchestranetworks.addon.rpfl.DefaultSchemaExtension | Enables access permission rules. |
com.orchestranetworks.addon.rpfl.DefaultRulesSchemaServicePermission | Enables action permission rules if the service is declared in the schema. If the service is declared in the module.xml file, create a class to extend DefaultRulesServicePermission and add is to the module.xml services declaration. |
Navigate to 'Configuration' → 'Data model properties' and add the 'DefaultSchemaExtension' to the 'Model properties' → 'Special extensions' attribute.
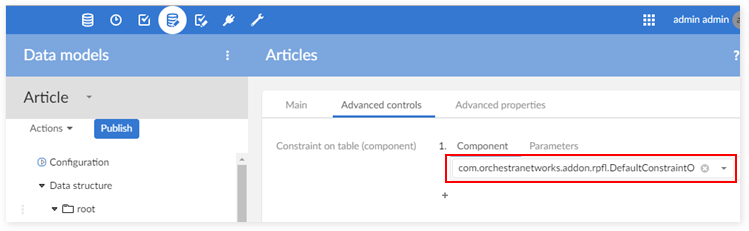
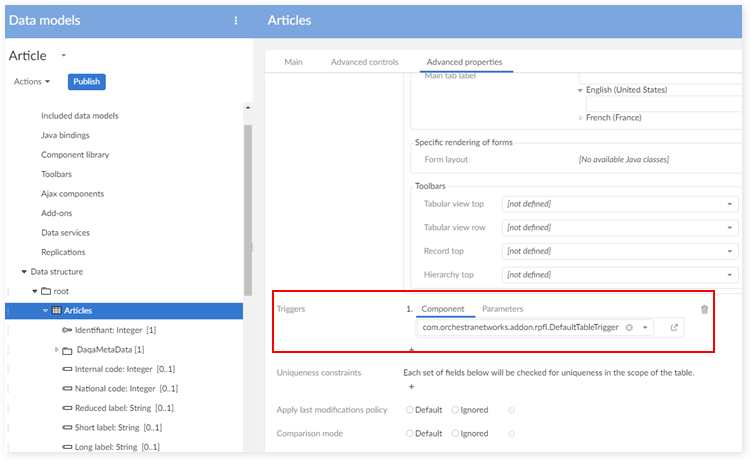
Select the data model's 'Articles' table and apply the following components:
On the 'Advanced controls' tab, add the 'DefaultConstraintOnTable' component, as shown below.
On the 'Advanced properties' tab, add the 'DefaultTableTrigger' component, as shown below.
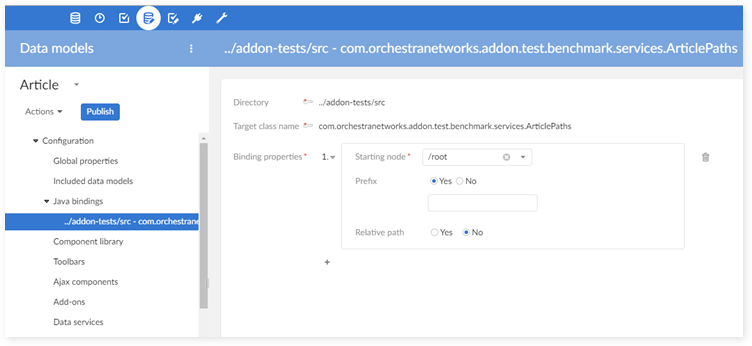
Use the 'Configuration' → 'Java bindings' to specify what Java types the model generates. This use case implements the configuration shown in the following image:
You can publish the data model and create a data set.
The next section describes how to create D.E.C.'s (Data Element Concepts) in the add-on.
Creating the D.E.C.s
A D.E.C. associates a specific business concept, such as a table, or a field with a rule. You can add each D.E.C. manually, or use the 'D.E.C. creation' service to automatically create them. However, manual creation can easily lead to duplication and is not a recommended practice.
The following demonstrates using the service to auto-generate the D.E.C.s:
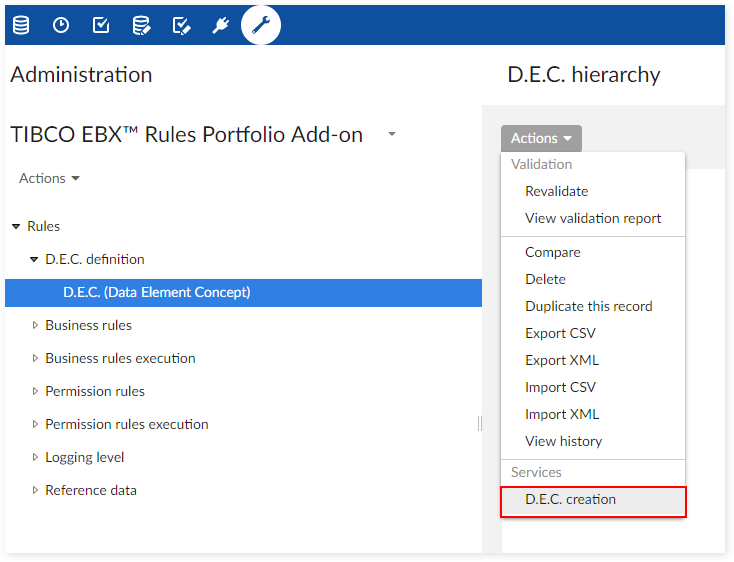
Navigate to the 'Administration' tab → 'Business rules' → 'TIBCO EBX® Rules Portfolio Add-on' → 'D.E.C. definition' → 'D.E.C. by type table' view and from the 'Actions' menu select 'D.E.C. creation'.
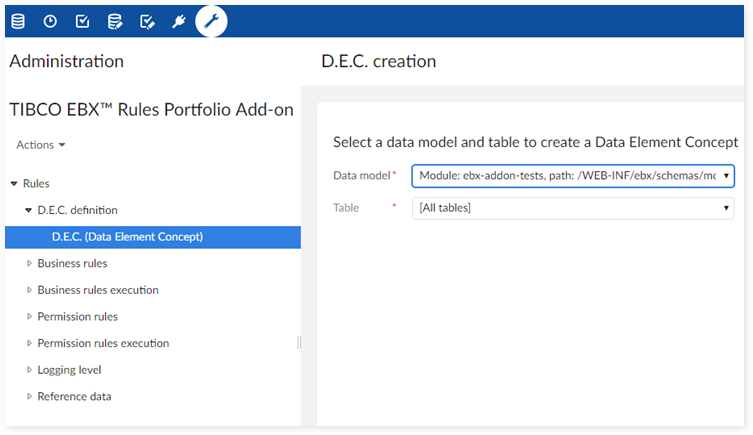
Enter the desired 'Data model' and 'Table' information and click 'Execute'.
Implementing the rule using Java
The requirements for this use case stem from the following two scenarios:
An user tries to delete a record when it has a child record.
An user tries to delete a record when it has an associated record.
Each of the above scenarios requires its own validation type business rule, relies on a Java implementation and applies to the same data model table ('Articles' in this case). Each Java implementation contains two classes. One class defines the rule and the other defines how the rule executes. The following table outlines these two classes:
Class | Description |
|---|---|
The rule definition class | This class has to implement the 'BusinessRuleDefinition' interface and defines the following rule information:
|
The rule implementation class | This class must implement the 'Rule' interface and it contains the logic to execute the rule. |
Note that the following steps only demonstrate creating one of the two rules. Just repeat the same set of steps to add the second rule.
To create the business rules:
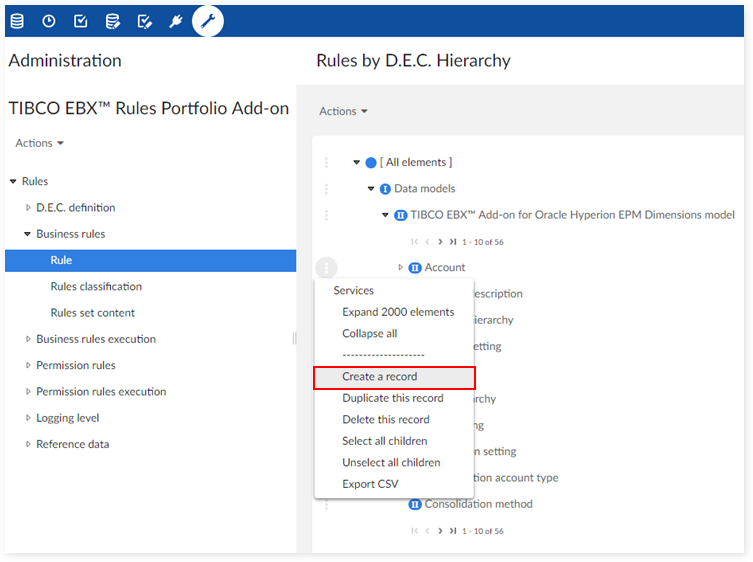
Navigate to the 'Administration' tab → 'Business rules' → 'TIBCO EBX® Rules Portfolio Add-on' → 'Business rules' → 'Rule' table and 'Create a record' on the appropriate D.E.C. This table's view defaults to 'Rules by D.E.C.' and allows you to easily select the D.E.C. to which you want to add the rule.
Fill in the required information. Properties of note are:
'Implementation type' - Set this property to 'Use Java implementation' to use a Java implemented rule.
'Type' - This property defines the rule type. For this use case, the type is set to 'Validation rule'.
'Severity' - This property should be set to 'Error'.
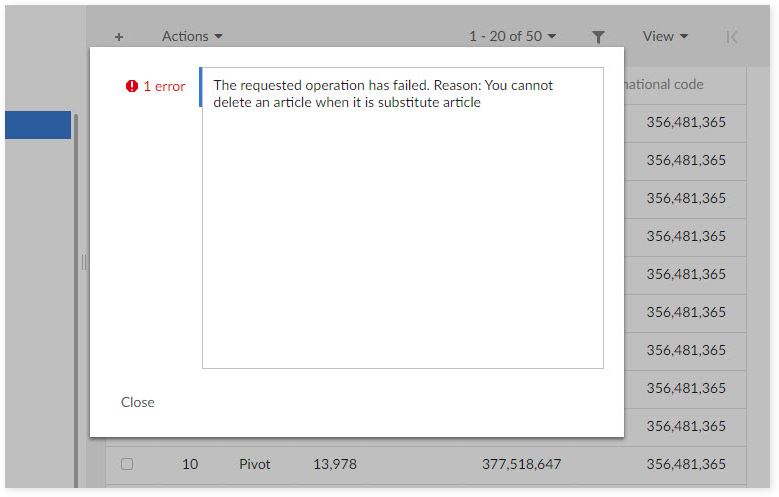
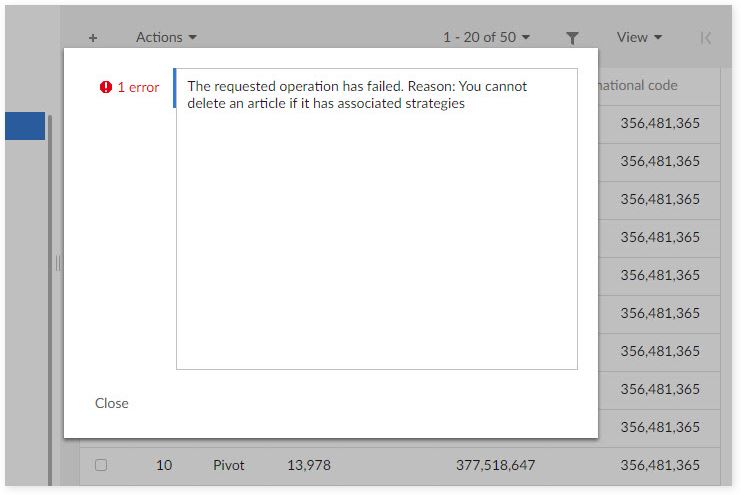
'Message' - Our first rule's message is set to "You cannot delete an article when it is substitute article." Our second rule's error message says, "You cannot delete an article if it has associated strategies."
After saving the record, the 'Java implementation' tab displays.
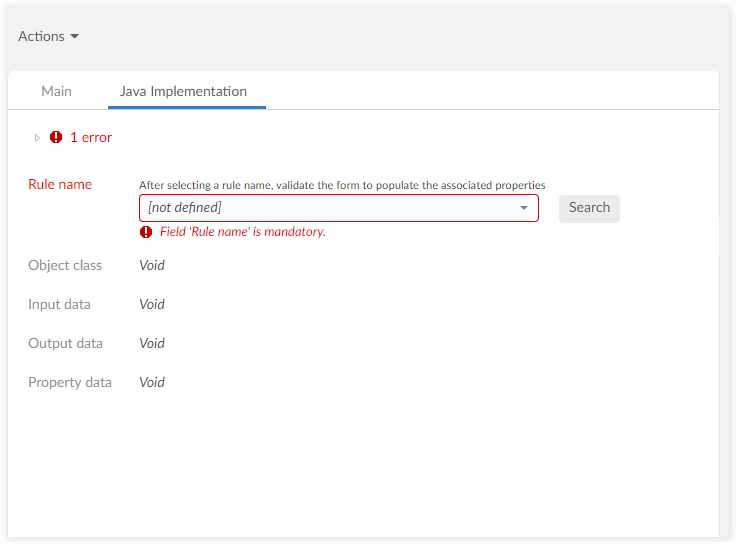
Click on the 'Java implementation' tab and use the 'Rule name' drop-down to select the first business rule. The 'Rule name' property only populates with rules that have been registered with the add-on. See the API documentation for more information.

To create a rule execution, navigate to 'Business rules execution' → 'Rule execution' and add a record to the same D.E.C. used for the rule definition. Among other things, a rule execution determines whether the associated rule is active, a rule validity time period and what type of event initiates rule execution. Ensure the required fields have values, including the 'Event' field which should be set to 'Before delete'. The 'Rule' field should be set to the business rule you want to apply this execution to. Save and close.
Repeat steps one through five to create the second business rule and rule execution. Once both rules are complete, you can publish the rules portfolio and test the rules.
To publish the rules portfolio, open the 'Actions' menu at the 'TIBCO EBX® Rules Portfolio Add-on' data set level and select 'Publish rules portfolio'.
Give the publication a unique name and be sure to select the data space containing the correct data model and data set. Click 'Publish'.
The following images show the error messages that display when we attempt to delete an 'Article' that is a substitute 'Article' and an 'Article' with a related 'Strategies', respectively.
Implementing the rule using a script
This section demonstrates using a script to meet the following requirements for this use case:
A user tries to delete a record when it has a child record.
A user tries to delete a record when it has an associated record.
The following steps provide script examples for both rules, but only demonstrate creating one of the two rules. Just repeat the same set of steps to add the second rule.
To create the business rules:
Navigate to the 'Administration' tab → 'Business rules' → 'TIBCO EBX® Rules Portfolio Add-on' → 'Business rules' → 'Rule' table and 'Create a record' on the appropriate D.E.C. This table's view defaults to 'Rules by D.E.C.' and allows you to easily select the D.E.C. to which you want to add the rule.

Fill in the required information. Properties of note are shown below:
'Implementation type' - Set this property to 'Use Script'. You can add the script to the 'Script' tab after saving.
'Type' - This property defines the rule type. For this use case, the type is set to 'Validation rule'.
'Severity' - This property should be set to 'Error'.
'Message' - Our first rule's message is set to "You cannot delete an article when it is substitute article." Our second rule's error message says, "You cannot delete an entity if it has associated strategies."
After ensuring the above properties are correct, save the record and the 'Script' tab displays.
Click on the 'Script' tab and add the appropriate script. The following two images show the script used for each rule. For a more in-depth explanation of how specific objects work, see the Scripting Language Guide in the online help.


To create a rule execution, navigate to 'Business rules execution' → 'Rule execution' and add a record to the same D.E.C. used for the rule definition. Among other things, a rule execution determines whether the associated rule is active, a rule validity time period and what type of event initiates rule execution. Ensure the required fields have values, including the 'Event' field which should be set to 'Before delete'. The 'Rule' field should be set to the business rule you want to apply this execution to. Save and close.
Steps one through four are repeated to create the second business rule and rule execution. Once both rules are complete, you can publish the rules portfolio and test the rules.
To publish the rules portfolio, open the 'Actions' menu at the 'TIBCO EBX® Rules Portfolio Add-on' data set level and select 'Publish rules portfolio'.
Give the publication a unique name and be sure to select the data space containing the correct data model and data set. Click 'Publish'.
The following images show the error messages that display when we attempt to delete a 'Article' with a child 'Article' and an 'Article' with a related 'Strategies', respectively.
Use case: Preventing a field from exceeding a value and auto-correcting
This use case uses the previously shown 'Article' data model and applies sample rules to the 'Product managers' table. Data model configuration for add-on compatibility and creation of the D.E.C.s followed the same processes as the previous use case. For more information about these processes, see the above sections 'Configuring the data model' and 'Creating the D.E.C.s'.
The next two topics show how to define a rule using Java and the built-in scripting language. Part of the rule definition includes a condition for rule execution, or 'Execution context', which defines rule requirements. When creating your own rules, not all situations require an 'Execution context'. In these cases you can simply remove the 'Execution context'. This rule enforces the following business requirement:
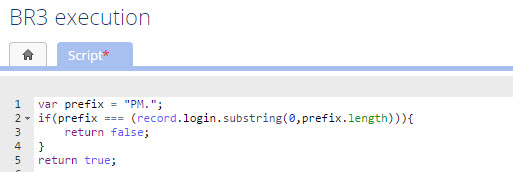
If the 'Login' field's value does not have a default prefix, then the add-on automatically adds a default prefix when you manually execute the rule.
Configuring the rule and execution conditions with Java.
Configuring a Java-based rule and execution conditions
When relying on Java implementation, you select from a list of available rules previously registered with the add-on. These rules already contain programming logic required to analyze data conditions and pass a result to the add-on. Subsequently, an end-user responsible for 'Rule' and 'Rule execution' configuration does not need Java-specific programming knowledge to complete his task. If you are required to create the rules in Java and register them with the add-on, refer to the API documentation for more information.
The following steps demonstrate 'Rule' and 'Rule execution' configuration based on use case requirements:
Navigate to the 'Administration' tab → 'Business rules' → 'TIBCO EBX® Rules Portfolio Add-on' → 'Business rules' → 'Rule' and create a new record under the 'Product managers' D.E.C.
Note: If you have not set up a data model or created the required D.E.C.s, see the 'Configuring the data model' and 'Creating the D.E.C.s' sections in the previous use case.
Enter the required information and click 'Save'. The 'Java implementation' tab displays. Properties of note:
'Implementation type' - Set to 'Use Java implementation' to use a Java implemented rule.
'Type' - This property is set to 'Table set rule'. This type of rule allows modifying existing data-one of the use case requirements. Keep in mind that you need to manually execute a 'Table set rule' rule using the 'Execute rules' service.
'Severity' - Set to 'Error'.
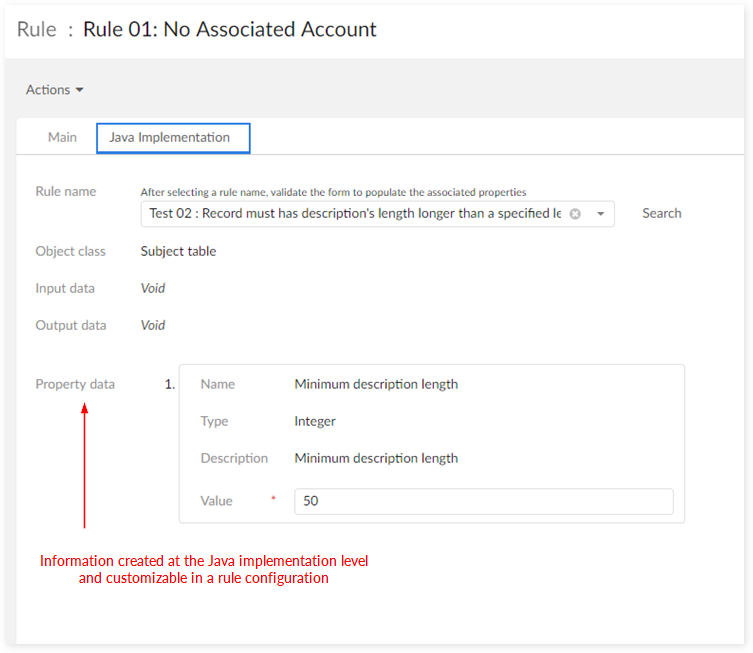
In the 'Java implementation' tab, use the 'Rule name' field to select the appropriate rule class and click 'Save'. After saving, the tab displays the 'Property data' defined in the Java class. Note that the 'Value' property, currently set to 'PM', is editable. This function allows you to simply change the value to reuse this rule for other business requirements-without additional software development. You can design any type of 'Property data' at the Java implementation level and customize the values while configuring a rule. Refer to the Java doc for more information.
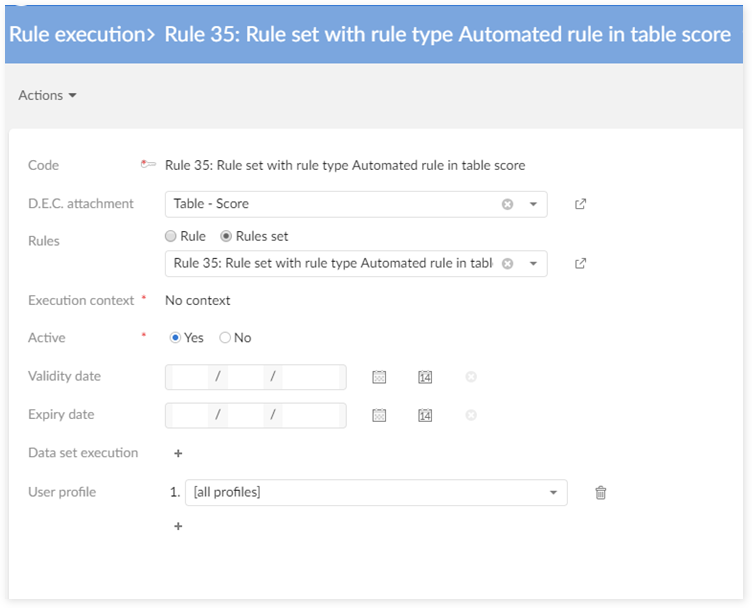
Navigate to 'Business rules execution' → 'Rule execution' and create a new record under the 'Product managers' table D.E.C. This is where you define when rule execution occurs and the 'Execution context' that specifies conditions for rule execution. Notice the following properties:
'Rule' - The 'Business rule' that these execution properties apply to.
'Execution context' - This property allows you to specify a condition for rule execution using either Java, or a script. This example uses Java. However, not all scenarios require an 'Execution context'. In these types of cases you can set this property to 'No context'.
'Event' - This property specifies when rule execution takes place. This use case implements a 'Table set rule' and requires you to run the 'Execute rules' service.
After entering the required information, click 'Save' and the 'Java implementation' tab displays.
Use the 'Rule name' property to select the desired rule used for this 'Execution context'. 'Save and close'.

Open the 'TIBCO EBX® Rules Portfolio Add-on' in 'Actions' drop-down menu and select 'Publish rules portfolio'. This creates the add-on's configuration snapshot as the execution environment for your rule. Enter the required information, including snapshot name and description, and the data space(s) to apply to.
Return to the data set and from the 'Actions' menu, select 'Rules Portfolio' → 'Execute rules'. The following image shows the rule execution result.

Configuring a script-based rule and execution conditions
When you use a script to define rule and execution logic, it requires the end-user to have some background programming knowledge. However, such a user can rapidly develop and implement rules by leveraging the add-on's scripting feature. This section observes the same use case conditions as the previous section, except it uses a script (examples included) to meet the requirements.
To create a rule that checks the 'Login' field value and add prefix automatically if the value does not have prefix:
Navigate to the 'Administration' tab → 'Business rules' → 'TIBCO EBX® Rules Portfolio Add-on' → 'Business rules' → 'Rule' and create a new record under the 'Product managers' D.E.C. Note: If you have not set up a data model or created the required D.E.C.s, see the 'Configuring the data model' and 'Creating the D.E.C.s' sections in the previous use case.
Enter the required information and click 'Save'. The 'Script' tab displays. Properties of note are:
'Implementation type' - Set to 'Use Script'.
'Type' - This property is set to 'Table set rule'. This type of rule allows modifying existing data-one of the use case requirements. Keep in mind that you need to manually execute a 'Table set rule' rule using the 'Execute rules' service.
'Severity' - Set to 'Error'.
The following image shows the information entered in the 'Script' tab.

Navigate to 'Business rules execution' → 'Rule execution' and create a new record under the 'Product managers' table D.E.C. This is where you determine when rule execution occurs and the 'Execution context' that specifies conditions for rule execution. Notice the following properties:
'Rule' - The 'Business rule' that these execution properties apply to.
'Execution context' - This property allows you to specify a condition for rule execution using either Java, or a script-as used in this example. However, not all scenarios require an 'Execution context'. In these types of cases you can set this property to 'No context'.
'Event' - This property specifies when rule execution takes place. This use case implements a 'Table set rule' and requires you to run the 'Execute rules' service.
After entering the required information, click 'Save' and the 'Script' tab displays.
The following image shows the information entered in the 'Script' tab.
Open the 'TIBCO EBX® Rules Portfolio Add-on' in 'Actions' drop-down menu and select 'Publish rules portfolio'. This creates the add-on's configuration snapshot as the execution environment for your rule. Enter the required information, including snapshot name and description, and the data space(s) to apply to.
Return to the data set and from the 'Actions' menu, select 'Rules Portfolio' → 'Execute rules'. As shown below, 'PM' prefix is added automatically in all 'Login' field values.
Use case: Check empty field with predefined assertion rules and the execution condition
Certain situations can lend themselves to using pre-built assertion rules to create new rules. These pre-built rules are script-based and alleviate the need to hand-code Java. The following lists the available pre-built assertion rules (business rule):
[ON] Assertion true (Manual validation rule, Validation rule and Table set rule)
[ON] Assertion false (Manual validation rule, Validation rule and Table set rule)
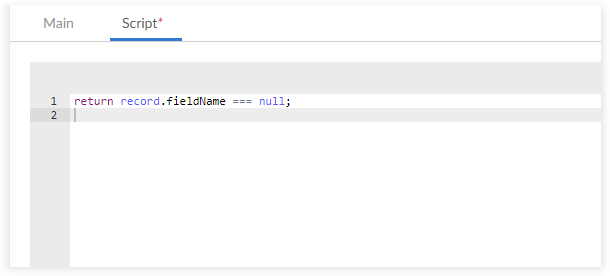
For example, to check if field (F) in a table (T) is empty, configure the following rule execution:
Create a rule definition on (T) with the pre-built assertion rule '[ON] Assertion false (Manual validation)'. This rule systematically returns a false value.
Configure a 'Rule execution' with scripting code to check that (F) is empty.
During execution, when the condition of execution is validated (the table field is empty), the rule executes and returns a value of 'False' which logs an error in the validation report. If the field is not empty, then the rule is not executed and no error is logged.
You can extend this type of configuration using a script to implement any execution context.
Use case: Set table permisison for a specific user using predefined assertion rules and execution conditions
The predefined assertion rules also allow you to set permisison on a data set, table, field and record. The available pre-built assertion rules (permission rules):
[ON] Hidden the data set, table, field, or record.
[ON] Permission read-only for the data set, table, or field/record.
[ON] Permission read-write for the data set, table, field, or record.
For example, to set table (T) hidden only for a specific user:
Create a rule definition on (T) with the pre-built assertion rule '[ON] Hidden the table'. This rule systematically hidden the table (T).
Configure a 'Rule execution' with the value on 'User profile' belong to the user applied by your rule.
During execution, when the condition of execution is validated (the user profile is correct), the rule executes and set hidden permission of table (T). If the user profile is not correct, then the rule is not executed and the user still has read-writer permission on table (T).
Use case: Finding an existing Java implementation
When you have many Java implementations - whether execution contexts, or rules - it can be difficult to remember their names. Without the exact name, you may not be able to locate the implementation of interest. To locate an existing implementation you can search for it by defining criteria in the search dialog.
Create a new, or open an existing rule or execution context that uses a Java implementation.
Next to the 'Rule name' field click 'Search'.
In the search box that displays, specify the following (note that the options that display in the search box differ depending on where you start the search):
Text contained in the implementation name can apply to all searches. If you are not sure of the name, or when entering a name returns limited results, you can use the type, scope and Object Class options to expand the search.
The type of rule option applies to business rules. If you have indicated a value on the rule's home tab in the 'Type' property, the search will be limited to that type. Otherwise, you will be able to choose a type to search for.
The permission scope option applies to permission rules. If you have indicated a value on the rule's home tab in the 'Scope' property, the search will be limited to that scope. Otherwise, you will be able to choose a scope to search for.
The Object Class option is available on all search types. The value specified here searches for types of business objects this rule can be applied to.
After entering your search criteria, click 'Execute'.
The 'Result' heading contains the search results. Click 'Select' next to the implementation you want to use.

Use case: Using the wizard to configure a rule
The rule configuration wizard offers an alternative way for you to configure rules. This option is especially helpful for new users as it eliminates some of the complexity and manual configuration steps. If you have any questions about a particular option, just open the tooltip for additional information.
The following outlines the general flow of the wizard:
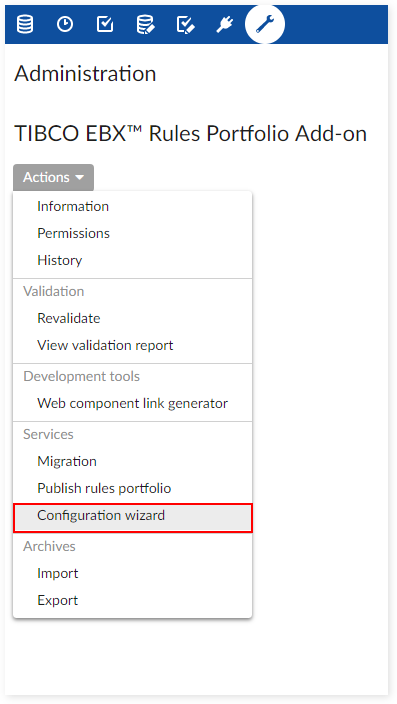
Open the wizard from 'Administration' > 'Business rules' > 'TIBCO EBX® Rules Portfolio Add-on' > 'Actions' > 'Configuration wizard'.
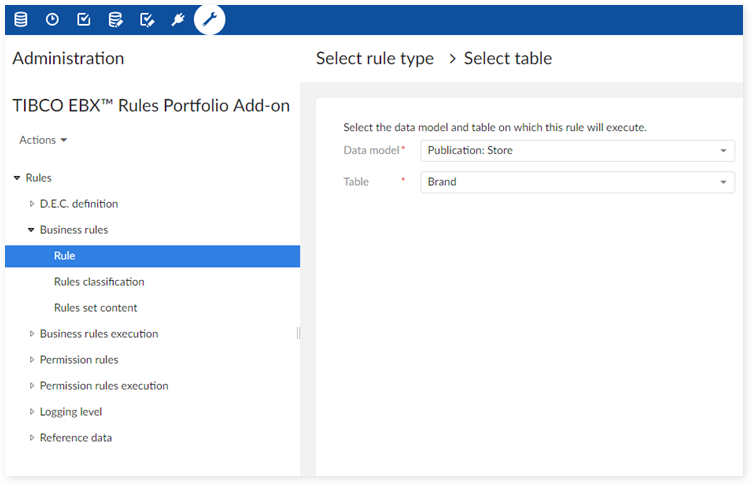
Select the type of rule you would like to create. Note that as of this release the wizard only supports creation of a business rule.
Select the data model and table on which this rule will execute.
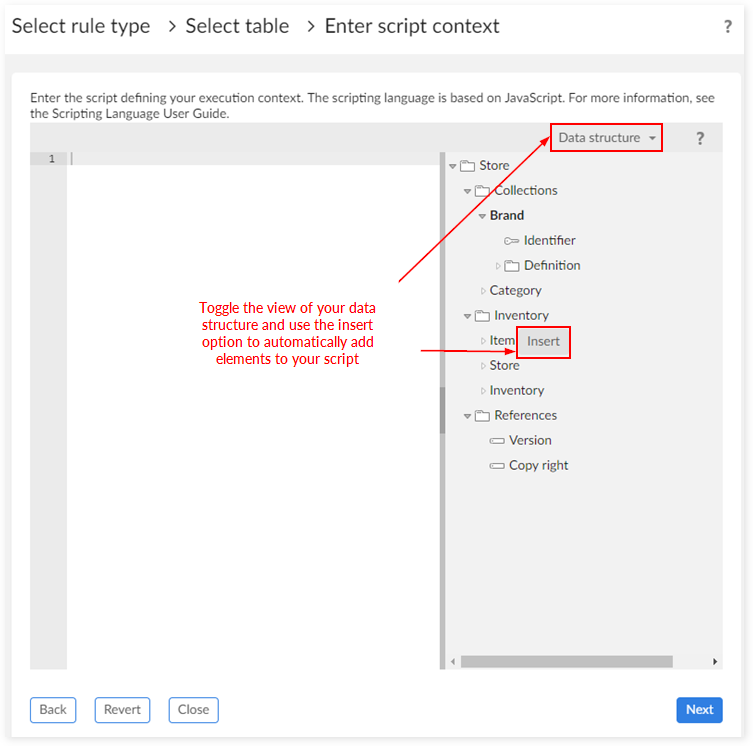
Choose whether to use an execution context. An execution context defines any conditions for rule execution. If you choose to use a script to define a context, the following screen displays.
Choose when you want the rule to execute.
Enter the rule name, specify severity, and an optional message.
Enter the script that specifies the business logic for the rule. See above the image associated with step four for tips on using the script.
You have the following options after entering your script:
If you are finished, save the rule and close out of the wizard by clicking 'Finish'. The add-on will present you with the option to publish the portfolio.
You can create a new set by entering the set's name in the 'Rule set name' box. You can then select 'Create more rule(s) for current table' to add additional rules to this set, or click 'Finish' to exit and close. The add-on presents you with the option to publish the portfolio.
Select 'Create more rule(s) for current table' to create an additional rule for this table. You can continue to add rules to a table using this option and just click 'Finish' when done.
Select 'Create rule for another table' to save the existing rule and restart the wizard.