Performing bulk actions
Overview
Uploading and attaching assets with the add-on's Upload and Attach services works well when you have a limited number of assets because:
You are limited to uploading 300 assets at one time.
You need to open each record to attach assets.
To save time and effort when you are working with a large number of assets, you can perform a bulk upload of zipped assets and then optionally attach assets automatically with batch processing. The following sections cover these topics:
Attention
To perform a bulk upload of assets, you must have access to the Administration panel. Additionally, to automatically attach assets, you must have access to the most recent version of the EBX® Data Exchange Add-on (New).
Bulk upload
To perform a bulk upload:
Navigate to Administration > User interface > TIBCO EBX® Digital Asset Manager Add-on > Digital asset and selecting the Digital asset table.
Open the Actions menu and select the Import from a ZIP file service.
Fill in the required fields:
Browse to select the desired file.
Specify the upload location using the Drive menu.
Set the action to take if existing folders are encountered: keep the existing, and the imported folders; replace the existing folders with the imported folders. Note this option is only available when importing to a Drive managed by EBX®.
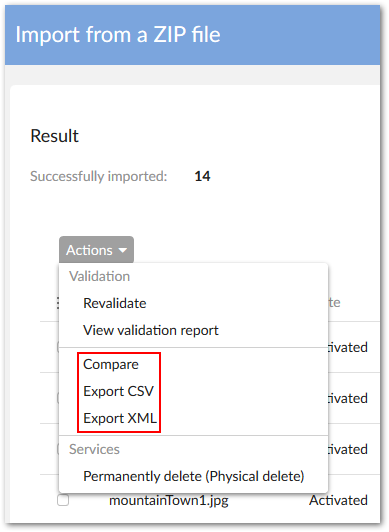
After clicking Import, the add-on keeps you apprised of its progress and displays a result page upon successful completion.
From the Result page's Actions menu (shown below), you can export a report of the results, or select multiple records to compare. Also, if the import fails, you can download a copy of the log file.
Attaching assets with batch processing
The EBX® Data Exchange Add-on (New) can automatically attach assets using the CSV or Excel import services. When performing the import, you use the Digital asset UUID lookup transformation function in the Mapping screen.
Pre-requisites:
A working EBX Digital Asset Manager Add-on configuration, including Drive and D.A.C., that links the Drive to the table location where you want to attach assets.
The Drive linked to the table must already contain the assets you want to attach.
The latest version of the EBX® Data Exchange Add-on (New)
A CSV or Excel file to map record primary keys and physical file names of assets. This file specifies where to attach assets and must include the following:
Columns that correspond to the primary key and Media-type fields of the records that you want to attach assets to. For example, in the following image the first column is the table's PK and the second is the media-type field.
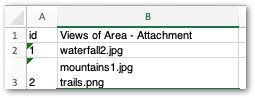
The fields in the Media-type column must contain a list of the file names of assets already uploaded to a Drive. Only exact names are valid and must include the file extension. Use the list separator defined in the EBX® Data Exchange Add-on to distinguish between file names in the list.
Attention
To obtain a CSV or Excel file with all primary keys and the columns ready for assets, you can perform an export with only the PK and media-type fields mapped.
The following instructions describe how to export a file containing the primary keys and corresponding asset file names, and then use an import operation to automatically attach assets. If you already have a file with primary keys and file names mapped, skip to Step 2.
Export primary key and Media-type fields:
Navigate to the table where assets are already attached to fields.
From the table's Actions menu, select Data Exchange (New) > Export CSV or Export Excel.
Select Mapping.
Delete all mappings, except for the primary key field. You can optionally delete all fields in the target table, except for the primary key and Media-type fields.
From the list Transformation functions, under Cross reference, drag the Digital asset name lookup function to the mapping area.
In the source table on the left, expand the Media-type field, and drag its connection point to the input of the transformation function.
Connect the output of the transformation function to the corresponding field in the target table.
Click Export and save the file.
Import generated the file to automatically attach assets:
Navigate to the table where you want to import assets.
From the table's Actions menu, select Data Exchange (New) > Import CSV or Import Excel.
Use the Source option to select the file containing the primary keys and lists of assets.
Select Mapping.
Apply the Digital asset UUID lookup transformation function:
Note that if a mapping was automatically generated, you must delete it before completing the following steps.
From the list Transformation functions, under Cross reference, drag the Digital asset UUID lookup function to the mapping area.
In the source table on the left, drag the connection point from the field containing the list of assets to the input (left side) of the transformation function.
Connect the output of the transformation function to the Media-type field in the target table.
Select Import.
If an error occurs for individual records or assets, the import will continue with the other records and assets. Any errors that occur display on the import result screen.