Additional configuration options
Creating metadata categories
In addition to tags, the add-on allows you to create your own categories of metadata to enrich assets. After applying metadata categories to assets, you can further describe the assets by adding metadata values. To perform these tasks:
Navigate to Administration > User interface > TIBCO EBX® Digital Asset Manager Add-on > Reference data > Metadata nature and create a new record to define a category of metadata.
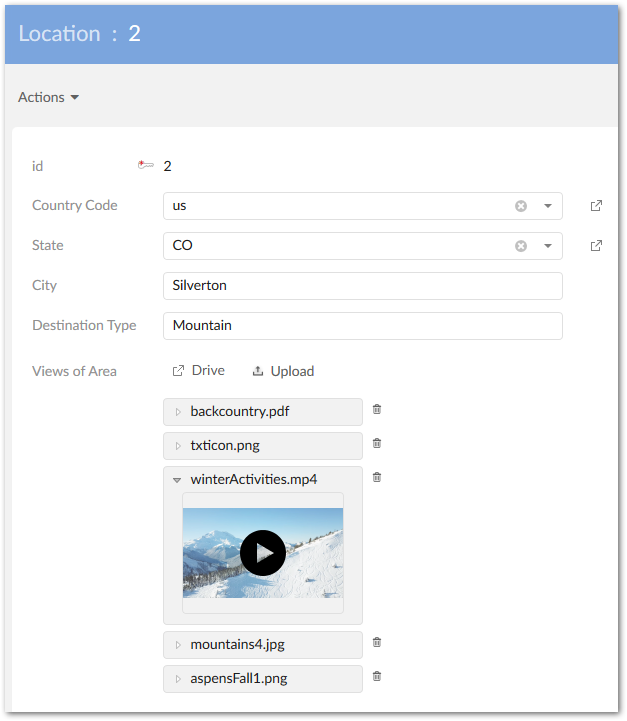
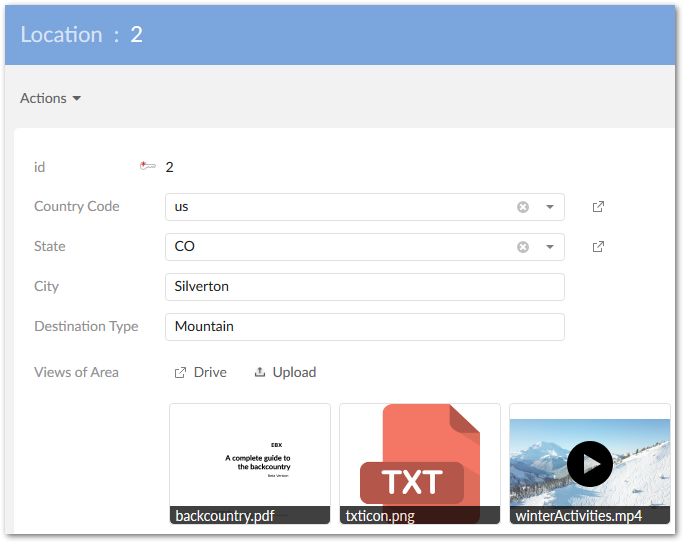
Access the Edit digital asset view:
When viewing a record with attached assets, select an asset's
 icon.
icon.Administrators can select Manage digital assets from a dataset's Actions menu. Then select an asset to open an expanded view and select the
 icon.
icon.
Select the Custom metadata tab and add a new value. While in this tab, you can also edit and remove existing metadata. Be sure to save and refresh after completing your changes.
Backing up and restoring
The add-on allows you to take a single action to create a backup of all the assets it manages. When you restore the files, you'll have to enter new paths for Drives included in the backup.
To create a backup:
Navigate to Administration > User interface > TIBCO EBX® Digital Asset Manager Add-on.
From the Actions menu > Services group, select Backup.
Enter a name for the zip file and click Backup.
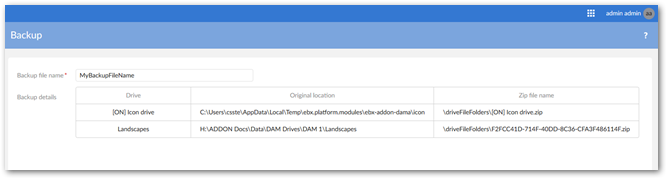
After the process completes, you can select Download to save a copy of the backup file.
To restore assets:
Navigate to Administration > User interface > TIBCO EBX® Digital Asset Manager Add-on.
From the Actions menu > Services group, select Restore.
Click Choose file to navigate to the backup file's location.
After selecting the file click Next.
A table listing all backed up Drives displays. Enter new paths, and click the Restore checkbox for Drives you want to restore. An important note: If you choose not to restore specific Drives, they will no longer be available.
Click Restore.
Allocating Drive disk space
When you create a Drive configuration, you point to a system folder to use as the Drive's physical location. You can specify how much space you want to allocate to the Drive with the Max usable space property. Once asset storage reaches this threshold, you can no longer upload assets to this Drive, unless you physically delete assets to make room.
Limiting image size
You can use an image configuration to limit the physical size (width/height) of images. Once you've created a configuration, you can add it to any Drive, or D.A.C. The configuration used by a D.A.C. cannot allow for larger images than that used by the Drive.
Specifying the view mode
A view configuration determines how assets display when attached to a data model field. Administrators can create configurations and use them in D.A.C.s. To create a view configuration:
Navigate to Administration > User interface > TIBCO EBX® Digital Asset Manager Add-on > D.A.C. > View configuration.
When you open an existing, or create a new record you can choose from the following options:
Mosaic view: Displays a tiled view of the assets. When you select this option, you'll be able to set the number of assets that display in rows and columns. You can also choose whether the view scrolls vertically, or horizontally to display additional assets.
List view: Displays assets in vertical list.
Table view: Enables display asset thumbnails when viewing a table. Use the available options to set the thumbnail size.
Decide whether assets display as their associated icons, or as thumbnails. When you choose:
To display icons, the assets display with their associated icon (if one exists).
To display thumbnails, you can set the thumbnail size and whether users can select an asset to expand it.
Choose whether quick action icons always display, or only display when users mouse over an assets thumbnail.
The following list of sample images show the outcomes of using the options mentioned above.
List view using thumbnails:
List view using icons:

Mosaic view with thumbnails:
Mosaic view with icons:

Whitelisting and blacklisting file formats
By default, the add-on allows upload of all file types. However, you may want to allow a set of file formats and block others, whitelist and blacklist respectively. The add-on allows you to add to a set of predefined file extensions. At the Drive level, you can restrict asset upload to only these file extensions. Alternatively, you could manually enter file extensions to blacklist. The D.A.C. level inherits permissions specified at the Drive level. However, you can override these settings. For example, you may have two different D.A.C.s linked to the same Drive. You could change permissions in the D.A.C.s so that only one of them can upload PDF files.
The following two settings are located in Administration > User interface > TIBCO EBX® Digital Asset Manager Add-on in the Drive and Digital asset component tables:
When enabled, the Restrict file upload option in a Drive record restricts asset upload to only the asset file types listed in the Reference data > File extension table. When enabled in a D.A.C. record, you can further refine restrictions by selecting options in the Supported extensions field. If you would like to include additional file extensions in the Supported extensions list, see the Adding new file extensions section below.
The Blacklisted extensions option only displays when the Restrict file upload option is disabled. This field allows you to manually enter file extensions to exclude from a Drive or D.A.C. You can use commas, semi-colons, periods, or whitespace to separate a list of extensions to blacklist. For example:
exe,bat,msi, etc.
Adding new file extensions
To enable upload and management of additional file formats:
Note
The following steps require administrative privileges.
Navigate to Administration > User interface > TIBCO EBX® Digital Asset Manager Add-on > Reference data > File extension.
Create a new record and fill in the following fields:
Business code: A user friendly name for this file extension.
Filename extension: Enter the filename suffix used to identify this file type.
Digital asset type: Choose an asset type from the drop-down list. This list populates with options from the Digital asset type table. You can create types in the table, or click + Create in the drop-down list to create a new type.
Icon → Select, or upload an icon used to identify this file extension type. The add-on stores all icons in the [ON] Icon drive.
Save and close.
Setting user permissions
If you have administrative access, you can set user permissions. Drives and D.A.C.s apply permission settings to user profiles and grant/restrict viewing, uploading, downloading, versioning and deleting. With the ability to apply permissions at two levels (Drive/D.A.C.), you can fine-tune asset management.
As an example, you may want allow a user to upload assets to a Drive. However, you may not want this same user to upload, attach, or edit any assets attached to a particular field. To accomplish this, you can grant appropriate access for the Drive and restrict access with the D.A.C.
Note
The add-on supports EBX® restriction policy functionality. For more in-depth information on restriction policies, see the EBX® User Guide and Reference Guide.