Managing groups
During matching, the add-on groups records that meet the criteria to be considered positive matches. The add-on also identifies records that are suspected of matching records in a group. When you manage a group of records, you can compare records, view record metadata, accept suspect records as duplicates, and reject false positive results. You can also enter the Merge view to merge data into a golden record.
If enabled by an administrator, an additional Match type column is displayed. This column identifies records that are included in the group because they are a transitive match. Transitive matching refers to the inclusion of records based on indirect relationships. For example, if Record A matches Record B, and Record B matches Record C, then Record A and C are grouped together due to their transitive connection through B. The column identifies records with the following match types:
Direct: The record was matched directly to the group's survivor.
Transitive: The record was matched indirectly through another matched record.
N/A: The group's survivor record; match type does not apply.
After a matching operation, you can open the Manage group view:
By selecting a record and then accessing the Manage group service from a table's Actions menu.
From the Consolidated view or Metadata view by selecting the Manage group icon next to a group.
The following image and table describe available actions:
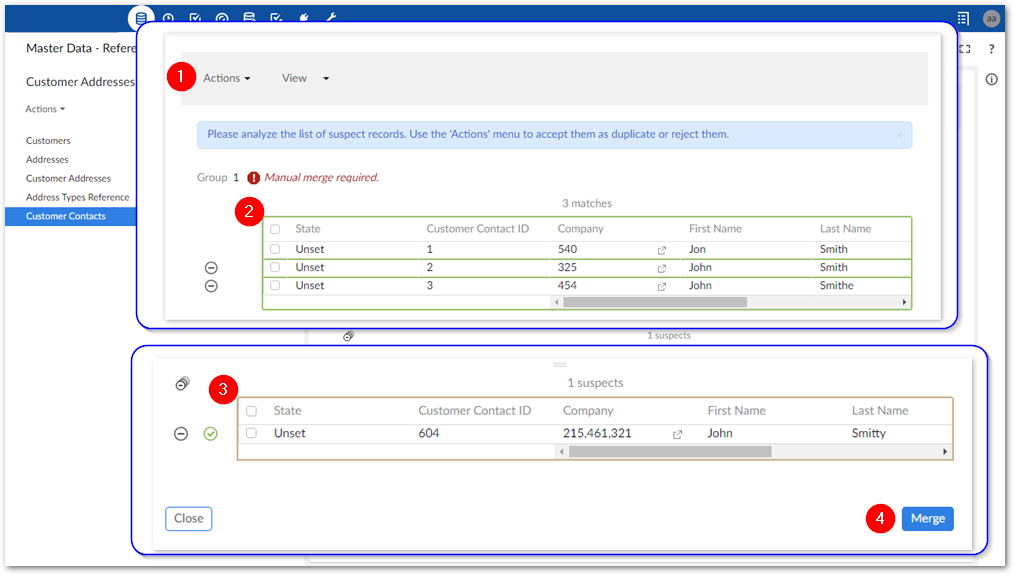
1) Actions menu, View menu, and filter | The Actions menu allows you to:
View menu: By default, any recommended or favorite view is applied. Otherwise, the table's default view is used. The View menu allows you to also select from any predefined table views. This allows you to create specific tabular views optimized for performing matching-related tasks. Note that the menu displayed in the add-on does not provide the option to create a new view. Instead, create these views from the standard EBX® tabular view by opening a table's View menu selecting Create a new view. Click the Filter icon to activate filters that: hide any merged records in the view, or to hide all fields except those configured to participate in matching.
The Display records menu allows to switch between vertical and horizontal display of the records. The view mode you select here is also maintained when navigating to the Merge screen. |
2) List of matches | The list of records identified as matching. Records are considered matches if they meet the criteria set out in the matching configuration, or if you confirm a record in the Suspects list. Use the Reject icon to remove a record from the list. Double-click a record value to open the record in the details view. |
3) List of suspects | This list contains records that were determined to be suspects. A record is considered a suspect when it meets the criteria defined in a matching policy. The icons displayed at the top of the list and across from each record allow you to: reject all records, reject individual records, or accept individual records. Double-click a record value to open the record in the details view. |
4) Merge button and Set as golden icon (not shown) | The Merge button opens the Merge view and makes all of the records in the Matches pane available for a manual merge. The |
Attention
The Manage group view is slightly different when matching is performed on business objects. The Actions menu combines options for the Matches and Suspects pane. Additionally, you use the Related tables menu to toggle display of the business object's related tables.