Merging business object records
Overview
The process of merging data allows you to select the fields in records that contain the most accurate data and merge them into a golden record. A golden record represents the most accurate and up-to-date version of data. You can perform merge tasks for the multiple tables that comprise a business object.
Note
When performing a manual merge on business objects, you are limited to 3 levels of tables. In other words, if the main table in the business object is considered the parent table, you can manually merge records from related tables to the grandchild level.
Merging business object records
To merge records:
Access the merge view in one of the following ways:
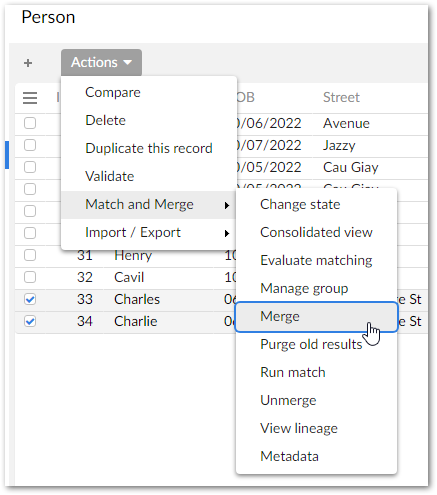
When viewing the business object's main table in the EBX® table view, select two or more records to merge:

When using the add-on's Manage group service, the Merge button is located in the bottom-right corner of the screen.
Choose values for the main table:
Click to select the fields you want to merge into the golden record. The choices you make are reflected by the preview at the bottom of the page. Once satisfied, click Next. Note that if a merge policy is configured, values will be pre-selected. You can still change these values manually.
See Business object merge UI overview for an overview of the available options on this screen.
Choose values for related tables:
Note
See Business object merge UI overview for an overview of the available options on this screen.
Click + New golden located next to the Result preview. You cannot select values to merge until completing this step.
Note
You can create multiple golden records. However, you can only select values from the same record once. After all of the available values have been used, you can no longer create another golden.
Add values to the golden record by:
Ticking the box to enable value selection for the records you want to merge. The values from the first record you select are automatically added to the new golden.
Choosing values from the selected records.
Optionally, repeat the above steps to create another golden record.
If required, merge records from child tables:
In the result preview, select the
 icon.
icon.Create a new golden record and add the values you want to merge into it.
If there are additional child tables to merge, use the button at the bottom of the screen to navigate between them.
After completing the above steps for all related tables, click Next to see the merge preview. If you chose not to merge some of the records, a warning pop-up displays the table and number of its records that will no be merged.
When you reach the Preview step, the add-on provides you an overview of what the merged record will look like. Select Merge to complete the process, or navigate to previous steps to make changes.
After the operations complete, the Summary screen informs you of whether the merge was successful.
Note
You cannot update records that are in the Merged or Deleted states.
Business object merge UI overview
The following sections highlight some of the UI features when merging a business object:
Main table merge screen
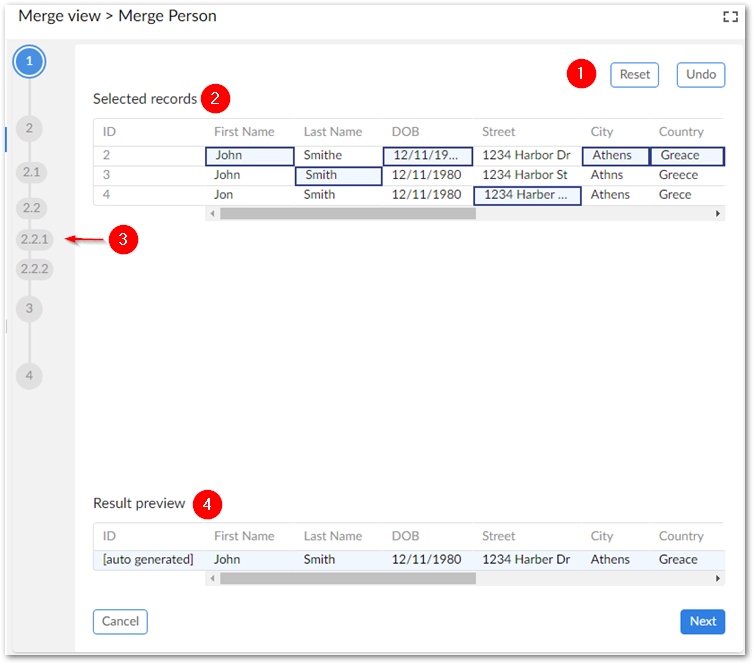
The following image and table highlight some of the options and functionality when merging the business object's main table:

1) Reset, Undo, and Apply merge policy | Select Reset to return all selected records to their original values. Select Undo to revert the most recent value selection. The undone change is highlighted in the Result preview. Apply merge policy is only available if a default merge policy is selected and automatically selects values for the golden record according to the merge policy. |
2) Data selection area | Select the data values to survive into the golden record. |
3) Merge progress tracker | This component allows you to track your progress during the merge process. It displays the current step, including sub-steps if applicable. Hover your mouse over a step to display a tooltip. |
4) Result preview | The golden record result based on the currently selected values to merge. |
Related and child table merge screen
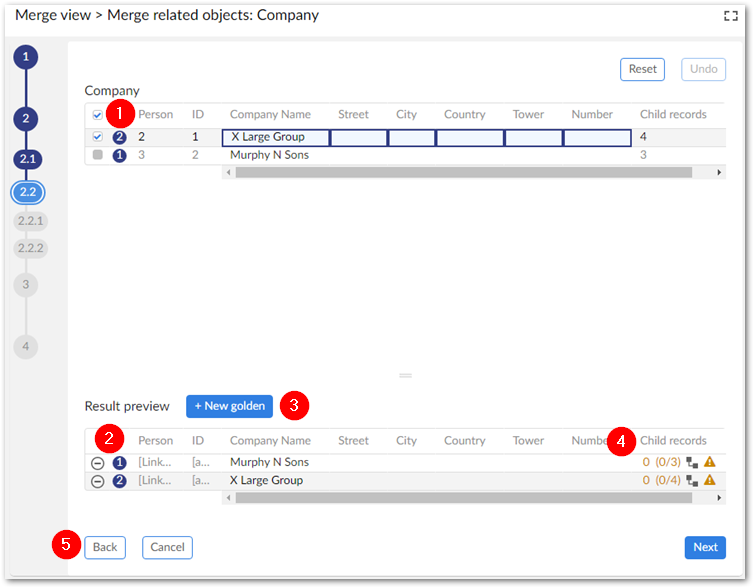
The screens for merging relate tables and child tables are mostly similar with a few minor differences. The following image and table highlight some of the merging options and features specific to related tables and child tables:
Note
To enable selection of values to merge, begin by selecting New golden.

1) Record selection | Selecting a record's checkbox allows you add its values to a new golden record. Once values have been added to a golden record, a number displays to indicate which record in the Result preview section contains its values. |
2) Result preview | Use the |
3) + New golden | Click this button to create a new golden record. Note that you cannot select values from the records above until a golden record is available to accept them. |
4) Child records (related table level only) | This displays at the business object's related table level and shows the number of child records available to merge, and that have been merged. Use the |
5) Navigation buttons | Use the Next and Back buttons to navigate between the business object's levels. When merging at the related table level, these buttons navigate between related tables. If you reach the final related table, and have skipped merging any child level records, a pop-up displays to ensure you want to continue. To access the child table level use the icon in the Child records column (described above). You can then navigate through and merge the child tables. When you reach the last child table, the Next button takes you to the Preview screen. |
Merge preview screen
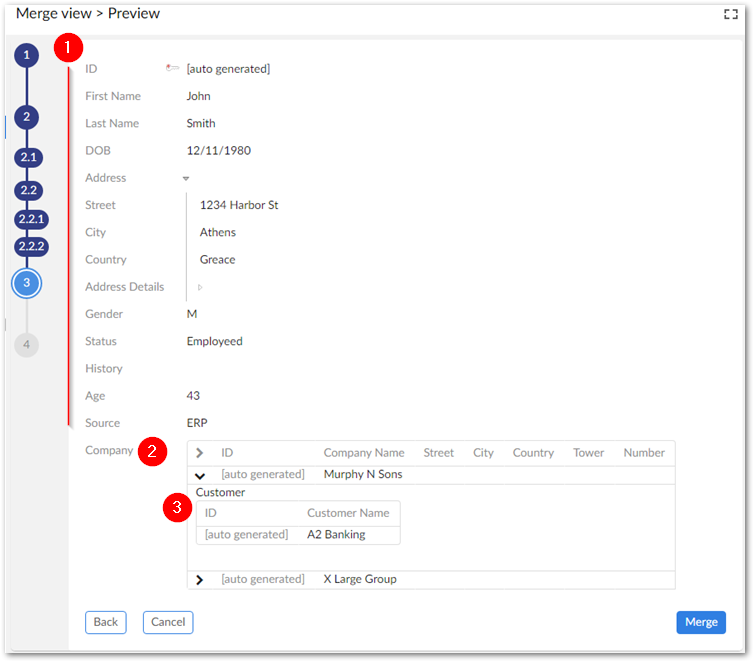
The following image and table highlight some of the options specific to previewing the merge results:

1) Main record values | Values from the business object's main table display first. |
2) Related record values | Records from related tables display in the top level tabular view. |
3) Related record children | Child records of related tables are nested here. |
Merge summary screen
This screen provides a summary of the merge operation that was just completed and allows you to access newly created golden records.