Staging
Overview
The staging feature allows you to move TIBCO EBX® repository elements from one environment to another. For example, it can stage configuration settings from a development environment to a testing environment. Many elements are supported as part of the staging feature. However, its main purpose is to handle configurable elements contained in the repository and not data that are updated by end users. See Supported types of staging elements for a list of all supported types of staging elements.
Note
If a group has no elements to stage, it does not display. For example, Historization profile does not display if no custom historization profile has been created.
By default, the staging features are active. Use the ebx.staging.activated parameter contained in the ebx.properties file to activate or to deactivate staging in different environments.
Note
Administrative access, or delegated staging access is required to use the staging feature. See Staging permissions and administrative delegation for more information.
Glossary
Staging server
An environment composed of deployed software (including EBX®) that is dedicated to development, testing, or production. Staging is used to build, test, and review an updated, or new solution before it is moved (staged) from one server to another.
Staging element
A configuration element in an EBX® repository that is stageable. Different types of staging elements include: data model publications, workflow model publications, dataspaces, etc.
Staging domain
A set of staging elements that can be transferred between EBX® servers.
Staging archive
File used to stage elements of a domain from a server to another.
Staging operations
The actions of importing and exporting a staging archive to and from a server.
Performing staging
The process of staging begins with the creation of domains to organize and stage elements. Once a domain is ready, it is exported as an archive file. Finally, the archive is imported into the target environment.
This operation can be performed in the EBX® graphical user interface, or by using the REST APIs. See Staging domains and best practices for staging domain best practices.
Attention
Only product versions with the same minor number are compatible for staging.
The following steps show how to use the user interface to perform a staging operation:
Create a domain:
See also
In the source repository, navigate to Administration > Repository management and select Staging.
Select Domains and click Add a domain.
Provide a name and save, but do not close.
Define the elements to stage by selecting the desired elements and if required, the specific content in the category. The list of selections is automatically saved on changes.
Note
Any elements that are in a state of error are hidden and cannot be selected.
Note
Additionally, each node in the repository is limited to displaying 1000 elements. It is possible to change this default value using the
ebx.staging.maxElementPerListproperty contained in theebx.propertiesfile.See also
Export and download the staging archive by selecting Download at the top of the screen or at each line of the domains table.
Import the staging archive:
In the target repository, navigate to Administration > Repository managementand select Staging.
Click Import a staging archive at the top of the screen.
Browse to select the staging archive.
Choose one of the import options. See Specifying import behavior for more information.
Click Import archive.
See Error handling for more information.
Specifying import behavior
The following image and table highlight available options when importing a staging archive:
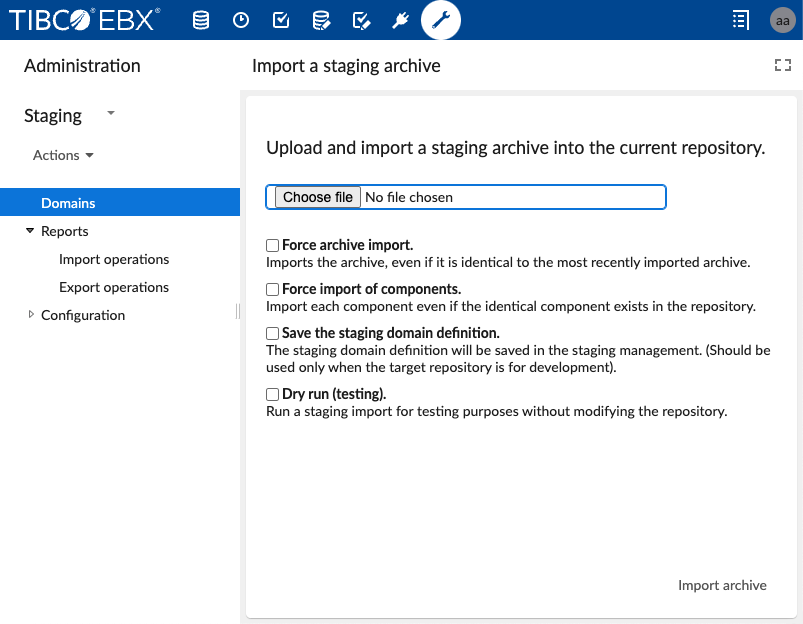
Force archive import | If the same staging archive was already successfully imported, the staging import is ignored by default. Use this option to force import execution of the archive. Use this mode if an initial import did not go as expected, then retry after making changes in the source repository. |
Force import of components | If the same staging component was already successfully imported, it is ignored by default. Use this option to force import execution of the component. Use this mode after modifying an archive and force replay the entire persistence process before going into production. NoteIf the same archive has already been successfully imported, the option |
Save the staging domain definition | By default, staging domain records are not created in the Domains table when executing an import operation. Use this option to import manually the domain definition. |
Dry run (testing) | This option is used for testing purposes to run an import without modifying the repository. Use this option to ensure the existence of declared dependencies. |
Staging domains and best practices
Staging domains are an effective means to organize the repository configuration settings. Use a domain to break large repository configurations into smaller parts. This allows each part to have different life-cycles. For example, HR and Procurement applications require updates at different times. In this case, create a separate domain for each application. Then define and stage these domains in multiple environments (dev, test, prod, etc.). This method also avoids having to test the entire configuration repository each time.
Domains require a unique name that conforms to dot notation. Supported characters include alpha and numeric from ASCII, underscores, dashes, and dots (the name cannot begin with an underscore). This behavior can be used like a namespace to create a hierarchy. For example: com.acme.hr, com.acme.procurement, com.acme.procurement.catalog, com.acme.procurement.catalog.2022.
Some best practices include:
Begin to clearly define domains as soon as possible in the staging life-cycle.
Use a separate domain for permissions because development environment permissions are usually different from production permissions.
Staging should only handle configuration data in the repository. The types "Data tables" and "Filtered data" are supported, but it should apply to data that are not updated by users (regions, countries, etc.) as the staging data will update them and might override changes by users.
Dataspaces that include long-duration transactional data hold operational data, and not configuration data. They can be numerous and clutter up view of staging components. Prevent them from displaying using the settings available in: Administration > Repository management > Staging > Configuration > Hidden dataspaces.
Create a backup of the database before importing one or more staging archives.
Staging permissions and administrative delegation
By default, administrators in EBX® have permission to access staging and can grant access rights to non-administrative users. Access rights can specify availability of individual actions, or all actions. However, since staging has the ability to create and update configuration elements, it is important to use caution when granting access to staging.
Grant a user staging administration permissions using administrative delegation. This process is completed using User permissions apply when selecting the content of a staging domain; they cannot select elements to stage that they don't have access to.
You can configure administrative delegation in the Administration panel under User interface > Global permissions.
The following table highlights the permission differences between an administrator and a user with staging administration delegation:
Administrator |
|
A user with delegated staging administration |
|
Error handling
Error handling during import operation
An import operation may return errors and warnings. The import can be successful, partially successful, on failure, have elements that were ignored or totally ignored. The import operation does not stop on first error, but tries all components. When an error occurs, the component will not import correctly. It might require a change in either the source or target repository to complete successfully. The error message should provide enough information to help discern the issue.
Note
Importing is not fully transactional and errors might lead to an unstable repository.
A dependency check is done, and if a required element is missing, an error is returned. This can happen when importing a domain that contains a dataset and the dataspace associated with the dataset is not in the domain, or in the destination repository.
When a warning occurs, the component has probably been imported correctly but might work in a degraded way, or is not accessible. During the dependency check, if a referenced optional element is missing, a warning is returned. This is the case of the owner profile of a dataspace.
Note
Staging tries to avoid writing as much as possible by default. This behavior can be overridden to force create or update staging elements. See Specifying import behavior for more information.
Import report
An import report is generated on each import operation performed through the UI or REST. It includes the import status of the domain and its components. The report also contains messages with severity levels (info, warning, error) that can help troubleshoot issues.
Import domain status values:
Success: All components are imported successfully. The import might ignore some components if they are already present and as expected in the destination repository.
Partially failed: Some component imports raised errors. Other components were imported successfully. The Status of each component import should be checked.
Failed: An exception occurred while reading the archive, or the component imports are all in error. Unlike the "Partially failed" status, no changes are performed to the repository.
Ignored: The archive is ignored as it was already imported or all the component imports were ignored. No changes are performed to the repository.
Waiting: Used in asynchronous mode. The import operation is queued and waiting to be processed.
Started: The import process is started and not finished.
Note
On system start, all imports that were started or waiting will pass automatically to failed because the job was interrupted.
Import component status values:
Success: The staging element was successfully created or updated.
Failed: An error occurred while importing the staging element.
Ignored: The import is ignored since the element is as expected in the repository.
Started: The import is started and not finished.
Error handling during export operation
Unlike import operations, the export operation only succeeds on full archive export; it fails if any error occurs. There is no partial states for staging exports.
If components in the domain are missing, an error is returned and the archive is not generated.
Export report
An export report is a report generated on each export operation performed through the UI or REST. It includes the export status of the archive.
Export domain status values:
Exported: The archive was successfully exported.
Requested: Used in asynchronous mode. The export is requested and currently processing.
Aborted: The archive export was aborted due to export errors or a processing interruption.
Expired: Using the REST service's asynchronous mode, an archive was generated but expired. It is no longer available.
Supported types of staging elements
The following types of repository elements are supported for the staging feature:
Dataspace
Dataspace permissions
Dataset (see Datasets for more information)
Dataset permissions
Data table
Filtered data
Data model (see Data models for more information)
Data model permissions
Data model publication (see Data models for more information)
Workflow publication
Perspective
Perspective permissions
Profile (Roles) (see Profiles for more information)
View publication
View publication permissions
Administration
Recommended perspective
Recommended perspective permissions
Historization profile
History and logs permissions
Task scheduler permissions
Workflow execution permissions
Workflow history permissions
Workflow interaction permissions
Workflow launcher permissions
Workflow technical configuration
Dataspace administration permissions
Data modeling permissions
Auto increment permissions
Global permissions
Scheduled tasks
Workflow models
Script publications
Script sources
Data tables
Data tables and filtered data are imported with a default configuration:
The default import mode is update or insert
The blocking constraints are disabled
The by delta mode is enabled
The table triggers are activated on import
Profiles
Only roles can be staged. Profiles are ignored when importing a staging archive, except for roles and if the directory is the default directory. When exporting a staging domain, a staging element linked to one or more profiles (user or role) will be staged with the link(s) whenever the users or roles are in the directory or not.
Note
In the case of a cycle in role relationships, all roles constituting the cycle are ignored
Data models
Data model publications and data models that are located in modules are not available for staging. However, a data model can be staged even if its corresponding publication is located in a module (the publication will not be staged).
Datasets
It's not possible to stage child datasets. They don't display when adding staging element to a domain.
EBX® Add-ons
EBX® Add-ons have specific components that can be staged. The sections below give information on the add-on components available to stage and where to find the components in the user interface. For reference purposes, the Staging location column in each table below refers to the following location: Administration > Repository management > Staging > Domains > <<SelectedDomain>> > Components.
The add-ons that include stageable components are:
TIBCO EBX® Data Model and Data Visualization Add-on
The table below shows the add-on's components available to stage and their location:
Add-on component | Staging location (beginning with category) |
|---|---|
Saved graph via DMA | Data models > Saved graph via DMA: [Name] |
Value and relationship graph configurations | Dataspace > Datasets > Value and relationship graph configuration: [Name] |
Data model graph configurations via DMA | Data models > Data model graph configurations via DMA: [Name] |
Data model graph configurations | Dataspace > Datasets > Data model graph configuration: [Name] |
Saved graphs | Dataspace > Datasets > Saved graph: [Name] |
Custom graph | Custom graph: [Name] |
TIBCO EBX® Data Exchange Add-on (New)
The table below shows the add-on's components available to stage and their location:
Add-on component | Staging location (beginning with category) |
|---|---|
SQL configuration | Dataspace > Datasets > Database and data model connections NoteThe database configuration is automatically migrated for the selected Database and data model connection configuration. |
User template | Dataspace > Datasets > Template information NoteIf a template is used for an SQL service, the corresponding SQL service is automatically included. |
TIBCO EBX® Insight Add-on (New)
The table below shows the add-on's components available to stage and their location:
Add-on component | Staging location (beginning with category) |
|---|---|
Dashboards | Dashboards NoteEach dashboard has dependencies to the specific assets it contains, such as datasets, tables, and fields. Empty dashboards and invalid indicators are automatically excluded. |
TIBCO EBX® Digital Asset Manager (New) Add-on
The table below shows the add-on's components available to stage and their location:
Add-on component | Staging location (beginning with category) |
|---|---|
Digital asset component | Dataspace > Datasets > Digital assets components |
Digital assets | Dataspace > Datasets > Digital assets in Drives NoteStaging can only migrate the Digital asset. Physical files must be migrated separately |
TIBCO EBX® Match and Merge Add-on
The table below shows the add-on's components available to stage and their location:
Add-on component | Staging location (beginning with category) |
|---|---|
Matching configuration | Data model publications > Matching configuration > Table > Matching configuration NoteAll elements that belong to a given matching configuration (main information, matching policies, merging policies and replications) are also migrated. |
Matching policy | Data model publications > Matching configuration > Table > Matching policy NoteAll components related a given matching policy are migrated, including a merge policy if it is linked with the selected matching policy. The exception is that the matching configuration's main information is not included. |
Merge policy | Data model publications > Matching configuration > Table > Merge policy NoteAll components related to a given merge policy are also migrated. |
REST API
See Staging operations for more information.
Temporary folders handling
Temporary folders are created to support staging operations and asynchronous process. Each folder created expires after a configured delay. The scheduled task DeleteExpiredStagingTemporaryFolders ensures periodic deletion of expired folders.
Note
The dedicated size on disk of temporary folders created for staging can be configured through the property ebx.staging.maxTemporaryFolderSizeInBytes.
Automatic import on startup
You can configure staging to automatically import specific archives on startup. This prevents you from having to manually initiate the import process and can ensure that all necessary data is available in your environment in a timely manner.
To set up automatic staging archive import:
In the
ebx.propertiesfile configure theebx.staging.importOnStartupproperty.Declare the folders containing the archives you want to import:
The folders should be physically located in a
/startupdirectory under the configured repository directory (example:${ebx.home}/ebxRepository/startup/folder1).Each folder should contain a JSON file called
instructions.json, which specifies the order and options of import for the archives in that folder.
The instructions.json file has the following format:
{
  "imports": [
    {
      "archiveFilePath": "myArchive1.zip"
    },
    {
      "archiveFilePath": "myArchive2.zip",
      "advanced_options": {
        "forceUpdateOnIdenticalComponent": false,
        "importDefinition": true
      }
    }
  ]
}
If an import fails, an errors.json file is created in the folder and contains a detailed report of the errors encountered during the import process. If the import is successful, an output.json file is generated in the folder and provides a report of the successfully processed imports.
Note
The advanced options are optional and lead to the same behaviour as the import options in the UI: Force import of components and Save the staging domain definition.
Note
Any folder containing the file output.json will be ignored during startup since it will be considered as already successfully imported.
Note
The declared folders and the archives specified in the instruction files must be strictly located under the startup folder of the configured repository. Navigation to parent folders, as well as the use of symbolic links, is not allowed.