User interface reference
Overview
The EBX® Script IDE includes the following main UI components:
Dock: Allows you to access the different types of script workspaces (Data model, Workflow, REST service, Role Mapper, and Messages).
Navigation Panel: Depending on the type of script workspace you're viewing, you can browse, select, create, import, and export.
Workspace: Location where you can write scripts, build REST endpoints, etc.
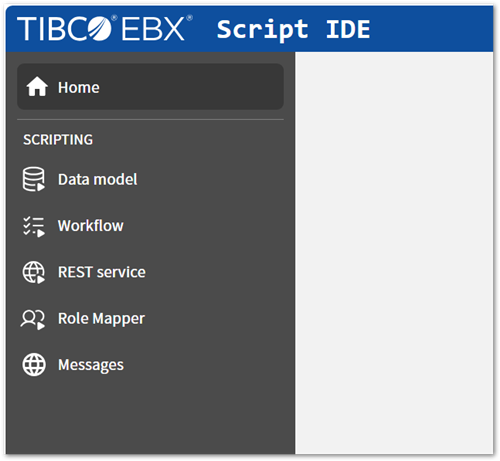
Dock
The Dock is the left-most component on the screen. It allows you to access the available scripting workspaces. Each workspace is specially tailored to one type of scripting. The Dock is resizeable and includes the following:
Navigation Panel
The Navigation Panel is the middle UI component and functions much like a file explorer. It's where you can browse and select your scripts. Each type of script has designated quick action icons that:
Create, delete, and publish.
Take you to specific components in the Data Model Assistant (DMA).
Import and export.
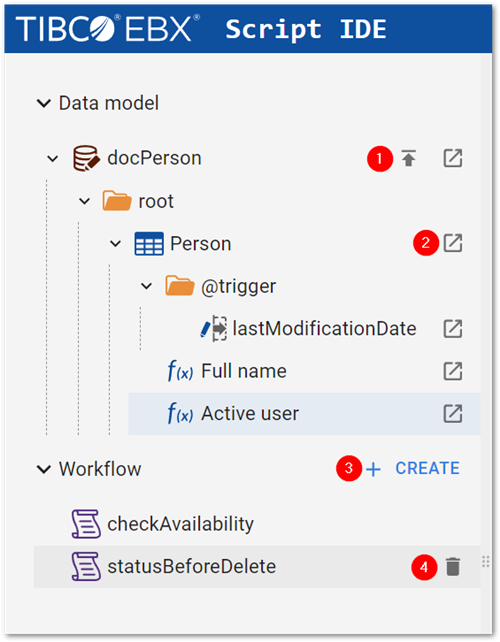
The following table describes available icons and actions in the Navigation pane:
| The Publish all icon publishes all scripts in a given data model. |
| The View in DMA icon opens the Data model assistant (DMA) with the selected item in focus. |
| The Create button is available for workflows, REST services, the Role Mapper, and Messages. |
| The Delete icon workflows, REST services, the Role Mapper, and Messages. |
| The Import icon allows you to import a script. |
| The Export icon allows you to export a script. |


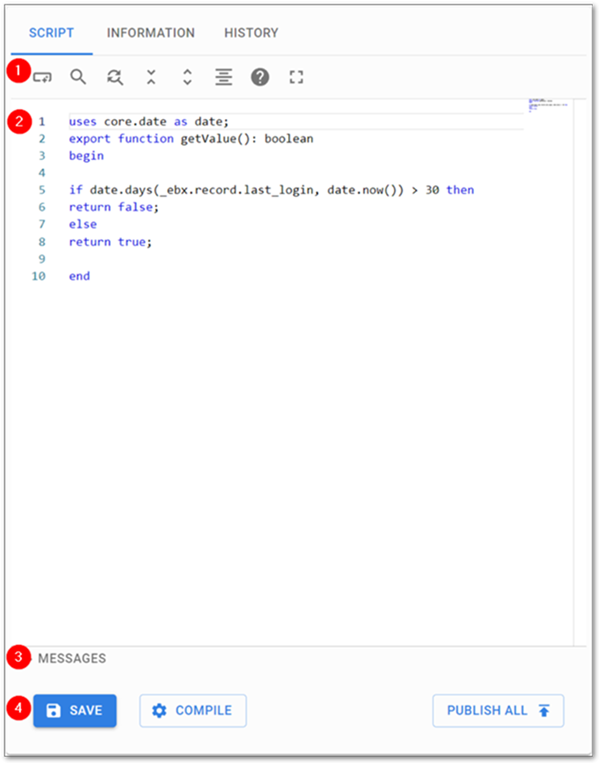
Workspace
The Workspace is the main area where you write and edit scripts; it's where the coding takes place. For scripted REST services, it's also where you can create the REST API definition.
The Workspace contains the following tabs and sections:
SCRIPT tab: You can write, edit, and view your scripts in this tab. It includes the following features:
Code completion
Hover for tooltips/help on individual components
Syntax highlighting
Compilation and error detection
Script saving and publishing
The SCRIPT tab includes a toolbar at the top with icons to call out various actions. Hover your mouse over each icon for a brief description of each.
The main body of the SCRIPT tab is where the actual script is written. At the bottom is an expandable messages section that displays information after saving, or compiling the script. Below the messages are the following buttons:
SAVE: automatically compiles and then saves the script.
COMPILE: complies the script without saving it.
PUBLISH ALL: publishes all scripts contained in the related data model.
INFORMATION tab: Displays details about the selected script. It is also where you specify whether capable scripts are indexed for search optimization.
PARAMETERS tab (workflow scripts only): Allows you to add and manage parameters applied to the script.
API DEFINITION tab (REST service scripts only): Allows you to define a REST endpoint, including its paths, path parameters, method, query parameters, body, and response.
DATA TYPES tab (REST service scripts only): Enables you to create data types to use with API definitions. Data types can also be used when creating the script for a REST service.
API HISTORY tab (REST service scripts only): Displays a list of API definition revisions and allows you to compare the differences between the current revision.
HISTORY tab: Efficiently manage script revisions in this tab. It offers a clear, chronological overview of all saved changes to your script. Each entry in the history is a snapshot of a specific change, allowing you to quickly understand how your script has evolved over time.
Rollback functionality: Use the arrows to undo individual changes and rollback your script to an earlier state.