Configuring the Runtime
- Procedure
- Select the Flogo icon in Activity Bar.
- In the Runtime Explorer, click Add a New Runtime or if a runtime exists click +.
- In the input field on the top, select the runtime type:
- Local Runtime
- TIBCO Platform
- TIBCO Cloud™ Integration (TCI)
Creating Local Runtime
In the New runtime dialog, specify the following details:
- Name: name for the runtime.
- Runtime type: it is Local Runtime by default.
- EMS Home: path to EMS Installation directory.
- IBM MQ Home: path to IBM MQ Installation directory.
Local is created and set as the default. Always Recreate Flogo Executable Checkbox
The Always Recreate Flogo Executable checkbox optimizes the Flogo Executable build time.
If you want to rebuild a Flogo executable every time, select this checkbox.
If the build process is slow or there are no significant changes to application dependencies, do not select this checkbox.
By default, this checkbox is not selected. An existing Flogo executable is reused if the following conditions are met:
Golang, Flogo Runtime, and connector versions are unchanged.
No new activities, triggers, or connections are added or removed.
No new custom extension is added or removed.
No new function is used in the mapper.
If any of these conditions are not met, the executable is rebuilt.
- The Flogo executable must always be started using the
--appoption. The embedded app inside the executable might differ from the working copy.
Exporting an application from the binary might result in an out-of-sync version.
Custom Extension Development: As a best practice, select the Always Recreate Flogo Executable checkbox for a fresh build every time.
Creating a Runtime for TIBCO Platform
In the New runtime dialog, specify the following details:
- Name: name for the runtime
- Platform URL: URL of the Control Plane
After entering the Platform URL, click Authenticate. This redirects to the TIBCO Platform URL where you need to sign in. After a successful sign-in, you will be redirected to Visual Studio Code.
- Data Plane: Select the desired data plane from the dropdown menu to which you want to connect.
- Capability Base URL: This is the Capability Public Base URL, which is present in the Flogo Capability that is provisioned in a data plane.
- TIBCO Developer Hub URL (Optional): Enter the URL of the TIBCO Developer Hub that you want to connect. The Developer Hub URL is auto-populated if you have provisioned Developer Hub in the Data Plane.
- Template tags (Optional): Enter the tags to filter the TIBCO Developer Hub templates.
- Documentation URL (Optional): URL for platform documentation.
If you use custom certificates for the TIBCO Control Plane setup, you must perform one of the following procedures:
Configuring the root CA certificate
Disabling certificate validation
If you have access to the root CA certificate, perform the following steps:
Set the
NODE_EXTRA_CA_CERTSenvironment variable to point to the root CA file. For example,NODE_EXTRA_CA_CERTS=C:\Users\flogouser\Documents\projects\test\mkcerts\rootCA.pem.Restart Flogo Extension for Visual Studio Code.
If you are using leaf or intermediate certificates, then perform the following steps to chain these certificates with the Root CA certificate:
Combine the certificates into a single file, placing the leaf certificate first, followed by any intermediate certificates, and finally the root certificate at the end.
Then set the
NODE_EXTRA_CA_CERTSenvironment variable to point to the file you just created.Restart Flogo Extension for Visual Studio Code.
This is not a best practice. However, if you do not have access to the root CA certificate, perform the following steps:
Set the value of the
NODE_TLS_REJECT_UNAUTHORIZEDenvironment variable to0.Restart Flogo Extension for Visual Studio Code
Creating a Runtime for TIBCO Cloud Integration (TCI)
To access TIBCO Cloud Integration apps, you must enable platform APIs from the Cloud APIs for the organization.
In the New runtime dialog, specify the following details:
- Region
- Name
- OAUTH Token. For more information, see How to generate an OAUTH Token?
The following Advanced fields are populated by default:
- Homepage URL: https://cloud.tibco.com/
- Documentation URL: https://integration.cloud.tibco.com/docs/index.html
- Designtime URL: https://integration.cloud.tibco.com/applications/details/flows/@{APPID}?applicationType=flogo
- Default App Export File: The default name with which you want to export an app
After connection to TIBCO Cloud Integration runtime is established, you can see the list of all the apps present in your org by opening the tree dropdown. You can take the following actions for these apps present in your Visual Studio Code org by hovering over the apps:
- Add app to favorites: Click to set an app as your favorite app that shows under the Favorite Remote Apps section.
- Export and open JSON: Click to export the app.flogo file of the app and download it in your workspace.
- Open in Browser: Click to open the app details page, you need to log in to TCI to view this page.
- Export Binary: Click to create a binary of the app and download it in your workspace.
- Export and Run Binary: Click to create, download, and run the binary of the app.
How to generate an OAUTH Token?
To create a runtime configuration, you need to first generate an OAUTH token.
- Procedure
- Navigate to Settings under your user account icon
 on TIBCO Cloud Integration.
 - On the left pane, click OAUTH Access Tokens
- Click Generate token to enter the Generate OAuth 2 token dialog.
- Specify the following details:
- Name: name of your token
- Valid for duration: number of days
- Can be used by these domains:
- Integration
- Connected Intelligence Cloud
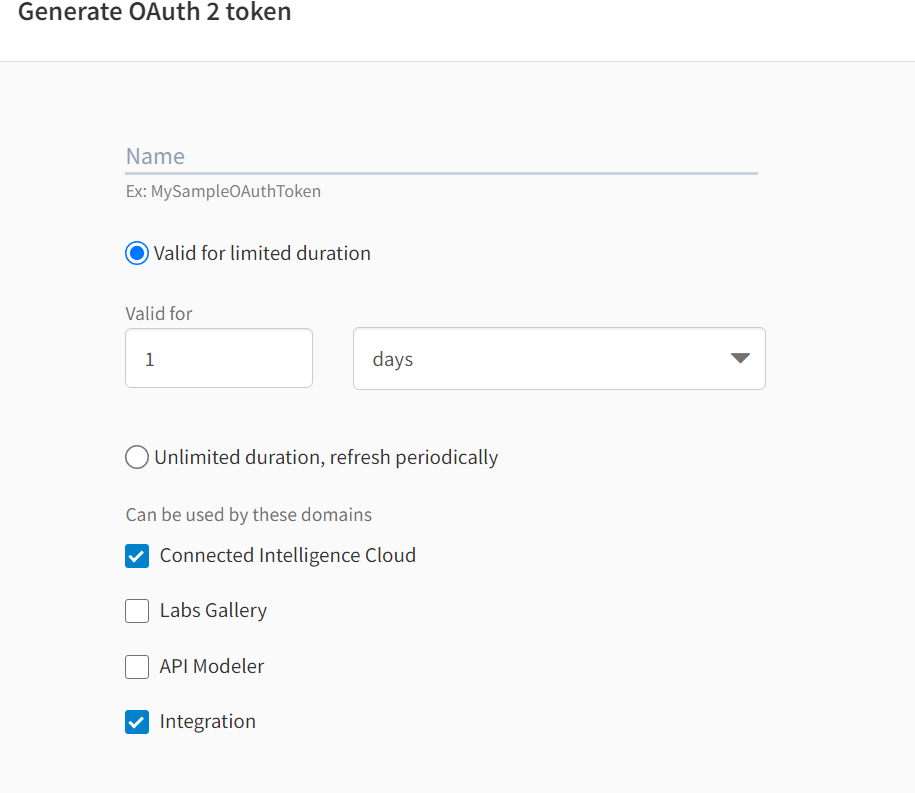
- Click Generate to create the access token that can be copied from the subsequent window.