|
| Copyright © Cloud Software Group, Inc. All Rights Reserved |
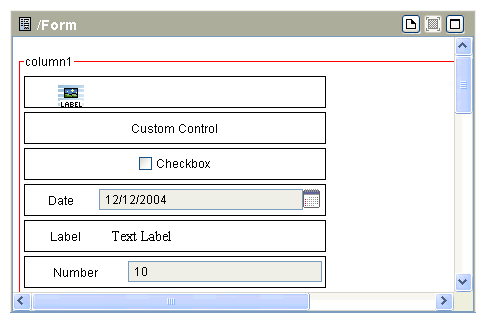
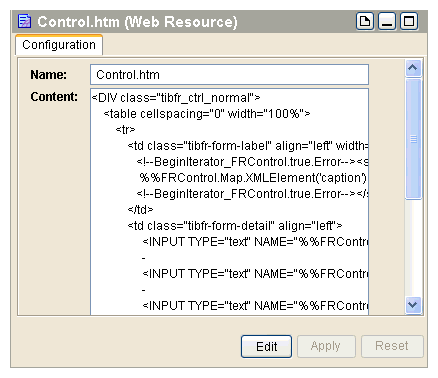
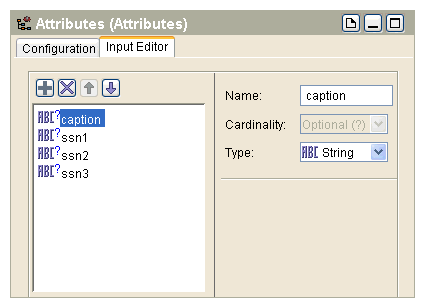
Each control has a set of attributes and an HTML template that specifies how the control is rendered in a pane at runtime. Attributes are defined in TIBCO Designer. The template, Control.htm, must include substitution variables that reference each attribute.
2. Click on the button Create a New Custom Control
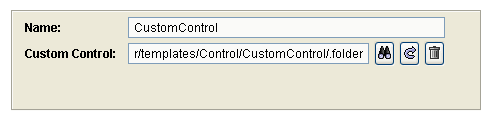
located on the top to create a new Custom Control resource.
The new control is created with two children objects, Attributes and Control.htm. For more information about these objects refer to Attributes, and To Edit Control.htm.
3. Type a name for the control in the Name field. You can also add a brief description for this control.
1. With a Form selected in the project panel, drag the Custom Control resource from the Form palette to the form displayed in the design panel. The Custom Control appears in the formFigure 12 Add a Custom Control
2. Select the new Custom Control in the design panel and proceed to connect it with the control definition in the project panel.
3. In the Configuration tab, click Browse resources button
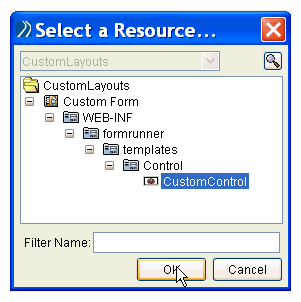
next to the Custom Control field. The dialog box Select a Resource appears.
4. Browse to the folder in a Form Resource Store where the custom control is defined, then click OK.Figure 13 Select a Resource.
5. Figure 14 Custom Control Location Displayed.
6. Click Apply.The Custom Control resource in the form is associated with the control definition in the Form Resource Store. Input fields for all defined attributes display in the Configuration tab, where you can specify default values. All user-defined input fields are optional fields in the runtime form.
1.
2. On the Input tab, use the buttons to add or delete attributes for the custom control. Control attributes become user input fields at runtime.Figure 15 Add/Delete Attributes![]()
3. Use the buttons above the screen on the left to add, remove, or order the attributes. For more information, refer to TIBCO BusinessWorks Process Design Guide.
4.
1. Select the Control resource in the project panel. Control.htm (or Control.html) is an HTML template that you can edit in the Content screen.Figure 16 Edit Control.htm.
2. Click Edit.Figure 17 Choose an Editor for Control.htmIf you have previously designated a text editor to work with TIBCO Designer, the file opens in that editor immediately.The file Control.htm opens in a text editor. For details, refer to the section Example for Control.htm.After you edit the file in your text editor, save it and close. You will be prompted to reload the file. Type a name for the template in the Name field.
3. Click Yes. The edited file is uploaded into the Configuration tab.The custom control definition is stored in the Form Resource Store, and can be added to a Form resource.Example for Control.htmThis example shows a simple form, which contains three fields for the Social Security number and explains the source code parts.Figure 18 Control.htm Example.<!--BeginIterator_FRControl.true.Error--><span class="tibfr-msg-error"><!--EndIterator_FRControl.true.Error--><!--BeginIterator_FRControl.true.Error--></span><!--EndIterator_FRControl.true.Error--><INPUT TYPE="text" NAME="%%FRControl.Map.FormInput('ssn1')%%" SIZE="3"
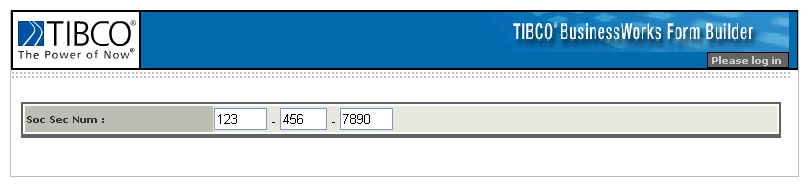
VALUE="%%FRControl.Map.XMLElement('ssn1')%%"><INPUT TYPE="text" NAME="%%FRControl.Map.FormInput('ssn2')%%" SIZE="2"
VALUE="%%FRControl.Map.XMLElement('ssn2')%%"><INPUT TYPE="text" NAME="%%FRControl.Map.FormInput('ssn3')%%" SIZE="3"
VALUE="%%FRControl.Map.XMLElement('ssn3')%%">Understanding the Control.htm Example
• <span class="tibfr-msg-error"> is displayed only in error mode.
• %%FRControl.Map.XMLElement('caption')%% is substituted for a caption
• %%FRControl.Map.FormInput(’attributeName’)%% is used to submit user input to the BusinessWorks engine. The direction is from the browser to the servlet engine.
• %%FRControl.Map.XMLElement('attributeName')%%" is substituted to display the actual value of attributeName. The direction is from the servlet engine to the browser.
|
| Copyright © Cloud Software Group, Inc. All Rights Reserved |