Copyright © Cloud Software Group, Inc. All Rights Reserved


Chapter 7 Deploying Formflow Applications : Creating and Deploying Formflow Applications

Creating and Deploying Formflow Applications
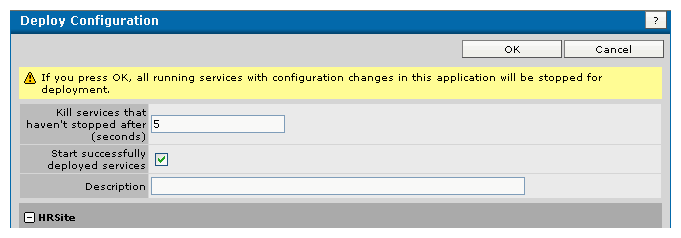
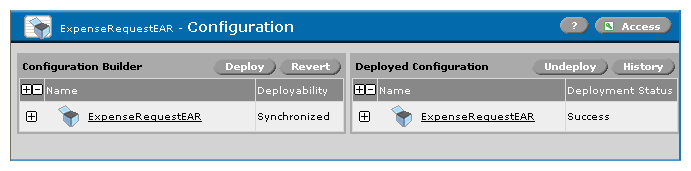
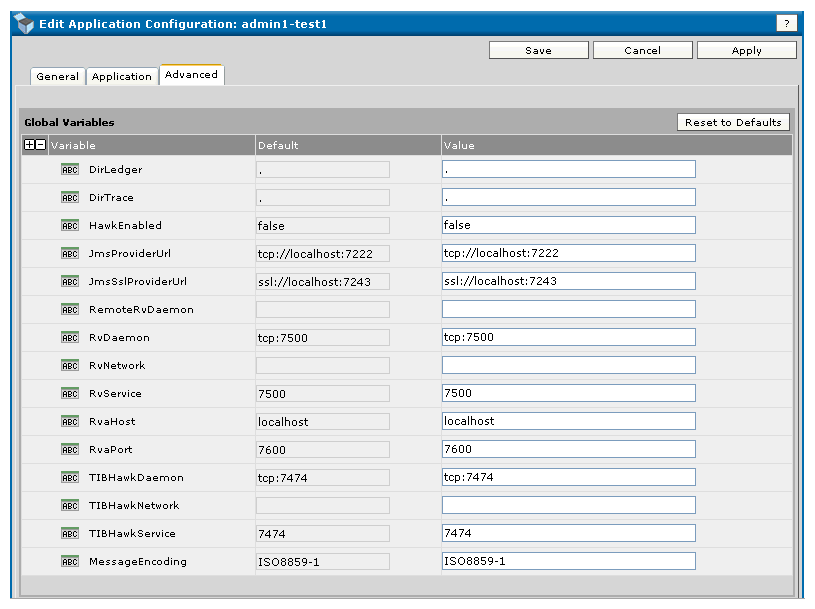
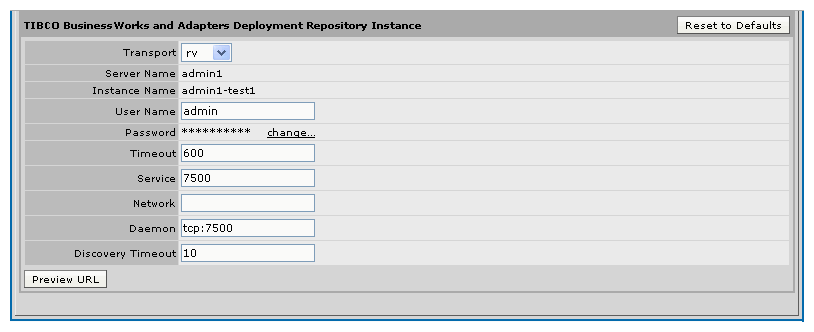
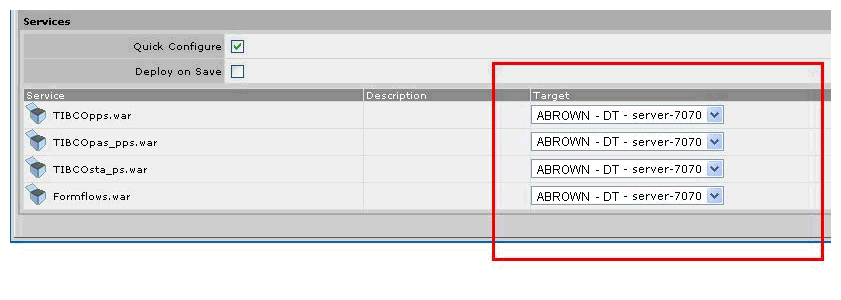
To use a formflow application, you first need to create one, to configure global variables (if desired) and repository instances of adapters, and then to deploy the application.
To create a new formflow application definition, load an .ear file that contains a FormBuilder Archive in TIBCO Administrator. After deployment, this archive becomes an application that runs in a servlet container.
During deployment, the .ear file is merged with a service archive containing all required libraries.
At runtime, set the TIBCO BusinessWorks engine properties in the following file: bwfb_install_dir/version/bin/BWConfig.cfg. When you rebuild the .ear file, BWConfig.cfg will be a part of this file.
To Create an Application
1.
Log into TIBCO Administrator by selecting Start >Programs>TIBCO>TIBCO Administrator Enterprise Edition version>TIBCO Administrator.
2.
3.
Select Application Management in the left hand frame and New Application in the Application Management screen on the right.
4.
Navigate to the saved .ear file and click OK to upload it. For ore information on creating archive files, see To Create an Enterprise Archive (EAR).
Figure 47 Upload EAR File
5.
6.
In your browser, type the following URL:
http://host_name:port/TIBCOpps/tibco/site_name/site
7.
To Configure Global Variables
To access global variables, in TIBCO Administrator select application_name>Configuration> application_name> Advanced.
The global variables are displayed such as in Figure 48:
Figure 48 Global Variables Displayed
You can change values for the following:
Variables (DirLedger, DirTrace, HawkEnabled, JmsProviderUrl, JmsSslProviderUrl)
Mail settings (FROM, HOST, TO_EMPLOYEE, TO_EMPLOYEE_MANAGER, TO_HR, TO_PAYROLL)
TIBCO Rendezvous daemons and services (RemoteRvDaemon, RvDaemon, RvService)
TIBCO Hawk daemons and services (TIBHawkDaemon, TIBHawkNetwork, TIBHawkService)
Message encoding (MessageEncoding)
You can configure values in these sections, or click Reset to Defaults to re-establish the default values.
To Configure Adapters Deployment Repository Instance
To access deployment repository instances of adapters, in TIBCO Administrator select application_name>Configuration> application_name> Advanced>.
The adapters deployment repository instances are displayed such as in Figure 49:
Figure 49 Adapters Deployment Repository
In this section, you can change values for the following:
Transport   From the dropdown list select rv (Rendezvous) or http.
Server Name   This name cannot be changed.
Instance Name   This name cannot be changed.
User Name    This name can be changed here.
Password   You can change your password here. Click on change, and then enter the new password in the Change Password dialog box.
Timeout   The default is 600 seconds.
Service   The default is 7500.
Network   Select Network.
Daemon   The default is tcp:7500.
Discovery Timeout   The default is 10 seconds.
All BusinessWorks FormBuilder services should be deployed on the same Tomcat instance.
To Select a Servlet Container for BusinessWorks FormBuilder Services
You may have multiple instances of Tomcat registered in your domain using the Domain Utility, such as on ports 7070 and 9090.
Once you are about to deploy a BusinessWorks FormBuilder application, you must make sure that you choose the same target Tomcat engine in the menu.
Figure 50 Select a Servlet Container for BusinessWorks FormBuilder Services
In the dropdown list, which may be displaying different port numbers in the Target window, select one target port (Tomcat instance) for all four services.
You also need to check if the application is deployable by checking the Configuration tab:
If an application is starting for the first time or if it was previously successfully undeployed, the display will show that the application is deployable (ready to be deployed).
If undeployment was not successful, a failure message displays in the Deployed Configuration column. To view more detailed information, click the History button, then click the Details link.
Deploy the Application
1.
If the servlet engine is not running, start it where the application is to be deployed. Log into the TIBCO administration domain as a user with administrative privileges.
2.
Navigate to the Application Management> application_name> Configuration module in the left panel.
3.
In the Configuration panel, click the Deploy button for the application.
Figure 51 Deploy Configuration
4.
If the application deploys successfully, a screen from Figure 52 displays in the Configuration module:
Figure 52 Deployment Success
If the application did not deploy successfully, a screen similar to Figure 53 appears:
Figure 53 Deployment Failure
You can check the reasons for the deployment failure by clicking History.
Undeploying Formflow Applications
After a formflow application has been deployed, any modifications to formflows or automated processes require undeploying the application. If a formflow application failed to deploy properly, you need first to undeploy it, make the appropriate changes, and then deploy the application again.
You should also undeploy formflow applications before uninstalling or upgrading the software.
Undeploying removes a formflow application from the servlet engine instance where it was originally deployed. The web application directory structure on the file system is deleted. The Enterprise Archive file is not affected, so the application can be redeployed.
To Undeploy an Application
1.
If the servlet engine is not running, start it where the application is deployed. Log into the TIBCO administration domain as a user with administrative privileges.
2.
Navigate to the Application Management> application_name > Configuration module in the left panel.
In the Configuration panel, click the Undeploy button for the application.
3.
If the application undeploys successfully, the display will show that the application is deployable.
Figure 54 Application Undeployed.
If undeployment is not successful, a failure message displays in the Deployed Configuration column.
4.
To view more detailed information, click the History button, then click the Details link.
Redeploying Formflow Applications
After undeploying an application, you can modify the TIBCO Designer project and redeploy the application. The existing application definition in TIBCO Administrator can be reused, or a new application can be created. This section describes how to reuse an existing application definition.
To Redeploy an Application
1.
After modifying the TIBCO Designer project, rebuild the Enterprise Archive resource. Save the archive under the same or a different name. For instructions, see Enterprise Archive (EAR).
To load the updated archive in TIBCO Administrator, follow the instructions given in section Creating and Deploying Formflow Applications.
2.
Select Application Management and then select the application you want to redeploy.
3.
Select Configuration. The Configuration screen of the selected application appears, showing that this application is deployable. See To Undeploy an Application for the view of this screen.
4.
Click on the Deploy button to redeploy the application.
5.
In the next screen, change any information about services that you need (such as terminating any running services, or starting the deployed services), and click OK.
If redeployment was successful, the following screen appears:
Figure 55 Application Redeployed

Copyright © Cloud Software Group, Inc. All Rights Reserved