Merging from a Dialog Box
You can merge your guidelines from within EDISIM Standards Editor or from a standalone program called GM.exe. Either method brings up the same dialog box.
Follow this procedure each time you are ready to merge two guidelines.
Setting up a Merge
-
Collect the information mentioned in Information Needed Before Merging.
-
Open the GM dialog box by:
-
Opening EDISIM Standards Editor 5.14 or later and clicking the GuideMerge toolbar button
 .
. -
Or, by double-clicking on
GM.exein the Bin directory of EDISIM, HIPAA Validator Desktop, or Instream.
-
-
Choose View > Options and check the settings, which are described in the next section.

Selecting Options
From the GM dialog box, choose View > Options and select any options that you need:
|
Option |
Description |
|---|---|
|
Show Debug Messages in Output |
If selected, this shows more information in the bottom of the merge dialog box. |
|
Overwrite Production Guideline During Merge |
If selected, the production guideline is overwritten without prompting. If this is not selected, and the production guideline exists, the merge fails. |
|
Use Description from Master guideline |
If selected, the master guideline descriptions will be used in the production guideline. |
|
Use Description from Spoke Guideline |
If selected, the spoke guideline descriptions will be used in the production guideline. |
|
Use Custom Description |
If selected, you can type a description that will be used for the production guideline. |
|
Allow User Attribute Overrides |
Allow User Attribute Overrides lets you change default merging behavior for selected user attributes. If the selected user attribute is set in the spoke guideline, it is to be set the same way in the resulting production guideline. |
|
Force User Attribute Overrides |
Force User Attribute Overrides lets you change default merging behavior for selected user attributes. If set in the master guideline, the selected spoke user attribute settings are to be used in the resulting production guideline. None means the spoke guideline’s user attributes never override those in the master guideline - even those objects that are marked must use in the spoke guideline. |
|
Include Version Information |
Include Version Information lets you add version information to add a .VERSION line into the .PRIVATE FORESIGHT area of the Production Guideline. To add the version information, check the “Include Version Information” and enter text in the text box to include in the .VERSION line. For example: Entering "8.8.0a" in the text box causes the following .VERSION line to be created:
|
|
Add Time Stamps to MERGEFROM information |
Add Time Stamps to MERGEFROMinformation lets you specify whether or not the .MERGEFROM line in the production guideline should include time stamps for the Master and Spoke guidelines. The time stamp is in the form YYYYMMDD.HHMMSS, and is determined from the guideline's .DATE entry in the std/sef file. This date represents the date that the guideline was last changed with Standards Editor, or was created with GuideMerge. Checked – Time stamp appears Unchecked – Time stamp does not appear |
Performing a Merge
-
Click the
 button to add a merge to the box.
 -
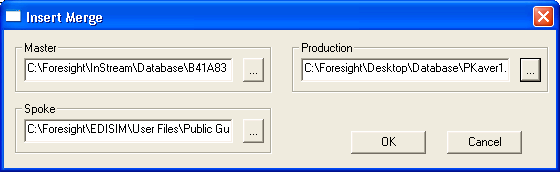
Fill out the three fields as follows (you can stretch the dialog box to make the fields wider).

Master Click the button at the end of the field and find the file containing the master guideline.
For HIPAA users, it is in HIPAA Validator Desktop’s Database directory or Instream’s Database directory. If it is not accessible to your current machine, copy its .STD file to a drive that is accessible.
Spoke Click the button at the end of the field and navigate to the file containing your company’s guideline. This is normally in EDISIM’s User Files\Public Guidelines directory. Production Click the button at the end of the field and navigate to the directory where you want to create your production guideline. Type the name of your guideline.
-
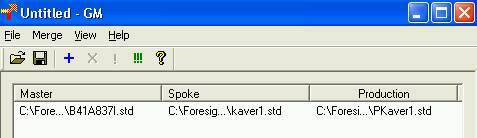
Click OK to add the merge to the top window.

-
If you have other merges to do, add them by clicking
. -
Click the
 button to perform the merge(s).
 If you have multiple merges listed, you can merge an individual line by clicking on it and then clicking
 .
. -
Read the diagnostics in the bottom pane and then check to be sure that the production guideline was created.


Changing a Merge
To change a merge listed in the top pane of the GM dialog box, double-click on it.
Adjusting the GM Box
You can stretch the dialog box horizontally by dragging the right and left edges out.
You can adjust the columns in the top window by dragging the splitters between the column headers:

Saving Merge Definitions
If you plan to repeat the merge when the spoke guideline or HIPAA guideline changes in the future, save it.
|
To do this … |
Do this … |
|---|---|
|
Save a merge definition |
Click |
|
Open a saved merge |
Open the GM box and click |
|
Add to a saved merge |
Open it and click |
|
Change a line in a saved merge |
Open it and double-click on the line. |

