Content-based TPA
| Data | X12, flat file, and XML |
| Programs | Validation |
| Selects | Profile, guideline |
Content-based TPA requires that someone set up business rules in TIBCO Foresight® EDISIM® Standards Editor. It is best done by an experienced guideline developer who understands the basics of EDISIM® business rules. See TIB_fsp-instream_n.n.n_BusinessRules.pdf.
With content-based TPA, you can have Instream validation switch to another guideline and profile many times within the same transaction set or functional group. You can switch at the ST segment or at any repeating loop within the guideline. Switching is triggered by one or more specific values between the ST and SE. The structure of each guideline must be similar, especially at the switch location.
| Overview of Content-based TPA validation with Instream programs | |
|---|---|
|
Invoking TPA |
CBPARTNERAUTOMATION in For details, refer Turning on Content-Based TPA |
|
Identifying lookup file directory |
CSV file directory identified by CBPARTNERAUTOMATION in For details, refer Lookup File Format |
|
Identifying lookup file name |
IdentifierLookup business rule in original guideline. For details, refer Setting up your Lookup Table for Content-Based TPA |
|
What it selects |
Validation guideline Validation profile |
|
Command line |
Use the -i -o, and -g validation command line parameters. For details, refer Validation Command Line |
|
Changes at |
Locations marked by DSR in the originating guideline. |
|
Standards |
X12, flat file, XML Mark a guideline switch point with a DSR mark in the Standards Editor. |
|
Unmatched files |
Originating guideline (-g on command line) Default APF |
Content-based TPA requires guideline changes.
|
Example: Check for guideline and profile at top of each transaction set |
Example: Check for guideline and profile at each 2000A loop |
|
|
|

To set up content-based TPA:
|
Step |
See page … |
|
Turn on CBPARTNERAUTOMATION in the |
|
|
Set up a lookup file containing transaction set values and corresponding guideline name and profile name |
|
|
Set up TPA business rules in your base guideline |
|
|
Start validating with the guideline that contains the TPA business rules |
Turning on Content-Based TPA
To enable content-based TPA:
-
Go to Instream’s bin directory and edit $dir.ini (Windows) or fsdir.ini (UNIX).
-
Go to the CBPARTNERAUTOMATION line.
-
If the line starts with a colon ( : ), remove the colon.
-
Adjust the path to point to the directory containing your content-based TPA file (described below). Retain the trailing slash and the quotation marks around the path:
CBPARTNERAUTOMATION= "C:\Foresight\Instream\Bin\"
Do not include a filename. It will be determined by the IdentifierLookup business rule in the guideline. This lets you have lookup files that are specific to particular guidelines. Put all lookup files in the directory specified in the CBPARTNERAUTOMATION line.
-
Do not include a filename. It will be determined by the IdentifierLookup business rule in the guideline. This lets you have lookup files that are specific to particular guidelines. Put all lookup files in the directory specified in the CBPARTNERAUTOMATION line.
-
If you are not using envelope-based TPA also, be sure that there is a colon at the front of the PARTNERAUTOMATION line.
Planning
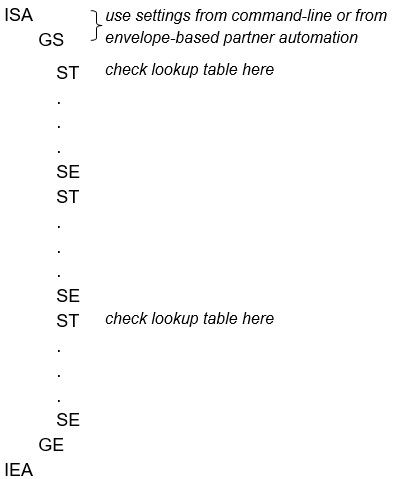
It helps to write out the scenario you are trying to capture. In our EDI example, this is:
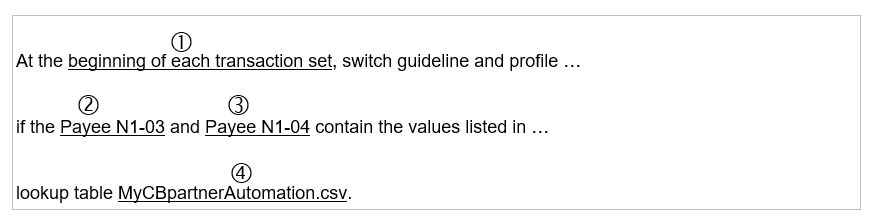
These are the pieces of information that we need to convey to Instream:
Where the guideline/profile switch should take place
For details, refer Marking the Potential Switch Location
The first element with a value that determines if a switch should take place
(Payee N1-03)
For details, refer Marking the First Value that Determines the Switch
The second element with a value that determines if a switch should take place
(Payee N1-04)
For details, refer Setting up a Rule that Checks the Lookup Table
-
The name of a table containing values and the corresponding guideline and profile names
For details, refer Setting up your Lookup Table for Content-Based TPA.
Setting up your Lookup Table for Content-Based TPA
-
Go to Instream’s DemoData\CBTPAdemo directory and copy MyCBpartnerAutomation.csv to the path that you specified in the $dir.ini or fsdir.ini file (For details, refer Turning on Content-Based TPA).
-
Edit this new file with a text editor like Notepad.
-
Add a line for each scenario that triggers a guideline or profile switch, as explained below.
-
Save as a text file.
Important: Use a text editor when editing the lookup file.Important: Avoid editing it with a spreadsheet, which may delete leading zeros, reformat numbers, and otherwise cause havoc with the content.
Lookup File Format for Content-Based TPA
This text file contains rows of comma-separated values. The top line in the file contains labels for the four columns. You can change the labels since they are ignored by Instream.
The first two values in each line determine if Instream should start using the profile in column three and the guideline in column four. Every line has exactly three commas:
Where:
| Value1 | First value from data. |
| Value2 | Second value from data. At least one value must be present. |
| Profile | Optional; defaults to the Bin directory if you don’t specify a full path. If you specify a path, do NOT use quotes even if it contains spaces. Do not end with a backslash. |
| Guideline |
Optional; use at least one of columns three and four. Do not include the file extension “.STD”. For HIPAA 278s, include the response guideline, a vertical bar, and then the request guideline:
If the data’s BHT-02 contains 11, the first guideline is used. If the BHT02 contains 13, the second guideline is used. |
If Instream does not match the data to columns 1 or 2:
1. It uses the guideline selected with envelope-based TPA.
2. If that is not in effect, it uses the guideline selected with the command line –g parameter.
Example Lookup File
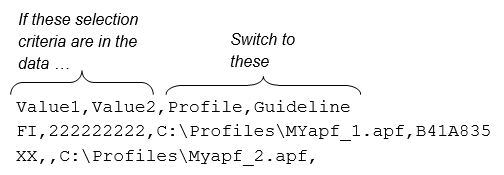
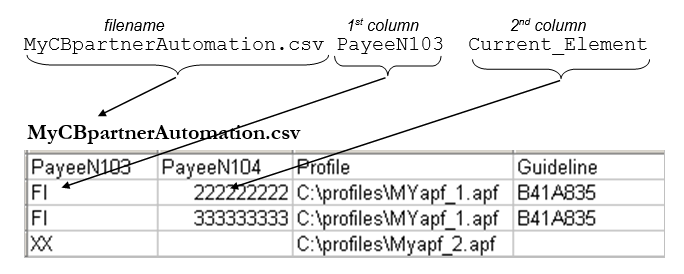
This is the lookup file for the example used throughout this section. You can find a copy of this file in DemoData\CBTPAdemo\MyCBpartnerAutomation.csv.
PayeeN103,PayeeN104,Profile,Guideline
FI,222222222,C:\Foresight\Instream\DemoData\CBTPAdemo\MYapf_1.apf,B41A835
FI,333333333,C:\Foresight\Instream\DemoData\CBTPAdemo\MYapf_1.apf,B41A835
XX,,C:\Foresight\Instream\DemoData\CBTPAdemo\Myapf_2.apf,
Explanation:
| First line | Headings. Ignored by validation; you can change them |
| Second line |
When validating, Instream uses profile MYapf_1.apf and guideline B41A835 if the data contains both of these values at the elements specified with a business rule: FI and 222222222 |
| Third line |
When validating, Instream uses profile MYapf_1.apf and guideline B41A835 if the data contains both of these at elements specified with a business rule: FI and 333333333 |
| Fourth line |
When validating, Instream uses the profile Myapf_2.apf if the data contains XX at the first element specified with the business rule. Since no guideline is given, it will use the one selected by envelope-based TPA, or, if that was not used, with the one selected by the command line –g parameter. |
Setting up your Base Guideline
The example used throughout this section sets up rules for the base guideline - the one that starts the validation. This guideline has the SetIdentifier and IdentifierLookup business rules. The guidelines that are invoked by this one won’t have these rules.
In this example, the rules will switch to another guideline and profile at the ST segment when certain values are found in the 835 Payee N1-03 and N1-04.
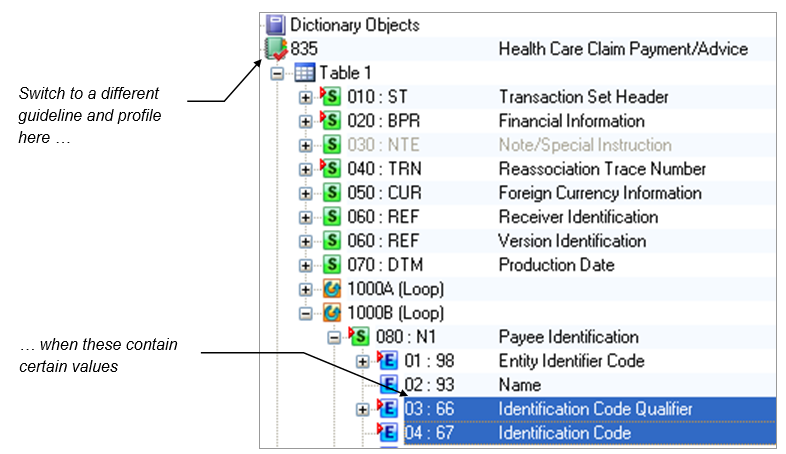
Marking the Potential Switch Location
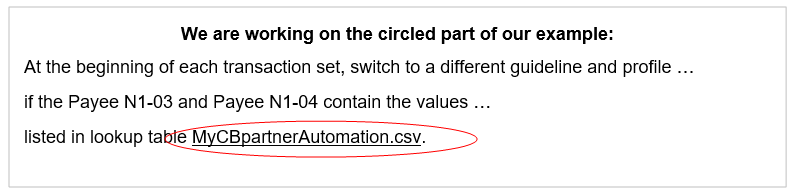
We are working on the circled part of our example:
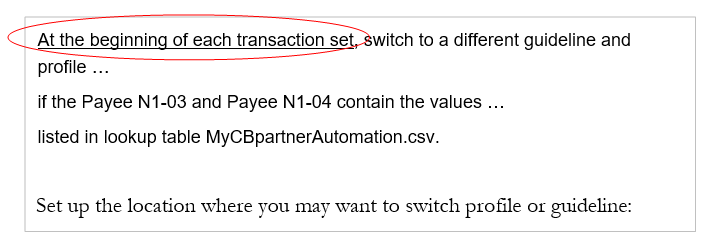
Set up the location where you may want to switch profile or guideline:
-
Open the guideline in EDISIM 5.15 or later.
-
Right-click on the place where you may want to change your profile or guideline. This can be the transaction set itself or any loop header (the header itself, not the first segment in the loop).
-
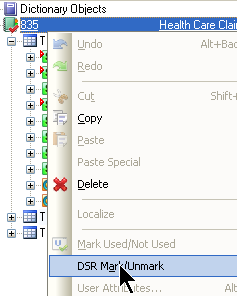
Select DSR Mark/Unmark.
Look for a small check mark on the item’s icon.
Notice whether the item you marked is mandatory or must be used. If this item is an optional loop, it might not appear in the data and so the guideline and profile will not change.
EDI Example
In our EDI example, we right-click and select DSR Mark/Unmark on the 835 transaction set line because we are going to look up a profile and guideline at the beginning of each transaction set in the data.
Marking the First Value that Determines the Switch
We are working on the circled part of our example

If you have two values that will determine what guideline and profile should be used, identify the first one.
(If you have only one value that determines the guideline/profile, skip this set of steps.)
-
Right-click on the element or field.
-
Choose Business Rules > New.
-
Under What Rule to Run, choose SetIdentifier.
-
For the SetIDvariable parameter, type a variable name of your choice that identifies this location. Do not use spaces or special characters.
Make a note of this name; you will need to use its exact spelling and capitalization in another business rule.
-
Close the business rules boxes.
Notice whether the element or field that you marked is mandatory or must be used. If it is optional, you may need more extensive business rules to cover the variations that can occur. For details, Example using one Element.
Our Example
In our example, we want to select guideline and profile for each transaction set based on the contents of the Payee N1-03 and N1-04.
To capture the contents of the N1-03 in a variable, right-click on the 1000B N1-03, choose Business Rules | New and set up this business rule:

This value corresponds to the first column in the lookup table.
Setting up a Rule that Checks the Lookup Table
We are working on the circled parts of our example:
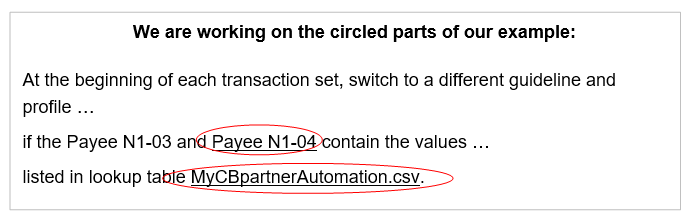
On the last location involved in the lookup, add the rule that actually compares the data to the lookup table:
-
Right-click on the element or field.
-
Choose Business Rules > New.
-
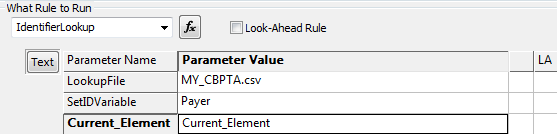
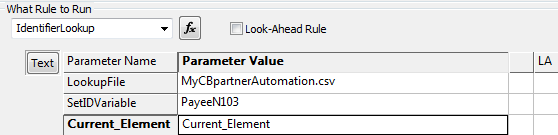
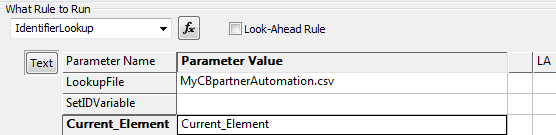
For What Rule to Run, choose IdentifierLookup.
-
For Parameter, type these three items, separated by one space each:
-
LookupFile is the name of the lookup file.
-
SetIDVariable is the variable assigned to the first element involved (if one exists).
-
Current_Element is Current_Element (usually) or another variable set by a SetIdentifier rule. See the example below.
When Instream validation reaches this location in the data, it checks the content-based lookup table to see if the first two columns match the values in the first variable and the current element or field. If so, it goes up to the switch point and validates with the guideline and/or profile from the lookup table.
How Rules Interact with Lookup Tables
Example Rule:
Example Lookup Table:
MyCBpartnerAutomation.csv

Our Example
In our example, we have assigned the variable PayeeN103 to our first element. We now go to the N1-04 and do the actual lookup by adding the IdentifierLookup rule shown above.
Testing your Content-Based TPA
-
Save your guideline.
-
Go to EDISIM’s User Files\Public Guidelines directory and copy the guideline to the Instream Database directory.
-
Validate some data that contains the data in the lookup file and some that does not. The command line is described on page Command Line for Validating.
The results file should have messages like these that confirm switching or not switching (search for the word “criteria”):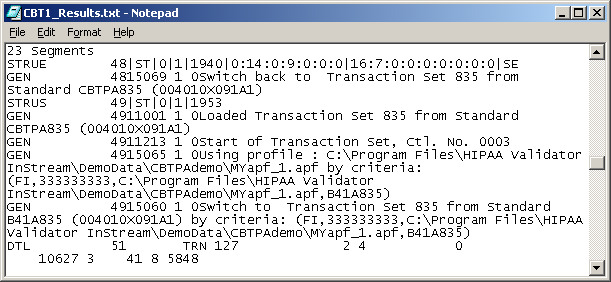
If you are using a HIPAA guideline: Once you have your automation working properly, merge your guideline with an Instream guideline or guidelinePlus as described in BusinessRules.pdf.
Our Example
-
Copy your EDISIM guideline into Instream’s Database directory.
There is a backup copy of the guideline (CBTPA_EX.std) in Instream’s DemoData\CBTPAdemo directory.
-
Edit V_835_4010_CBTPA.bat (Windows) or V_835_4010_CBTPA.sh (UNIX) in Instream’s Demodata\CBTPAdemo directory and replace the guideline with your guideline’s name. Save and close the file.
-
Run the file and look for the results in Instream’s Output directory.
Command Line for Validating
Omit parameters that Instream can find in the LOOKUP file. Instead of having to change the command line for different partner scenarios, the command line can be implemented like this for all scenarios:
HVInStream.exe -iInFile -oOutPath -gGuideline
Where:
-i Always required on the command line.
-o Always required on the command line.
-g Guideline that contains the IdentifierLookup business rule for content-based TPA. Omit if you are also using envelope-based TPA.
Content-Based TPA Demos
HIPAA EDI
See readme_CBTPA.txt in Instream DemoData\CBTPAdemo directory for information on how to run the demo. By default, results will be in the Instream Output directory.
Flat File
Run V_FFdelim_CBTPA in the Instream Scripts directory.
Example using one Element
When using only one element to determine if the profile or guideline should change, use only two parameters for the IdentifierLookup in Standards Editor:
The lookup file will have column 2 empty:
PayeeN103,,Profile,Guideline
222222222,,C:\Profiles\MYapf_1.apf,B41A835
333333333,,C:\Profiles\MYapf_1.apf,B41A835
HIPAA Example using Optional Elements
Overview
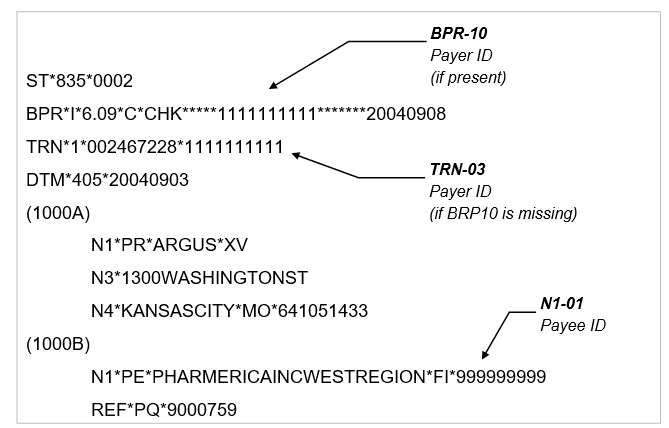
In a different 835 example, we change profiles at the ST for certain Payer ID - Payee ID combinations.
Payer ID is either the BPR-10 (if included) or else the TRN-03
Payee ID is the 1000B N1-04
Assume that we want this to happen:
|
If Payer ID |
And Payee ID |
Then use this profile |
|---|---|---|
|
1111111111 |
999999999 |
MYapf_1.apf |
|
not 1111111111 |
999999999 |
MYapf_2.apf. |
Strategy
-
Set up the lookup file.
-
Check the $dir.ini (Windows) or the fsdir.ini (UNIX).
-
Set up the business rules in the guideline:
-
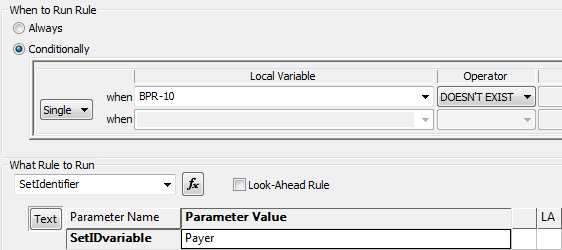
If the BPR-10 is present, use its value as the Payer ID.
-
On the TRN-03, check to see if the BPR-10 is present. If not, use this value as the Payer ID.
-
On the Payee N1-04, look up the Payer ID and the current value (the Payee ID) in the lookup file
Set up lookup file MY_CBTPA.CSV
Payer,Payee,Profile,Guideline
1111111111,999999999,MYapf_1.apf,
,999999999,MYapf_2.apf,
Check the $dir.ini or fsdir.ini
For CBPARTNERAUTOMATION, remove the leading colon and put in the path to the directory containing the lookup file.
Customize the Guideline
-
In the EDISIM Standards Editor, start a new 835 addenda guideline based on 835AW120.
-
To mark the place where the profile is to change, right-click on the 835 line at the top and choose DSR Mark/Unmark.
-
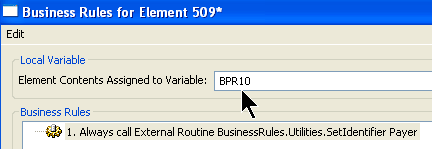
Put a SetIdentifier business rule on the BPR-10 (an optional element):

-
Also on the BPR-10, add a local variable, like this:

-
On the TRN-03, add a rule like this (notice the parameter is the same as on the BPR-10):
We now have a value in Payer - either the BPR-10 or the TRN-03.
-
On the 1000B N1-04, do the lookup: