|
•
|
select Tools > Manage Monitor Event Request, or
|
These selections cause the Manage Monitor Event Request dialog to be displayed, which provides options to do the following:
|
•
|
Create New Monitor Event Request - Use this option if you want to create a new MER message. This sets the <FullImport> element in the MER XML to true, which causes the new MER message to overwrite any existing MER message on the iProcess Engine. (To view the existing MER message on the iProcess Engine, you can select the Edit Monitor Event Request on the Server option, then cancel out of it, if desired.)
|
|
•
|
Edit Monitor Event Request on the Server - Use this option if you want to edit an existing MER message on the iProcess Engine. This allows you to add additional MonitorDetails to any existing MonitorDetails, or to edit an existing MonitorDetail. This sets the <FullImport> element in the MER XML to true.
|
|
•
|
Import Monitor Event Request XML - Use this option to either import or construct the MER XML manually. When using this option, you can set the <FullImport> element to true to overwrite an existing MER, or to false to append to an existing MER.
|
|
1.
|
From the Manage Monitor Event Request dialog, select the Create New Monitor Event Request option.
|
|
2.
|
On the Monitor Event Request Definition dialog, click the  icon.
|
|
3.
|
From the Procedure field drop-down list on the Add Monitor Detail dialog, select the procedure whose events you want to monitor.
|
The causes the GlobalFieldList to be populated with all of the fields defined in the selected procedure.
|
4.
|
In the Available Fields list, select the “global fields” whose data will be exported for every monitored event defined for this MonitorDetail (the <GlobalFieldList> element of the MER). Global fields are optional. (You can later select fields for a specific MonitorLine included in the MonitorDetail.)
|
|
6.
|
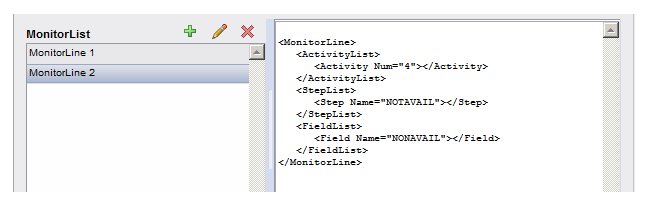
In the MonitorList section, click the icon.
|
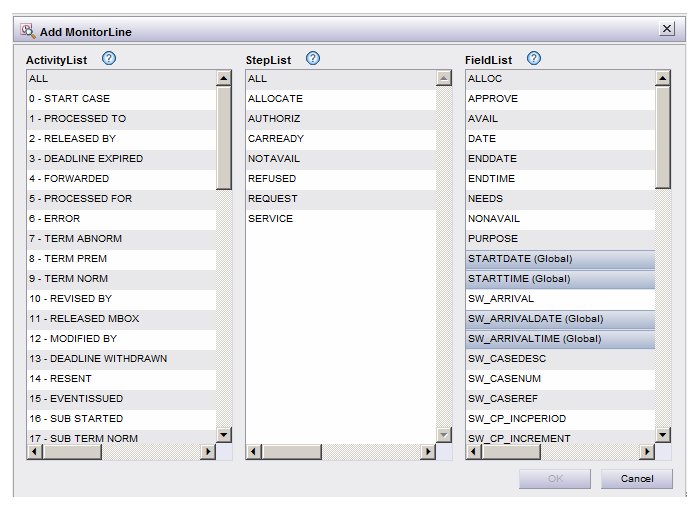
This causes the Add MonitorLine dialog to be displayed, which is used to define the <MonitorLine> element in the MER XML. This dialog displays a list of all activities (audit events), steps, and fields that are defined in the previously selected procedure:
|
7.
|
From the ActivityList, select all of the audit events that you want to publish.
|
|
8.
|
From the StepList, select the steps for which the selected activities (events) are to be published.
|
|
9.
|
From the FieldList, optionally select fields whose data you want published.
|
|
11.
|
Optionally repeat
step 6 through
step 10 if you want to define additional MonitorLines for the MonitorDetail, which could include different combinations of activities, steps, and fields.
|
|
12.
|
On the Add MonitorDetail dialog, click OK.
|
|
−
|
Send MER to Server - This option writes the MER XML to the iProcess Engine, overwriting any existing MER.
|
|
−
|
Export MER XML - This option causes the Export Monitor Event Request XML dialog to be displayed, which allow you to copy the definition of the MER XML to the clipboard for the purpose of pasting into an external file.
|
|
1.
|
From the Manage Monitor Event Request dialog, select the Edit Monitor Event Request on server option.
|
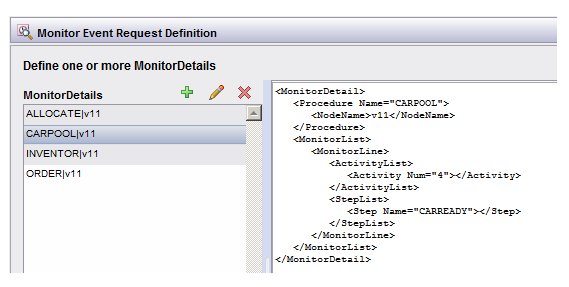
The MonitorDetails list is populated with all MonitorDetails that are currently defined on the iProcess Engine:
|
2.
|
On the MonitorDetails list, select one of the following options:
|
|
−
|
- The causes the Add Monitor Detail dialog to display, which allows you to add a new MonitorDetail to the existing MER.
|
|
−
|
 - This causes the Edit Monitor Detail - This causes the Edit Monitor Detail dialog to display, which allows you to edit the MonitorDetail that is currently selected in the MonitorDetails list. |
|
2.
|
From the Procedure field drop-down list on the Add Monitor Detail dialog, select a procedure whose events you want to monitor.
|
The causes the GlobalFieldList to be populated with all of the fields defined in the selected procedure.
|
3.
|
In the Available Fields list, select the “global fields” whose data will be exported for every monitored event defined for this MonitorDetail (the <GlobalFieldList> element of the MER). Global fields are optional. (You can later select fields for a specific MonitorLine included in the MonitorDetail.)
|
|
5.
|
In the MonitorList section, click the icon.
|
This causes the Add MonitorLine dialog to be displayed, which is used to define the <MonitorLine> element in the MER XML. This dialog displays a list of all activities (audit events), steps, and fields that are defined in the previously selected procedure:
|
6.
|
From the ActivityList, select all of the audit events that you want to publish.
|
|
7.
|
From the StepList, select the steps for which the selected activities (events) are to be published.
|
|
8.
|
From the FieldList, optionally select fields whose data you want published.
|
|
10.
|
Optionally repeat
step 5 through
step 9 if you want to define additional MonitorLines for the MonitorDetail, which could include different combinations of activities, steps, and fields.
|
|
11.
|
On the Add MonitorDetail dialog, click OK.
|
|
12.
|
On the Monitor Event Request Definition dialog, choose one of the following options for the edited MER XML:
|
|
−
|
Export MER XML - This option causes the Export Monitor Event Request XML dialog to be displayed, which allows you to copy the definition of the MER XML to the clipboard for the purpose of pasting into an external file.
|
|
1.
|
On the Monitor Event Request Definition dialog,, select the MonitorDetail you want to edit, then click the icon
|
|
2.
|
On the Edit MonitorDetail dialog, optionally add or remove “global fields” from the MonitorDetail. Global fields are fields whose data will be exported for every monitored event defined for this MonitorDetail (the <GlobalFieldList> element of the MER). Global fields are optional. (You can later select fields for a specific MonitorLine included in the MonitorDetail.)
|
|
a.
|
From the ActivityList, select all of the audit events that you want to publish for this MonitorLine.
|
|
b.
|
From the StepList, select the steps for which the selected activities (events) are to be published.
|
|
c.
|
From the FieldList, optionally select fields whose data you want published.
|
|
7.
|
Optionally repeat
step 4 through
step 6 if you want to define additional MonitorLines for the MonitorDetail, which could include different combinations of activities, steps, and fields.
|
|
8.
|
On the Add / Edit MonitorDetail dialog, click OK.
|
|
9.
|
On the Monitor Event Request Definition dialog, choose one of the following options for the edited MER XML:
|
|
−
|
Export MER XML - This option causes the Export Monitor Event Request XML dialog to be displayed, which allows you to copy the definition of the MER XML to the clipboard for the purpose of pasting into an external file.
|
The Import Monitor Event Request XML option provides a means to either import or construct the MER XML manually.
|
1.
|
From the Manage Monitor Event Request dialog, select the Import Monitor Event Request XML option.
|
|
2.
|
On the Import Monitor Event Request XML dialog, either type or paste the desired XML into the dialog, then click OK.
|
The Monitor Event Request Definition dialog is displayed, containing the MER definition that was in the
Import Monitor Event Request XML dialog when you clicked
OK.
|
3.
|
On the Monitor Event Request Definition dialog, choose one of the following options for the imported MER XML:
|
|
−
|
Export MER XML - This option causes the Export Monitor Event Request XML dialog to be displayed, which allows you to copy the definition of the MER XML to the clipboard for the purpose of pasting into an external file.
|

- This deletes the MonitorDetail that is currently selected in the MonitorDetails list.
After deleting an existing MonitorDetail, you can click on of the other icons to either add a different MonitorDetail or edit an existing MonitorDetail, or you can click Send MER to Server to remove the deleted MonitorDetail from the MER on the iProcess Engine. icon on the toolbar.