|
5.
|
In the Welcome dialog, click Next..
|
|
6.
|
Read through the license text, click I accept the terms of the license agreement, and then click Next.. Or if you do not agree to the terms of the license agreement, click Cancel to exit the installation process.
|
|
7.
|
In the TIBCO Installation Home dialog, click Use an existing TIBCO_HOME, and then choose the appropriate TIBCO_HOME from the list. Click Next. For more information, see
Installation Environment.
|
|
−
|
Components - These are building blocks, accessed via TIBCO General Interface Builder, that are used to construct iProcess applications. For more information, see the TIBCO iProcess Workspace (Browser) Components Concepts guide.
|
|
−
|
Samples - Includes sample code for setting up things like ASP forms, single authentication, etc. The sample code available is described in the TIBCO iProcess Workspace (Browser) Configuration and Customization guide.
|
|
|
The Component Selection dialog does not indicate if you already have any of the listed items installed. Therefore, if you install an iProcess Client, Components, or Action Processor in the same location as one already installed, the existing one will be overwritten.
|
Selecting the iProcess Client checkbox on the
Component Selection dialog causes a series of four
iProcess Client dialogs to be displayed. These dialogs are described in the following subsections.
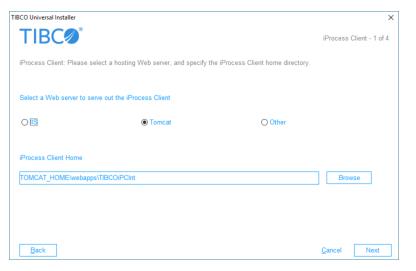
The first iProcess Client dialog is used to specify the Web server that will host the client application, as well as the home directory of the client application.
|
•
|
Web Server: Specify which Web server will be used to host the iProcess Client: IIS, Tomcat, or other.
|
|
•
|
iProcess Client Home: Specify the directory in which the iProcess Client software will be installed. You can use the Browse button to locate the directory.
|
If Tomcat is selected for the Web server, the home directory defaults to TOMCAT_HOME\webapps\TIBCOiPClnt (in Windows) or
TOMCAT_HOME/webapps/TIBCOiPClnt (in UNIX). You must replace
TOMCAT_HOME with the directory in which Tomcat is installed (e.g., D:\Tomcat). The remainder of the default path can also be changed, if desired. (Note that if the
TOMCAT_HOME variable is defined on the system, the installer will automatically insert the variable’s value instead of displaying “TOMCAT_HOME”.)
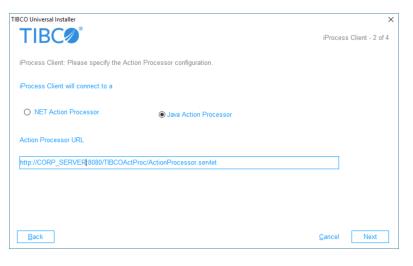
The second iProcess Client dialog is used to specify the type of Action Processor to which the iProcess Client will connect, as well as the URL to the Action Processor.
Information entered in this dialog is written to the config.xml file for the iProcess Client. This information can be modified at a later time by manually editing the
config.xml file. For more information, see the
TIBCO iProcess Workspace (Browser) Configuration and Customization guide.
|
•
|
iProcess Client will Connect to a: Select the Java or .NET Action Processor. This is the Action Processor to which the iProcess Client you are currently installing will connect.
|
|
•
|
Action Processor URL: This is the URL to either the Java Action Processor or the .NET Action Processor. This must be in the form:
|
http://Host:Port/APDir/ActionProcessor.ext
|
−
|
Host is the name of the machine hosting the Action Processor.
|
|
−
|
Port is the port number used by the Web server to communicate with web applications.
|
|
−
|
APDir is the directory (or virtual directory alias) on Host in which the Action Processor is installed.
|
|
−
|
ext is the file name extension (this is “servlet” if it’s a Java servlet, i.e., the Java Action Processor; or “aspx” if it’s a .NET ASP web application, i.e., the .NET Action Processor).
|
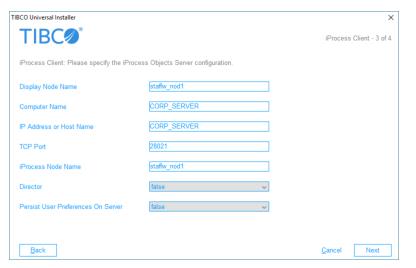
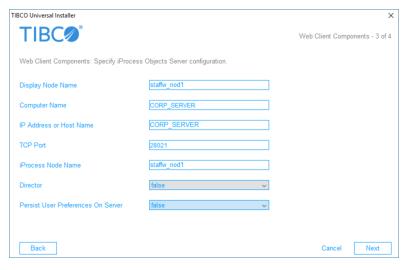
The third iProcess Client dialog specifies information about the TIBCO iProcess Objects Server that the user can log into after starting the iProcess Client.
Information entered in this dialog is written to the config.xml file for the iProcess Client. This information can be modified at a later time by manually editing the
config.xml file. For more information, see the
TIBCO iProcess Workspace (Browser) Configuration and Customization guide.
|
•
|
Display Node Name: The name that you would like displayed in the iProcess Client Server field drop-down list on the Login screen. This is the name the user would select when choosing a server to log into.
|
|
•
|
Computer Name: The name of the machine on which the TIBCO iProcess Objects Server is installed.
|
|
•
|
IP Address or Host Name: The IP address of the machine on which the TIBCO iProcess Objects Server is installed. You can enter the name of the host machine in this field, as long as that name resolves to the IP address of the machine where the iProcess Objects Server is running. Note, however, that this name must be able to be resolved by the machine on which the Action Processor is running.
|
|
•
|
TCP Port: The TCP port number used by the TIBCO iProcess Objects Server. (The TCP port used by the server is specified using the iProcess Objects Server Configuration Utility in Windows systems ( SWDIR\bin\SWEntObjSvCfg.exe), or by editing the iProcess Objects Server configuration file in UNIX systems ( $SWDIR/seo/data/swentobjsv.cfg). For more information, see the TIBCO iProcess Objects Server Administrator’s Guide.)
|
|
•
|
iProcess Node Name: The name of the TIBCO iProcess Engine / iProcess Objects Server to which the user can log in. This is the “nodename” that is assigned to the iProcess Engine when it is installed.
|
|
•
|
Director: Specifies whether or not the previous entries actually describe a TIBCO iProcess Objects Director, which is used to connect the client to a server). Select “true” if the specifications are for a Director, or “false” if a TIBCO iProcess Objects Director is not being used.
|
|
•
|
Persist User Preferences On Server - This specifies whether user data 1 is persisted locally or on the server, as well as obtained locally or from the server upon login. Server-side persistence allows users to move to different machines and/or browser types, and pick up user preferences specified from another machine and/or browser type.
|
|
−
|
Options values (that is, all settings on the Options dialog in the application) are stored on both the client and the server. This is required because the language setting is stored in the Options data and this is needed to set up the locale before login.
|
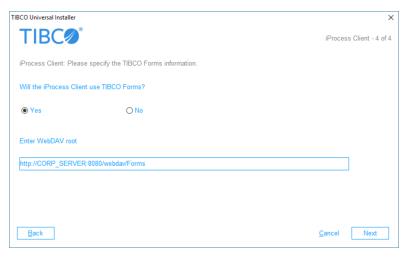
The fourth iProcess Client dialog is used to tell the installer if your client application is using TIBCO Forms. TIBCO Forms are forms that are created and deployed using TIBCO Business Studio. For more information, see the
TIBCO Business Studio Forms User’s Guide.
|
•
|
Enter WebDAV root - Enter the base URL of the location at which the TIBCO forms are stored. The installation program writes this URL to the webDAVRoot configuration parameter in the client application’s config.xml file. This allows the client application to find the TIBCO Forms on the server.
|
If you don’t know if the client application will use TIBCO Forms, respond No; the
webDAVRoot configuration parameter can be manually updated at a later time. For more information, see the
TIBCO iProcess Workspace (Browser) Configuration and Customization guide.
Selecting the Components check box on the
Component Selection dialog causes as series of four
Web Client Components dialogs to be displayed. These dialogs are described in the following subsections.
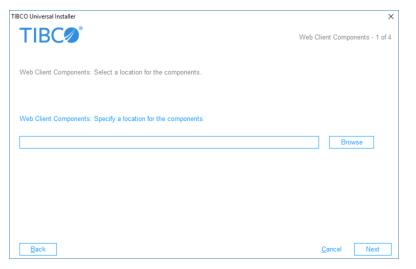
The first Web Client Components dialog is used to specify the location in which the iProcess Workspace (Browser) components (also known as WCC components) are to be installed.
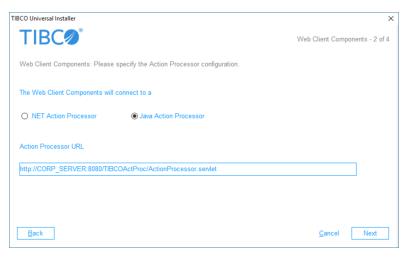
The second Web Client Components dialog is used to specify the type of Action Processor to which custom applications created with WCC components will connect. It also allows you to specify the URL to the Action Processor.
Information entered in this dialog is written to the config.xml file created for a custom application created with WCC components. For more information, see the
Custom Applications chapter in the
TIBCO iProcess Workspace (Browser) Components Concepts guide.
|
•
|
The Web Client Components will connect to a: Select the Java or .NET Action Processor. This is the Action Processor to which the custom application created with the iProcess Workspace (Browser) components will connect.
|
|
•
|
Action Processor URL: This is the URL to either the Java Action Processor or the .NET Action Processor. This must be in the form:
|
http://Host:Port/APDir/ActionProcessor.ext
|
−
|
Host is the name of the machine hosting the Action Processor. Note that if you are hosting both the custom application and the Action Processor on the same machine, and they are both being hosted by Tomcat, you can specify Host as “localhost”.
|
|
−
|
Port is the port number used by the Web server to communicate with web applications.
|
|
−
|
APDir is the directory (or virtual directory alias) on Host in which the Action Processor is installed.
|
|
−
|
ext is the file name extension (this is “servlet” if it’s a Java servlet, i.e., the Java Action Processor; or “aspx” if it’s a .NET ASP web application, i.e., the .NET Action Processor).
|
The third Web Client Components dialog specifies information about the TIBCO iProcess Objects Server that the user can log into after starting a custom application that was created with iProcess Workspace (Browser) components.
Information entered in this dialog is written to the config.xml file created for a custom application created with iProcess Workspace (Browser) components. For more information, see the
Custom Applications chapter in the
TIBCO iProcess Workspace (Browser) Components Concepts guide.
|
•
|
Display Node Name: The name that you would like displayed in the custom application Server field drop-down list on the Login screen. This is the name the user would select when choosing a server to log into.
|
|
•
|
Computer Name: The name of the machine on which the TIBCO iProcess Objects Server is installed.
|
|
•
|
IP Address or Host Name: The IP address of the machine on which the TIBCO iProcess Objects Server is installed. You can enter the name of the host machine in this field, as long as that name resolves to the IP address of the machine where the iProcess Objects Server is running. Note, however, that this name must be able to be resolved by the machine on which the Action Processor is running.
|
|
•
|
TCP Port: The TCP port number used by the TIBCO iProcess Objects Server. (The TCP port used by the server is specified using the iProcess Objects Server Configuration Utility in Windows systems ( SWDIR\bin\SWEntObjSvCfg.exe), or by editing the iProcess Objects Server configuration file in UNIX systems ( $SWDIR/seo/data/swentobjsv.cfg). For more information, see the TIBCO iProcess Objects Server Administrator’s Guide.)
|
|
•
|
iProcess Node Name: The name of the TIBCO iProcess Engine / iProcess Objects Server to which the user can log in. This is the “nodename” that is assigned to the iProcess Engine when it is installed.
|
|
•
|
Director: Specifies whether or not the previous entries actually describe a TIBCO iProcess Objects Director, which is used to connect the client to a server). Select “true” if the specifications are for a Director, or “false” if a TIBCO iProcess Objects Director is not being used.
|
|
•
|
Persist User Preferences On Server - This specifies whether user data 2 is persisted locally or on the server, as well as obtained locally or from the server upon login. Server-side persistence allows users to move to different machines and/or browser types, and pick up user preferences specified from another machine and/or browser type.
|
|
−
|
Options values (that is, all settings on the Options dialog in the application) are stored on both the client and the server. This is required because the language setting is stored in the Options data and this is needed to set up the locale before login.
|
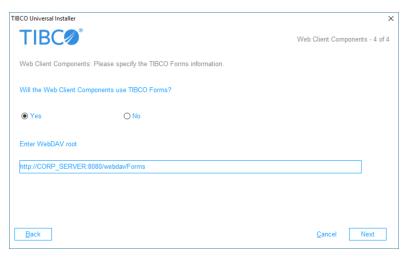
The fourth Web Client Components dialog is used to tell the installer if your custom application is using TIBCO Forms. TIBCO Forms are forms that are created and deployed with TIBCO Business Studio. For more information, see the
TIBCO Business Studio Forms User’s Guide.
|
•
|
Enter WebDAV root - Enter the base URL of the location at which the TIBCO forms are stored. The installation program writes this URL to the webDAVRoot configuration parameter in the custom application’s config.xml file. This allows the custom application to find the TIBCO Forms on the server.
|
If you don’t know if the custom application will use TIBCO Forms, respond No; the
webDAVRoot configuration parameter can be manually updated at a later time. For more information, see the
TIBCO iProcess Workspace (Browser) Configuration and Customization guide.
Selecting the iProcess Action Processor checkbox on the
Component Selection dialog causes the following Action Processor-related dialogs to be displayed:
|
•
|
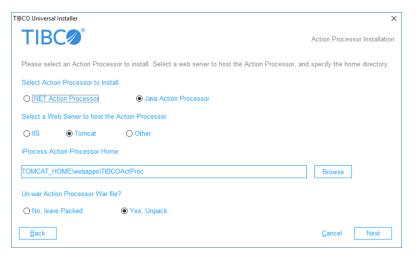
Action Processor to Install: Specify which Action Processor you want to install — .NET or Java — by clicking the appropriate radio button.
|
|
•
|
Web Server: Specify which Web server will be used to host the Action Processor: IIS, Tomcat, or other. Note that if the .NET Action Processor was selected, this is automatically set to IIS, which is the only Web server you can use to host the .NET Action Processor.
|
|
•
|
Action Processor Home Directory: Specify the directory in which the Action Processor software will be installed. You can use the Browse button to locate the directory.
|
If Tomcat is selected for the Web server, the home directory defaults to TOMCAT_HOME\webapps\TIBCOActProc (in Windows) or
TOMCAT_HOME/webapps/TIBCOActProc (in UNIX). You must replace
TOMCAT_HOME with the directory in which Tomcat is installed (e.g., D:\Tomcat). The remainder of the default path can also be changed, if desired. (Note that if the
TOMCAT_HOME variable is defined on the system, the installer will automatically insert the variable’s value instead of displaying TOMCAT_HOME.)
|
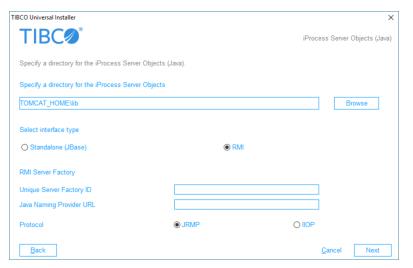
•
|
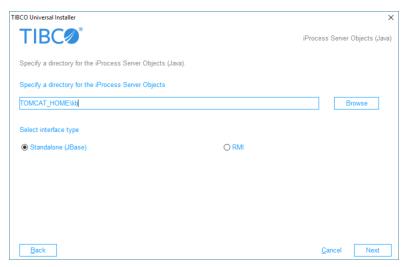
Interface Type: Specify which iProcess Server Objects (Java) interface type should be installed. The choice here will depend on how the iProcess Server Objects (Java) are implemented, as follows:
|
|
−
|
Standalone (JBase) - This is the local solution — it exposes TIBCO iProcess Server Objects functionality as simple Java objects. This interface does not make use of remote objects. It is typically used when incorporating a broker application that is automatically processing work items arriving in a particular work queue.
|
|
−
|
RMI (Remote Method Invocation) - This is the remote solution — it uses Java’s Remote Method Invocation (RMI) technology. This allows the client to be located on a machine remote from the TIBCO iProcess Server Objects.
|
If RMI is selected, the following fields and radio buttons are displayed:
|
−
|
Unique Server Factory ID: This is a unique name that identifies the server factory. If you are running the iProcess Server Objects (Java) through RMI, a server factory must be set up to access the remote objects across the network. The name that is given to the server factory when it is set up, is entered in this field.
|
|
−
|
Java Naming Provider URL - Specifies the location of the Registry when the Registry is being used as the initial context. This value must contain a URL in the form "protocol://host:port". Some examples are:
|
|
−
|
Protocol: This specifies the protocol used to marshall objects across the RMI boundary. This protocol is specified when the server factory is started — the same protocol must be specified here. The options are:
|
- JRMP - Java Remote Method Protocol
- IIOP - CORBA standard Internet Inter-Orb Protocol
If JRMP is selected, the
<IsJRMP /> element in the
apConfig.xml file is set to true; if
IIOP is selected, the
<IsJRMP /> element is set to false.
For more information about the RMI interface, see the TIBCO iProcess Server Objects (Java) Programmer’s Guide.