Copyright © Cloud Software Group, Inc. All Rights Reserved

Chapter 4 Working With Work Items : Filtering a Work Item List

Filtering a Work Item List
“Filtering” a list of work items involves entering filter criteria so that only some of the work items are shown in the list, rather than all of them. Filtering a list of work items allows you to display only the work items you are interested in. For example, you may only be interested in work items that arrived in the work queue after Dec. 15, 2004. You can filter the list so that only those work items are shown.
The filtering function allows you to build a “filter expression” that is applied to all work items for the work queue that was selected. If the work item satisfies the filter expression (e.g., it arrived after Dec. 15, 2004), it is shown in the work item list; if it does not satisfy the filter expression, it is not shown in the list (and is not downloaded from the iProcess Engine).
You can filter the work item list at any time by:
by selecting Filter... from the View menu on the work item list.
This displays the filter dialog, on which you can specify a filter expression. This is explained in the following subsections.
The filter dialog may also be automatically displayed when you attempt to open a work queue from the work queue list. This occurs if the number of work items in the work queue exceeds a threshold that you’ve specified in your user options (see Work Item Filters).
If the number of work items exceeds the threshold specified in your user options, the filter dialog is automatically displayed:
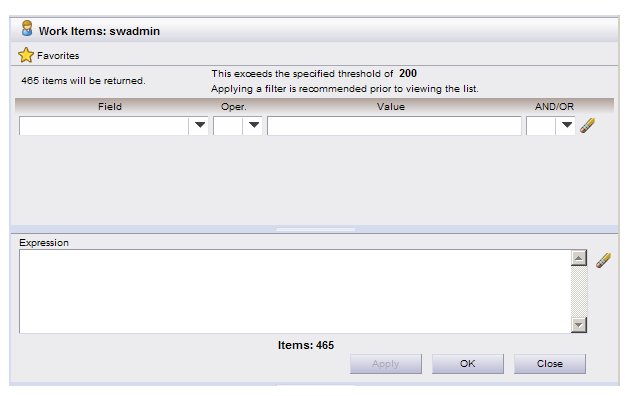
If a filter expression is still active, the Filter icon will be shown with a green check mark (as shown below), and if the filter dialog is displayed, the previously entered filter expression will be shown in the Expression section.
Notice the “465 items will be returned” message in the upper left part of the example filter dialog. This is the number of work items that will be returned if you click on the OK button to display the work item list. If this is a large number, you should enter a filter expression so that a smaller list is returned, making it easier to find the work items you want to work on.
The message on the upper right part of the filter dialog tells you the current threshold number that is specified in your user options — in this example, it’s 200. For information about specifying this number, see Work Item Filters).
Building a Filter Expression
The filter dialog allows you to build a “filter expression” that is used to evaluate each work item to determine if it should be included in the list.
The following summarizes building a filter expression:
Choose a field to filter on. A “field” in this context is not necessarily a field that appears on a form in a work item — although it can be. These also include “system fields,” which contain information about the work item that is stored in the system, such as the date/time the work item arrived in the work queue, whether or not the work item is “new” (i.e., unopened), etc.
Choose an operator that will be used in your filter expression, e.g.,’=’ (equals), ’<’ (less than), ’>’ (greater than), etc.
Enter the value to be compared against the value in the field you chose. (The value entered in the Value field must match the data type for the field selected. For information about the valid data types, see Value Data Types.)
For example, to list only work items that arrived in the work queue after Dec. 15, 2004:
Field: Arrival Date
Value: 15/12/2004
You can choose multiple fields to filter on.
At any time while building the filter expression, you can “apply” the expression by clicking on the Apply button. The “##### items will be returned” message is updated to inform you of the number of work items that satisfy the filter expression you’ve built. This is the number of work items that will be listed when you click on the OK button.
You can also click the OK button at any time without first clicking the Apply button — this causes any filter expression(s) you’ve entered to be applied and the list displayed. But you will not know the number of work items that will be returned in the list until after the list is displayed — clicking Apply first allows you to know how many will be returned before the list is displayed.
Also note that you can use the Close button to close the filter dialog without applying the filter expression (assuming you have not yet clicked Apply). Any expression you’ve entered will remain on the filter dialog, so that if you return to the filter dialog again prior to closing the work item list, the expression you had entered will still be available.
You can clear/remove the currently displayed filter expression at any time by clicking on one of the ”eraser” icons on the right side of the filter dialog.
Each step required to build the filter expression is described in more detail in the following subsections.
Choosing a Field to Filter On
To choose a field to filter on:
1.
Click the arrow on the right side of the Field column. The following drop-down list is displayed:
This drop-down list provides a comprehensive list of the fields you can filter on. It consists of:
System Fields - These fields contain information that is provided by the system, e.g., the date and time the work item arrived in the work queue, the case number the work item is associated with, etc.
A comprehensive list of available system fields is provided in System Fields Available for Filtering Work Items.
Case Data Fields - These fields contain case data that was entered into a field on the form associated with a work item, e.g., a customer name or invoice number.
A system administrator determines which case data fields are available to filter on, and in which work queues they are available.
There are two types of case data fields that you can use to filter the work item list:
Work queue parameter fields - These are special fields that can be used to store work queue-specific data. Unless the system administrator assigned different names to these fields, they appear in the Field drop-down list as WQ Parameter1 - 4, as follows:
Filtering on a work queue parameter field allows you to filter on the value in the work queue parameter field. For instance, if the system administrator assigned the “customer name” field to the “work queue parameter 1" field, you could then filter on “WQ Parameter1” to display only the work items in the work queue that contain a certain customer name.
Case Data Queue Parameter (CDQP) fields - These are similar to work queue parameter fields; they hold case data that was entered on a form associated with a work item.
A system administrator must assign case data fields to CDQP fields to make those fields available for filtering (and sorting). If this has been done, the name of the field appears in the Field drop-down list. In the following example, the Occupation field is a case data field that appears on a form and that has been designated a CDQP, causing it to appear in the Field drop-down list:
It’s important to understand that CDQP fields contain “work item data” (as opposed to “case data”.) “Work item data” is the data associated with a work item while it’s in a work queue — if you enter information in a form, then “keep” the work item, the information you’ve entered is written to work item data. “Case data” is the information that is written to the database after you’ve “released” the work item — if you enter information in a form, then “release” the work item, the information you’ve entered is written to case data. For more information about these types of data, see Case Data Fields.
2.
For a list of the available system fields, see System Fields Available for Filtering Work Items.
Choosing an Operator for the Filter Expression
The Oper. field allows you to select an operator for the filter expression. Click on the arrow on the right side of the Oper. field. The following drop-down list is displayed:
Select the appropriate operator from the list (you can also type in the operator). The selections are:
 
Equal to (regular expression equality operator1)

1
Using this operator allows you to enter “regular expression” syntax to perform more complex string search functions. As regular expressions are beyond the scope of this document, refer to an outside source for information about valid regular expression syntax.

Specifying a Value for the Filter Expression
Enter the value in the Value field that you would like compared to the value in the field you selected in the Field field.
For example, to list the work items that are currently locked by user “susieq”, enter “susieq” in the Value field:
 
Value Data Types
The value entered in the Value field must match the data type for the field selected. (For information about the valid data types for each of the system fields, see the list of system fields on page 96.)
The following are the types of data that can be entered in the Value field:
 
Note that all of the system fields that are flags (i.e., fields that have either a true or false state (e.g., urgent , forwardable , etc.)) are numeric: 0 or 1, where 0 indicates false and 1 indicates true.
The default date format1 is “dd/mm/yyyy”.
The default time formata is “hh:mm”, using a 24-hour clock.
The default date/time formata is “dd/mm/yyyy hh:mm”.

1
The order of the day, month, and year, as well as the date and time separator characters are specified on the TIBCO iProcess Engine. These may be different on your system, depending on how it was set up.

The date and/or time format that is currently specified on your TIBCO iProcess Engine is shown on the filter dialog when you select a date or time field in the Field drop-down list. For example:
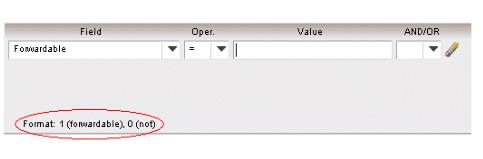
The iProcess Workspace (Browser) also provides information about the format required for other types of fields selected from the Field drop-down list. In the following example, the client is telling you that since the “Forwardable” work item flag has been selected, the valid values are 1 (for forwardable) and 0 (for not forwardable):
Using Wild Cards in the Filter Value
You can use the following “wild card” characters in the value you enter in the Value field when filtering on text fields (note that wild cards can’t be used with non-text fields (for a list of the field types, see System Fields Available for Filtering Work Items)):
 
Wild card characters may be substituted for one or more characters in your filter value. For example:
Filtering on Empty Fields
The special SW_NA value can be used in filter expressions to list work items that contain a field that is empty (the “NA” means “not assigned”).
Note, however, this value must be typed into the Expression section (free-form area — for information about building free-form expressions, see Building a Free-Form Filter Expression). If it is typed into the Value field, the system will enclose SW_NA in quotes in the expression — you don’t want quotes around it.
For example, to list the work items containing an Occupation field in which a value has not been entered:
Conversely, to list the work items containing an Occupation field in which a value HAS been entered, type in this expression (using the “not equal” operator):
Ranges of Values
Ranges of values can be specified, although it requires you to enter special syntax in the Expression section. A range of values must be in the following form:
FilterField=[Val1-Val2|Val3|Val4-Val5|...]
This allows you to specify one or more ranges, each separated by a vertical bar character (|), all enclosed in square brackets ([ ]). You can also include individual values in the expression.
For example, the following expression will return all work items that have a case number between 300 and 500, as well as the work item with a case number of 633:
You can enter the entire expression free-form in the Expression section, if desired. Or, you can select the field and operator from the Field and Oper. field drop-down lists. You may or may not be able to enter the entire value in the Value field, depending on the filter field chosen. If required, modify the expression in the Expression section so that it is in the form shown above.
If dates and/or times are used in a range of values, they must be specified in the following format:
 
Date1

1
The order of the day, month, and year can be modified by the system administrator. The correct order is shown on the filter dialog if you select a date field in the Field drop-down list.

For example, the following expression will return all work items that arrived in the work queue between the dates of Jan. 01, 2006 and Jan. 31, 2006 (inclusive):
And the following expression will return all work items that arrived in the work queue between the times of 8am and 10am, as well as between the times of 2pm and 2:30pm (all inclusive):
Filtering on the Current Date
The SW_DATE system field contains the current date. You can use this system field in filter expressions. For instance, you can search for all work items that have arrived in the work queue today (see the example below).
Note, however, this value must be typed into the Expression section (free-form area — for information about building free-form expressions, see Building a Free-Form Filter Expression). If it is typed into the Value field, the system will enclose SW_DATE in quotes in the expression — you don’t want quotes around it.
For example, to list the work items that have arrived in the work queue today:
Conversely, to list the work items that arrived in the work queue any day other than today:
Applying the Filter Expression
To apply the filter expression shown in the Expression window, you can:
Click the OK button. This causes any filter expression(s) you’ve entered to be applied and the list displayed. But you will not know the number of work items that will be returned in the list until after the list is displayed.
Click the Apply button. The system will apply the filter expression and calculate how many work items satisfy the expression. This number is shown on both the top and the bottom of the filter dialog (22 in this example):
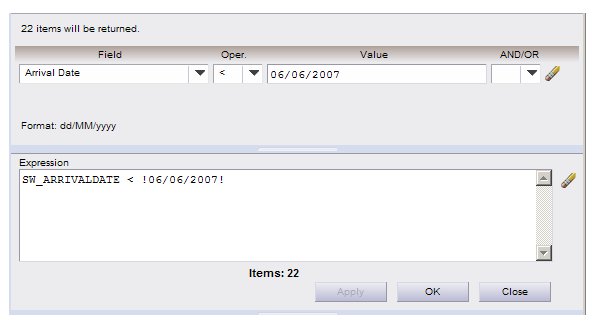
If you clicked Apply, and the number of work items that will be returned from the iProcess Engine is satisfactory, click the OK button to display the work item list (for information about the work item list, see Work Item Lists).
If the number of work items that will be returned is still too large, you can modify the filter expression by changing any of the selections in the Field, Oper., or Value fields, then click Apply again to get a new work item count.
Anytime you add, delete, or modify a filter expression on the filter dialog, and have not yet clicked the Apply button to apply it, the following message is shown to notify you that the changed filter expression has not been applied:
Whenever the message shown above is displayed, the Apply button will be active.
You can also click one of the “eraser” icons to delete filter expressions. Clicking the one to the right of the filter fields clears that row of fields; clicking the one to the right of the Expression window clears all filter expressions entered so far.
Note that if you apply the filter expression, then view the work item list, the Filter icon will now contain a red check mark to indicate that a filter has been applied on the list:
Specifying Multiple-Clause Filter Expressions
You can use logical operators to combine multiple “clauses” in your filter expressions.
A “clause” is a field/operator/value set. The expression:
SW_ARRIVALDATE = !20/10/2005! AND SW_ADDRESSEE = ”susieq”
contains two clauses, separated by the AND operator. The following are the logical operators that can be used to separate clauses:
 
The expression is true if the first clause and the second clause are true.
The expression is true if the first clause or the second clause is true.
Logical ANDs and ORs are entered into a filter expression using the AND/OR field. Click the arrow to display the drop-down list and select either AND or OR. When you select an AND or OR, another set of fields is displayed, in which you can specify the clause that will be ANDed or ORed to the preceding clause.
Example 1
This example will return work items that arrived in the work queue on or before 20/10/2005, and that have a case description that begins with “C”:
In this example, both clauses must be true for a work item to be returned in the list.
Example 2
This example will return work items that either have an expired deadline or are flagged as urgent:
In this example, either one of the clauses can be true for the work item to be returned in the list.
Specifying More Than Two Clauses
If you specify more than two clauses, they are always evaluated in pairs from left to right. Consider the following:
In this example, the entire filter expression created is this:

 
SW_EXPIRED = 1 AND SW_URGENT = 1 OR SW_CASEDESC = "C*”

 
The system will evaluate this expression as if there are parentheses around the first two clauses in the expression. For example:

 
(SW_EXPIRED = 1 AND SW_URGENT = 1) OR SW_CASEDESC = "C*”

 
As you continue to add clauses to the expression, the system continues to evaluate from left to right. For example, if you added a fourth clause to the expression above, it would include the following implied parentheses:

 
((SW_EXPIRED = 1 AND SW_URGENT = 1) OR SW_CASEDESC = "C*”) AND SW_PRONAME = "LOAN"

 
Building a Free-Form Filter Expression
After specifying filter criteria in the Field, Oper., and Value fields, the filter expression appears in the Expression window:
The expression that appears in the Expression window is what is actually sent to the iProcess Engine. You are free to edit this text in any way desired. Note, however, that the results may not be what you expect if the expression is not in the format required by the iProcess Engine. For example, dates must be enclosed in exclamation characters (!07/05/2006!), times must be enclosed in the ‘#’ character (#18:30#). These special characters are automatically added for you when you use the Field, Oper., and Value fields to build the expression.
You can also add parentheses to the expression in the Expression window to create more complex filter expressions.
The system field names that appear in the Expression window (e.g., SW_DEADLINEDATE) are listed in the table of system fields on page 96.
Favorite Filter Expressions
The “favorites” feature allows you to save your favorite (i.e., commonly used) filter expressions. This allows you to quickly select an expression by name, rather than requiring you to enter each element of the expression.
To use the favorites feature, click on the Favorites button on the filter dialog:
The following dialog is displayed:
In this example, there have already been two favorites saved: “High priority w/expired deadline” and “New Urgent”.
To use one of the saved favorites:
1.
Select the desired favorite in the Saved Favorites section.
2.
Click the Load button.
The filter expression associated with that name is automatically entered into the Expression section on the filter dialog and is automatically applied to the work item list — the “### items will be returned” text is displayed on the filter dialog indicates how many work items satisfied the filter expression.
Saving a New Favorite Filter Expression
To save a new favorite filter expression:
1.
2.
Click on the Favorites button on the filter dialog. The Favorites Manager dialog is displayed.
3.
In the field on the bottom of the Favorites Manager dialog, enter the name you would like to give the filter expression you are saving in the favorites (the entry in this field defaults to the current date and time).
4.
Click Save to save the new favorite.
System Fields Available for Filtering Work Items
The following table lists the system fields that can be included in expressions when filtering work items.
The text in the Description column in the table below corresponds to the text in the Field field drop-down list on the Filter dialog. When you choose a field from the Field field drop-down list, the actual system field name (e.g., SW_CASEDESC) is entered in the filter expression in the Expression window on the Filter dialog.
* The actual name that appears in the Filter field drop-down list for the work queue parameter fields may be different than those shown here if the system administrator has assigned different names to them.

Copyright © Cloud Software Group, Inc. All Rights Reserved