Copyright © Cloud Software Group, Inc. All Rights Reserved

Chapter 4 Working With Work Items : Processing Work Items

Processing Work Items
A work item represents a step in a case (see the illustration of a procedure on page 3). Typically, a work item has an electronic form associated with it that must be opened and filled out (some forms may only display information and will not have fields to fill out). You can then keep the work item in your work queue so that it can be opened again and completed at a later time. When the form is completed, the work item is released so that the case can progress, possibly resulting in another work item that represents the next step in the case.
Opening Work Items
Opening a work item causes the form associated with that work item to be displayed, allowing you to enter information into the form.
Opening a work item also “locks” that work item, causing a lock icon () to appear in the Status column.
If you attempt to open a work item that you’ve already opened, a message is displayed informing you that if you open it again, there could be a loss of data — the system will save any changes in data for the first of those work items that is kept or released. When you attempt to keep or release the second instance of the work item, an error is returned; your only option will be to click Cancel to close the work item, losing any changes made on that form.
If any user of the TIBCO iProcess Workspace (Browser) attempts to open a work item that another user has already opened, a message is displayed on their screen informing them that the work item is already opened. They will not be allowed to open it. (Multiple users can have access to a work item if the work item was sent to a group work queue; another user may also have access to a work item if “participation” has been used to give a user access to another user’s work queue.)
 
Work items can be opened from either the work item list or from the list of outstanding work items (Case Detail / Outstanding tab) using one of the following methods:
press the Enter key,
select Open Selected Work Item(s) from the Tools menu on the list,
right-click the mouse button on the selected work item(s) and select Open Selected Work Item(s) from the drop-down menu, or
If you are opening work items from the list of outstanding work items, they are always opened in a floating form, i.e., they cannot be opened in the Preview Pane.
If you are opening work items from the work item list, you cannot open multiple work items if you are displaying the work item forms in the Preview Pane. If you are opening forms in the Preview Pane, and you select multiple work items, the Open Selected Work Item(s) function is disabled.
Opening the First Available Work Item
When opening work items from the work item list, you can also open the “first available” work item, where “first available” means a work item that is not locked nor suspended, starting from the first work item in the list.
To open the first available work item, use one of the following methods:
Select Open First Work Item from the Tools menu on the work item list,
right-click the mouse button anywhere on the work item list and select Open First Work Item from the drop-down menu, or
Opening the Next Available Work Item
When opening work items from the work item list, you can also open the “next available” work item, where “next available” means a work item that is not locked nor suspended, starting from the currently selected (highlighted) work item.
To open the next available work item, select (highlight) the work item where you want the search for the next available work item to start, then:
Select Open Next Work Item from the Tools menu on the work item list,
right-click the mouse button on the selected work item and select Open Next Work Item from the drop-down menu, or
Work Item Form Location
The location at which the work item form is displayed when you open a work item depends on whether or not the preview feature is turned on.
The preview setting can be viewed or set by:
by selecting Preview from the work item list View menu.
The following drop-down menu is displayed:
The check mark indicates the currently selected preview option.
If the Preview On - Open Forms in Preview Pane selection is checked, the work item form is opened in the Preview Pane.
Note that the Preview Pane may be set to automatically resize when a work item is opened, then return to the previous size when the work item is closed. For information about how this done, see Work Item Preview Default.
If the Preview On - Float Forms selection is checked, the work item form is opened in a separate floating window. Note that the window in which the form opens may be either a dialog or a new browser window, depending on a user options setting — for more information, see Layout Options.
if your application uses any non-GI form (also referred to as “external forms”), they will always be opened in a separate browser window, regardless of the setting of the Preview selections.
Opening / Locking Work Items Multiple Times
Be aware that in an “enterprise” environment, there may be other applications besides the TIBCO iProcess Workspace (Browser) application that affect the work items you see in work queues.
For this reason there are two “locked” flags that indicate the locked/opened status of work items:
Locked - This flag indicates that a user of another application besides the TIBCO iProcess Workspace (Browser) application has the work item locked (opened). These work items cannot be opened by any user of the TIBCO iProcess Workspace (Browser) application.
Long Locked - This flag indicates that a user of the TIBCO iProcess Workspace (Browser) application1 has the work item locked (opened). Note that the same user who has the work item locked can log in using the same username at a different workstation and open the work item that is already open. The first one to release the work item will be successful; the second one to attempt to release the work item will fail.
Columns are available in the work item list that show the state of each of these flags (for information about changing the columns that show in the work item list see, Opening a Case from the Work Item List):
In this example, a user using an application other than the TIBCO iProcess Workspace (Browser) application has locked the work item (the Locked flag is true). Notice, however, that regardless of the application that locked the work item, the Status column shows the work item is locked, and the Locked By column shows who has the work item locked.
Automatically Opening Work Items
The work item list provides an auto-repeat feature that causes the next available work item to be automatically opened after you’ve released a work item, where “available” means a work item that is not locked nor suspended. This allows you to process work items in succession without manually opening each one.
To turn on the auto-repeat feature:
select Auto-Repeat Open Work Item from the Tools menu.
The auto-repeat feature works as a toggle — clicking the icon causes it to remain highlighted while the feature is enabled.
And selecting Auto-Repeat Open Work Item from the Tools menu causes a check mark to appear next to the selection, indicating the feature is active:
If the auto-repeat feature is turned on, but you keep or cancel a work item (rather than release it), the auto-repeat process ends (it does not toggle it off, but it does not open the next available work item).
The auto-repeat toggle is persistent — it remains in its current state until you change it. Note, however, that the auto-repeat state is saved either locally or on the server, depending on a configuration setting made by the system administrator:
Filling in a Work Item Form
The form that appears when you open a work item is specific to your installation. Each company that uses the iProcess Workspace (Browser) will create their own forms that relate to the specific business they are in.
Your company will instruct you in properly filling out the forms that they have designed for the iProcess Workspace (Browser). The following is an example of what a form may look like:
Note that the form may open in the Preview Pane, a separate dialog, or a separate browser window, depending on how your system is set up. For more information, see Preview Pane.
Use the Tab key to move from field to field on the form.
A “date picker” is available to enter dates in date fields. Click on the calendar icon next to the date field. A calendar is displayed from which you can choose a date; clicking on a date in the calendar causes it to be entered in the field.
Keeping Work Items
Keeping a work item causes any information you have entered in the form to be saved, then the work item is closed (and unlocked) and placed back in the work queue. The work item is then available to be opened and completed at a later time.
To keep a work item, click on the Keep button on the work item form.
Releasing Work Items
Releasing a work item means that you are done with that work item. If there are any fields on the form associated with the work item that are marked as “required,” they must be filled in before the system will allow you to release the work item.
Releasing the work item causes any information you’ve entered to be saved, then the work item is closed (and unlocked) and it is removed from the work queue. The case advances to the next step in the procedure, possibly resulting in another work item appearing in someone’s work queue.
To release a work item from the work item form, click the Release button on the form:
Releasing a Work Item from the Work Item List
You can release a work item from the work item list (i.e., rather than from the work item form). However, the work item must be directly releaseable, meaning that it cannot have any data entry fields on the form associated with the work item (if it has a form). It does not mean the input fields have been filled in — the form cannot have input fields.
To release work items that are directly releasable, highlight one or more work items in the work item list, then:
select Release Work Item(s) from the Tools menu on the work item list,
right- click the mouse button on the desired work item(s) and select Release Work Item(s) from the drop-down menu, or
If a work item is not directly releasable, the Release Work Item(s) function will be disabled when you select the work item.
Canceling Changes
You can cancel any changes made on a work item form by “undoing” the changes.
To undo your changes, click on the Undo button on the work item form. The work item is closed and returned to the work queue without saving changes.
Unlocking Work Items
Work items are automatically unlocked when you keep or release them; normally, you do not need to explicitly unlock work items.
This function is for those rare occasions when a work item was left open for some reason (e.g., a system crash).
Unlocking a work item using the unlock function causes any changes that were made on the form while the work item was open to be discarded.
Any user can unlock a work item that they have opened.
To unlock a work item that was opened by another user, you must have system administrator authority.
To unlock work items, highlight one or more locked work items in the work item list, then:
select Unlock Work Item(s) from the Tools menu.
A message is displayed confirming that the work item was unlocked.
Forwarding Work Items
You can select and manually forward one or more work items to another work queue (for information about setting up automatic forwarding of work items, see Redirecting Work Items to Another Work Queue).
Note that there are several levels of access permission that determine whether or not you can manually forward work items, as follows:
User access profile - If your user access profile does not allow you to forward work items, the Forward Work Item(s) menu selection and icon do not appear on the work item list.
Step definition - When the procedure is defined, the designer specifies whether or not work items representing each step are forwardable. There is a Forwardable column (as well as a Forwardable Image column) that indicates whether or not the step definition allows the work item to be forwarded.
User definition on the server - A user attribute on the server can be set for each user that allows that user to:
If one or more of the work items you’ve selected are not forwardable, either because the step definition does not allow it, or because your user attribute definition does not allow it, the Forward Work Item(s) menu selection and icon are grayed out:
Additionally, if a work item is currently locked or it is in a case that is currently suspended, it cannot be forwarded.
For work items that can be forwarded. there are two ways in which you can forward them:
Using the “drag and drop” method - To forward using this method, select one or more work items in the work item list, then “drag and drop” them onto the work queue to which you want to forward them.
You are asked to confirm before the work items are forwarded.
Using this method, you can forward only to work queues to which you have access (as those are the work queues that are displayed in your work queue list).
Using the Forward dialog - To forward using this method, select one or more work items in the work item list, then select Forward Work Item(s) from the Tools menu on the work item list, or click on the 
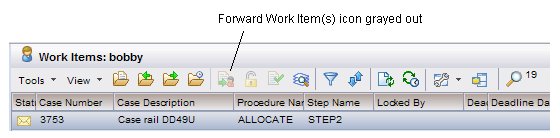
icon on the work item list toolbar.
A dialog similar to the following is displayed:
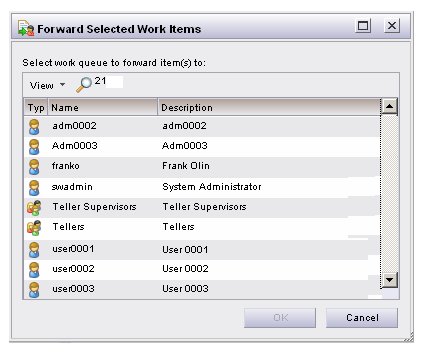
This dialog will list either all work queues on the system, or only the work queues to which you have access, depending on how your user access profile is set up (see User Access Profiles).
Select the desired work queue from the list (you can forward to only one work queue at a time), then click OK. The selected work items are forwarded and the work item list is automatically updated.

1
If a work item is locked with the TIBCO iProcess Workspace Lite application (a TIBCO client application that allows persons with disabilities to access iProcess BPM functionality using standard accessibility aids, such as screen readers and magnifiers), it also sets the Long Locked flag to true.


Copyright © Cloud Software Group, Inc. All Rights Reserved