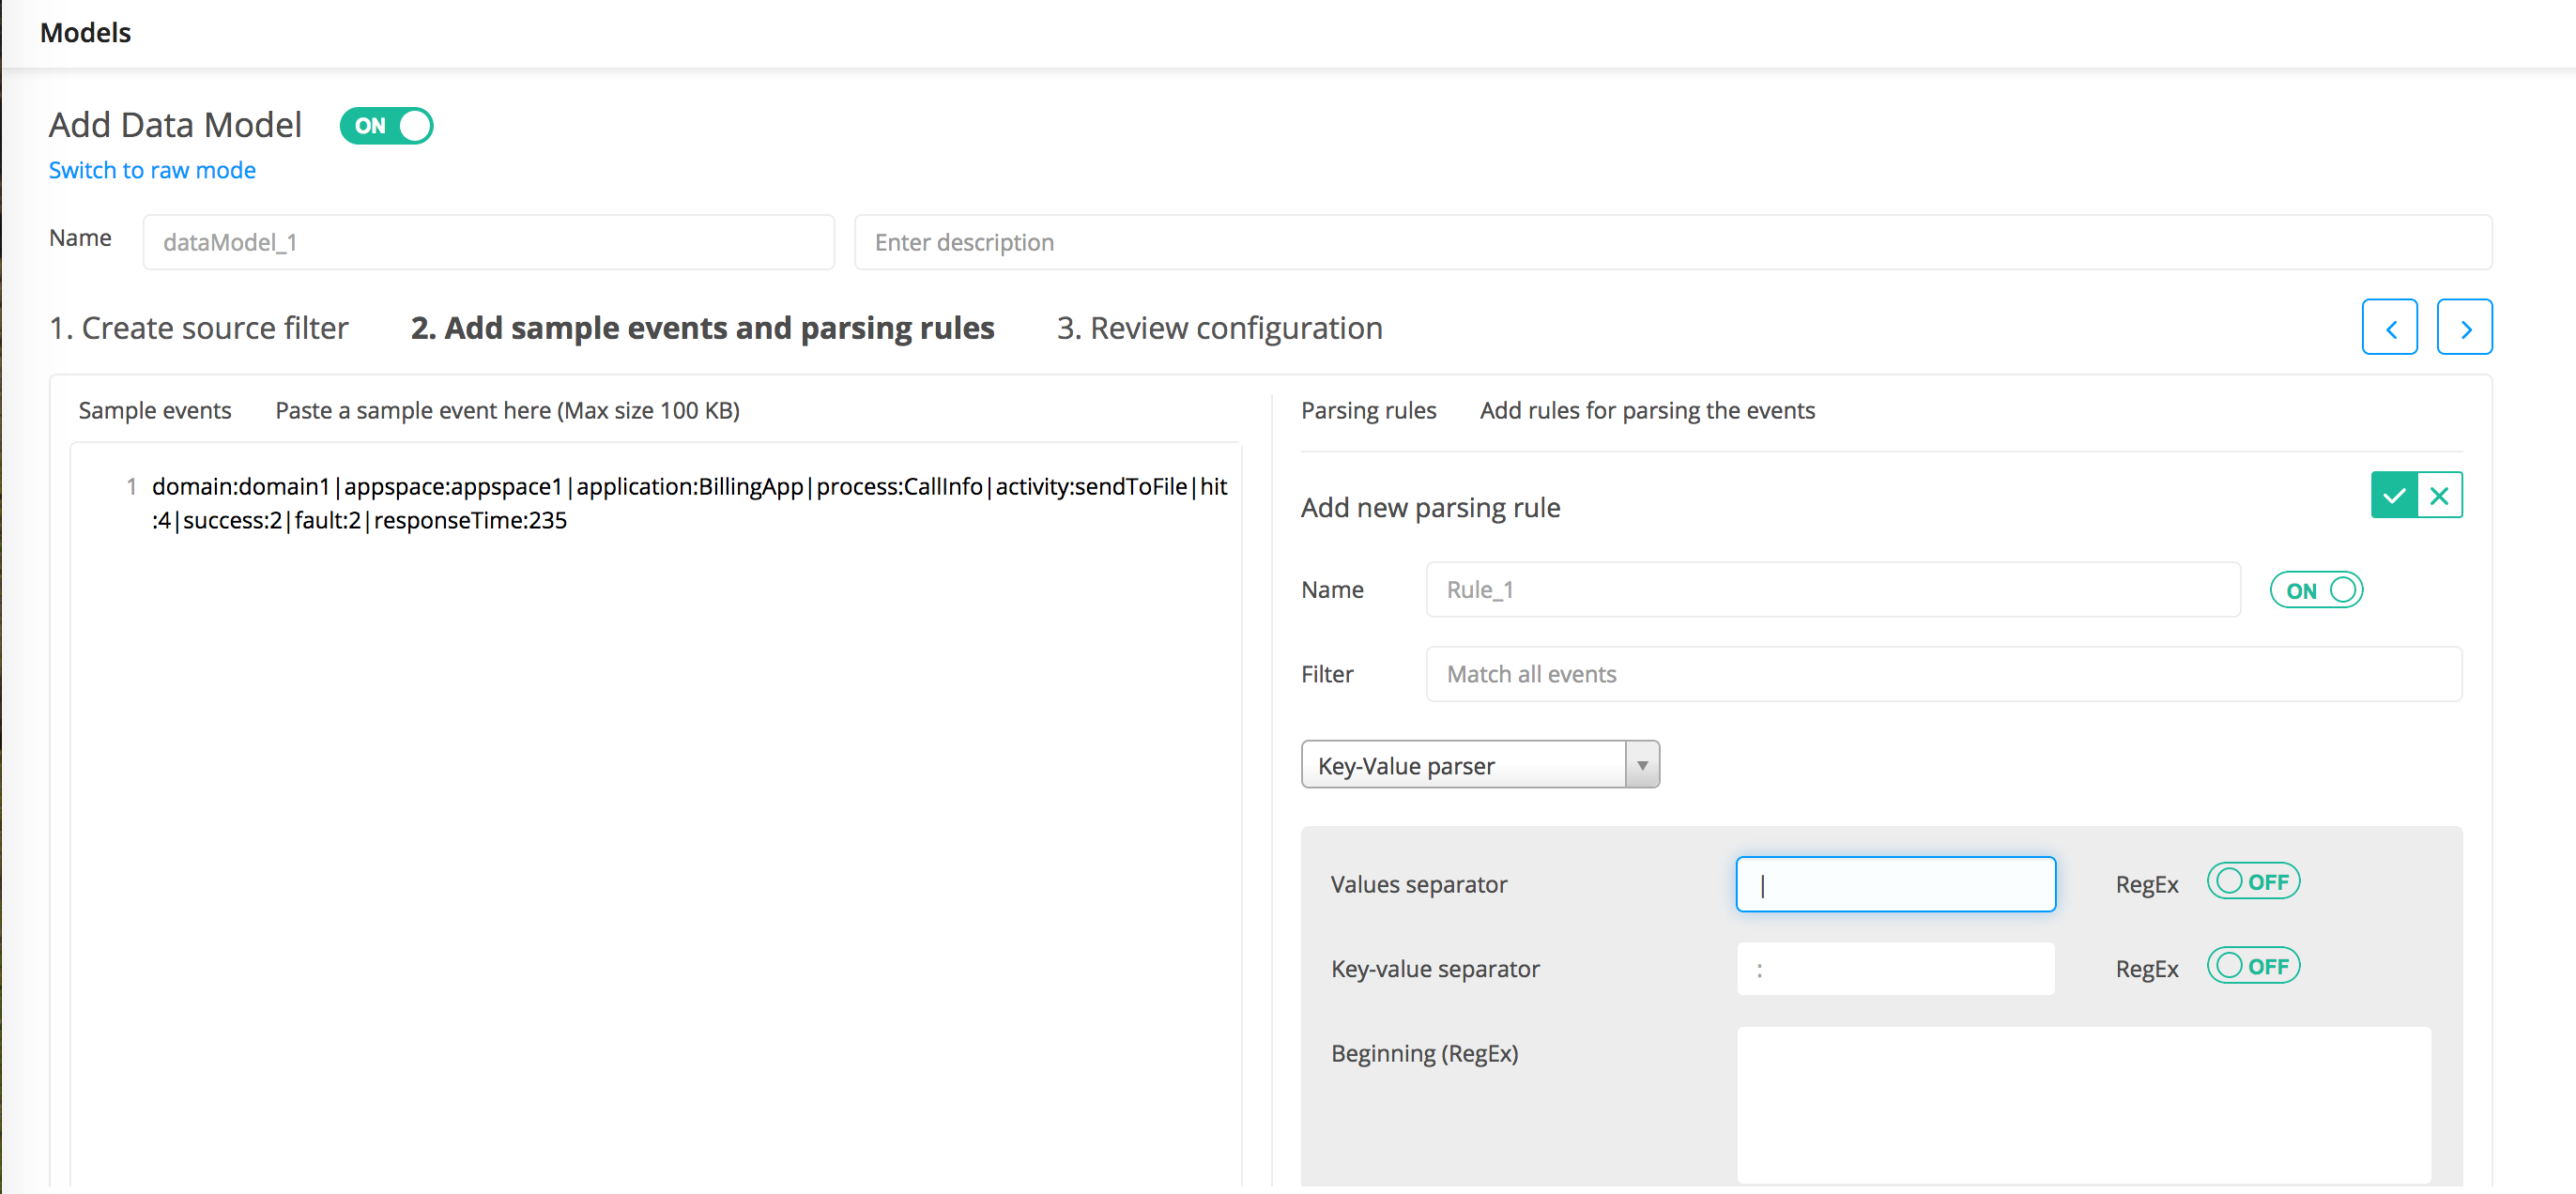
Adding a Parsing Rule
You can add one or more parsing rules that define how to parse log events.
Procedure
- Enter the filter that is assigned to the parsing rule in the Filter field. All regular expression patterns are supported.
-
From the
Choose parser
list, select the type of parser you want to use. The options are:
Key-Value, Columnar, Regex, CEF and
Syslog.
- For the
Key-Value parser, define the following information:
- Values separator: Enter the delimiter that you want to use to separate key-value pairs. You can add only one separator at a time. The delimiters are case sensitive. For example, user=bob,vm=windows where user=bob is one pair and vm=windows is another pair separated with delimiter comma (,). The delimiter can be a single character, a string that has to be matched exactly, or a Java regular expression.
RegEx: Select ON to use as a Java regular expression or OFF to use as a literal string.
- Key-value separator: Enter the delimiter that you want to use to separate keys from their values. The delimiters are case sensitive. For example, user=bob where user is a key and bob is a value separated with delimiter equal sign (=). The delimiter can be a single character, a string that has to be matched exactly, or a Java regular expression.
RegEx: Select ON to use as a Java regular expression or OFF to use as a literal string.
- Beginning (RegEx): If you want some initial characters in each line to be ignored, enter a regular expression for it. If a segment at the beginning of the line matches this regular expression, it is ignored. For example, if a line starts with Login and then followed by keyvalue pairs, then if you enter Login in this field, the first word Login is ignored when extracting columns. Named groups in the regular expression are extracted as columns.
- Ending (RegEx): If you want some characters at the end of each line to be ignored, enter a regular expression for it. If a segment at the end of the line matches this regular expression, it is ignored. Named groups in the regular expression are extracted as columns.
- Last key: Enter a key name. Whenever that key is found in a line, the parser stops searching for more key-value pairs in that line and the value for that key is the remaining content of the line. For example, if the line ends:
Severity="high",EventSubClass="1",ObjectID="389576426"
then if you specify Severity as the last key, then the value for severity is:
"",EventSubClass="1",ObjectID="389576426".
- Values separator: Enter the delimiter that you want to use to separate key-value pairs. You can add only one separator at a time. The delimiters are case sensitive. For example, user=bob,vm=windows where user=bob is one pair and vm=windows is another pair separated with delimiter comma (,). The delimiter can be a single character, a string that has to be matched exactly, or a Java regular expression.
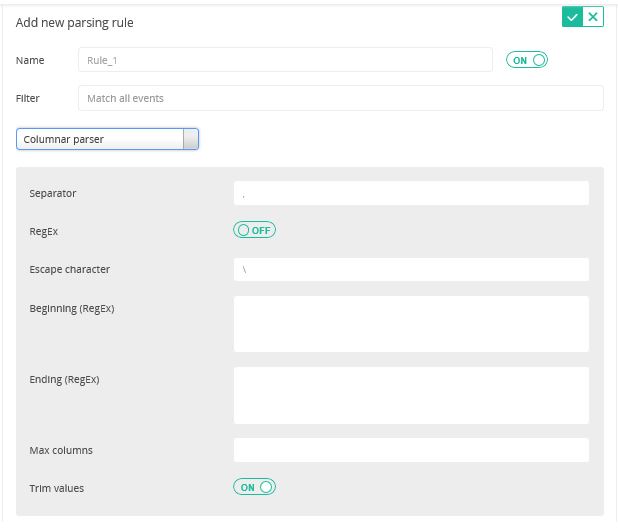
- For the
Columnar parser, define the following information:
- Separator: Enter the delimiter that you want to use as a column separator. The separator can be a string of one or more characters, or a Java regular expression. The delimiters are case sensitive. For example, bob,windows where comma (,) is a character used to separate two columns.
- RegEx: Use this option to define how the separator should be interpreted. Select ON to use as a Java regular expression or OFF to use as a literal string.
- Escape character: Define a character that is actually used to escape the character used as a column delimiter. The delimiters are case sensitive. For example, if you use a comma as a column separator and your column value has a comma in it, then that value has to be escaped so that a parser does not think that the instance of the comma is the start of a new column.
- Beginning (RegEx): If you want some initial characters in each line to be ignored, enter a regular expression for it. If a segment at the beginning of the line matches this regular expression, it is ignored. For example, if a line starts with Login and then followed by columnar data, then if you enter Login in this field, the first word Login is ignored when extracting columns. Named groups in the regular expression are extracted as columns.
- Ending (RegEx): If you want some characters at the end of each line to be ignored, enter a regular expression for it. If a segment at the end of the line matches this regular expression, it is ignored. Named groups in the regular expression are extracted as columns.
- Ending (RegEx): If you want some characters at the end of each line to be ignored, enter a regular expression for it. If a segment at the end of the line matches this regular expression, it is ignored. Named groups in the regular expression are extracted as columns.
- Max columns: Enter the maximum number of columns to be extracted. If more columns than maxColumns are found, then the content of the additional columns is included in the last column. For example, if the separator is <space> and the maxColumns value is 3 for a message like “a b c d”, then there are 3 columns with values “a”, “b” and “c <space> d”.
- Trim values: If defined ON, then the extra (white) space that is generated at the beginning and end of the column is removed. If defined OFF, the extra space is not removed.
- For the
Regex parser, define the following information:
- Regex pattern: Make sure to enter a valid PCRE regular expression that contains the groups (named or unnamed) to extracted into column values from the log event. Also, it is good practice to use one or more sample events to validate your regular expression and make sure that the correct values are extracted from the event. For a list of supported regular expression meta characters, based on Java regular expressions, see Supported Regular Expression Characters.
(?<Sequence>\d+).*(?<ACL>\%\w+ \-\d\-\w+)\:\s(?<Name>\w+)\s(? <Version>\w+) \s(?<Status>\w+)\ s(?<Protocol>\w+)\s(?< SourceIP>\d{1,3}\.\d{1,3}\.\d{ 1,3}\. \d{1,3}).*(?< DestinationIP>\d{1,3}\.\d{1,3} \.\d{1,3}\.\d{1,3}).*This extracts 8 fields: Sequence, ACL, Name, Version, Status, Protocol, SourceIP, and DestinationIP. - For the
Key-Value parser, define the following information:
-
Click
Auto generate columns
to extract columns based on the parser type.
All custom columns are extracted in the Manage columns for this rule panel. You can add, edit, and delete custom columns. Click
 to add a column. Click inside the
Column and
Expression fields to edit any values. Hover over the row, and the Delete
to add a column. Click inside the
Column and
Expression fields to edit any values. Hover over the row, and the Delete
 button is displayed on the right side of the row for you to delete the column.
- Column: The name of the column that is displayed in the results. Click in the row to add or update any column name. The content assist shows contextual matches of the existing custom column names for you to select.
Note: Two columns cannot have the same name. When defining column names, follow the guidelines described in the COLUMNS Statement section.
- Expression: Define how to map values extracted by parser into defined columns. You can use arithmetic operators and conversion functions when defining an expression. The conversion functions are typically used when you need to define new columns where the expressions for new columns can use conversion functions to convert between data types and combine them using various operators. For details about the arithmetic operators, see
FILTER Statement section and for conversion functions, see
Predefined Functions. The type of expression depends on the parser type:
- For Key value parser, the expression uses a key name preceded with “$” to extract the value for the column. For example, $user is the value of the key "user" in the log line or null if the key is not present.
- For Columnar parser, the expression uses the $<n> identifier where n is the column number for the value of column n. For example, $2 is the value of the column "2".
- For Regex parser, the columns are extracted using the capturing group pattern the named capturing group pattern or a combination of both. If you select the parser and the column list is empty, the parser tries to guess columns from the sample data.
- For CEF parser, based on the ArcSight Extension Dictionary, the CEF header columns are extracted and the remaining data is formatted as key-value pairs. For example, Sep 19 08:26:10 host CEF:0|Security|threatmanager|1.0|100|worm successfully stopped|10| src=10.0.0.1 dst=2.1.2.2 spt=1232
This extracts these columns and their values: $cefVersion=0, $cefDeviceVendor=Security, $cefDeviceProduct=threatmanager, $cefDeviceVersion=1.0, $cefSignatureID=100, $cefName=worm successfully stopped, $cefSeverity=10, $sourceAddress=10.0.0.1, $destinationAddress=2.1.2.2, $sourcePort=1232 - Column: The name of the column that is displayed in the results. Click in the row to add or update any column name. The content assist shows contextual matches of the existing custom column names for you to select.
-
Click
 to refresh the
Parser preview
panel to view all extracted columns and their data types that are matched by the corresponding parsing rule.
Each event that matches with the corresponding rule is identified in the same color for easy readability. For custom columns, click in the Type field to change the supported data type. Select the data type from the list.
to refresh the
Parser preview
panel to view all extracted columns and their data types that are matched by the corresponding parsing rule.
Each event that matches with the corresponding rule is identified in the same color for easy readability. For custom columns, click in the Type field to change the supported data type. Select the data type from the list. -
Click
 to add a new parsing rule. The
Parsing rules panel displays the newly added rule.
to add a new parsing rule. The
Parsing rules panel displays the newly added rule.
-
Click
3. Review configuration or click
 located on the right side of the page to manage columns.
For more information, see Managing Columns.
located on the right side of the page to manage columns.
For more information, see Managing Columns.

Copyright © Cloud Software Group, Inc. All rights reserved.