Upgrading in a High Availability Environment
This section describes the procedure to upgrade appliances in high availability setup.
- For upgrading a standalone appliance, see Upgrading a Standalone Appliance.
- For detailed information about HA, see FailoverTIBCO LogLogic® Log Management Intelligence Administration.
- Both HA appliances must have the same hardware model and software version.
- Ensure that you have read Upgrade Considerations and have performed all tasks mentioned in Preparing to Upgrade the Appliance on each appliance.
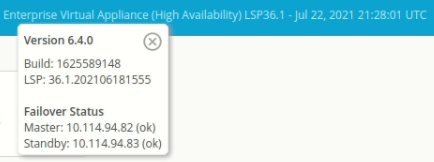
- Ensure that your HA environment is synchronized, by viewing the cluster status on the
build details on the top navigation bar. Ensure that there are no warning messages.

- If currently enabled in your HA environment, disable the following features on the active appliance:
- Archiving:
Note down all the archive configuration settings to help you when you reenable the archiving feature.
- Advanced Features:
Must be disabled from the CLI. Disabling Advanced Features automatically disables the Monthly Index, Advanced Aggregation, and Monitoring Console features.
- Archiving:
| Appliance | Appliance type | IP address |
|---|---|---|
| Appliance A | HA active | 19.0.2.44 |
| Appliance B | HA standby | 19.0.2.45 |
| Public | HA public | 19.0.2.46 |
| Network mask | 255.255.255.0 | |
| Network broadcast | 19.0.2.255 |
The process of upgrading an HA pair involves disabling HA on the standby appliance (appliance B) and then on the active appliance (appliance A). After upgrading the appliance software on each appliance, you enable HA on appliance B and then on appliance A. Thus, after upgrade, the active and standby appliances are interchanged.
- Forcing failovers for the purpose of keeping one particular appliance “active” is not recommended, because it has no particular benefit and any failover event causes some loss of data - even if for a few seconds. To force a failover, you must wait until the postupgrade process is complete.
- The log data collected on appliance A after disabling HA is ignored while setting up HA on appliance A during initialization and syncing.
- Procedure
- From the CLI, disable the HA configuration:
- From a command prompt, log in as the
rootuser, and type the password. - Run the following command to disable HA:
set failover disable
- When the prompt displays the message CHANGES HAVE NOT BEEN SAVED!, type save and then press Enter.
- From a command prompt, log in as the
- Install the correct version of LogLogic LSP.
- Perform the GUI upgrade steps.
- After the appliance reboots, run the postupgrade script as described in Running the Postupgrade Script.
- From the CLI, disable the HA configuration:
- From a command prompt, log in as the
rootuser, and type the password. - Run the following command to disable HA:
set failover disable
- When the prompt displays the message CHANGES HAVE NOT BEEN SAVED!, type save and then press Enter.
- From a command prompt, log in as the
- Set up HA configuration:
- From a command prompt, log in as the root user, and type the password.
- Run the following command to set up HA:
set failover configure
- Enter the IP addresses of the cluster:
<HA_public_IP_address> <network_mask> <network_broadcast> bond0.For example:19.0.2.46 255.255.255.0 19.0.2.255 bond0
- When prompted about this appliance being the destination of automatic migration:
Enter N.
Type the IP address of the peer appliance (appliance A):
19.0.2.44 - Follow the prompts. Ensure that you type
save when prompted.
Wait until
doneis displayed on the CLI, indicating that the HA setup is successful on the appliance.
At this point, appliance B has become the active appliance. As appliance A is no longer part of the HA pair, it is reported as "out of cluster" by appliance B. - Install the correct version of LogLogic LSP.
- Perform the GUI upgrade steps.
- After the appliance reboots, run the postupgrade script as described in Running the Postupgrade Script.
- After the upgrade process completes successfully, set up the HA configuration:
- From a command prompt, log in as the root user, and type the password.
- Run the following command to set up HA:
set failover configure
- Enter the IP addresses of the cluster:
<HA_public_IP_address> <network_mask> <network_broadcast> bond0.For example:19.0.2.46 255.255.255.0 19.0.2.255 bond0
- When prompted about this appliance being the destination of automatic migration:
Enter Y.
Type the IP address of the peer appliance (appliance B):
19.0.2.45 - Follow the prompts. Ensure that you type
save when prompted.
Wait until
doneis displayed on the CLI, indicating that the HA setup is successful on the appliance. Appliance A has become the standby appliance.
- (Only for
TIBCO LogLogic® LX1025 Appliance) Enable the swap file by performing the following steps:
- Log in to the appliance through SSH as
tooruser. - Run the following command:
$ /loglogic/scripts/enable_12g_swap_file.sh
- Log in to the appliance through SSH as
- Reenable the following features if you had disabled them before starting the upgrade process:
- ArchivingImportant: Do not change any settings in the archive configuration while re-enabling the archive feature.
- Advanced Features
After enabling Advanced Features, you can explicitly enable the Monthly Index, Advanced Aggregation, and Monitoring Console - as applicable. In an HA environment, you can enable the Advanced Features, Advanced Aggregation, and Monitoring Console only from the CLI on the active appliance.
- Archiving