Deploying the Mashery Local OVF Template
Procedure
- Select File >Deploy OVF Template.
-
Navigate to and select the
.ova file you received from Mashery.
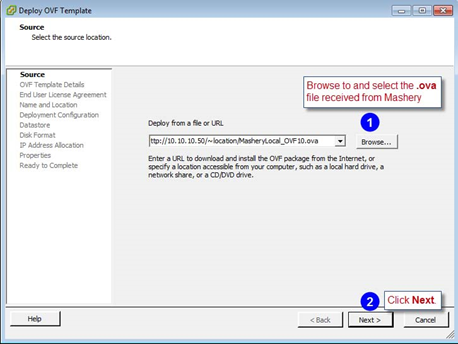
- Click Next.
-
Run the following command to start the installation:
Enter a name that is meaningful to your managing your virtual environment. This name has no relevance to what your users and partners will see in Mashery products but is meaningful to your administration of your ESX environment. Your operations team likely has naming conventions that should be followed. Then, click Next.
-
Select the appropriate VM datastore, and then click
Next.

Note: Ensure that you pick a datastore with enough free space. See Hardware and Software Requirements for guidance.The Disk Format window appears. -
Select the
Thin provisioned format or
Thick provisioned format option for
Disk Format according to your needs and best practices, and then click
Next. See this
VMware performance study for guidance. Thin clients, although faster, need to be monitored closely to ensure you do not run out of space and sometimes require attention to shrink them back down. Remember also that a large number of thin provisioned VMs can affect performance due to frequent metadata updates.

The Network Mapping window appears. -
Select the appropriate Network Mapping for your environment, and then click
Next.

The Ready to Complete window appears. -
Click
Finish to complete the provisioning.

-
Select the
Power On icon for the instance to boot the instance.

-
You need to get the IP addresses of the instance for use when performing further configuration steps within the Mashery Local appliance. Select the instance and then click
View All to find the IP address and make a note of them.

A recommended best practice is to select IP addresses as follows:- eth0: use as a public interface where API calls would be coming in from the developers.
- eth1: use as an internal interface for the nodes to talk to each other and where nodes can interface with the backend systems.
This scheme allows you to deal with your firewall rules more easily and keep services on different subnets if needed for security reasons. Typically, the Admin UI would be handled via eth1 as it most likely would be from the internal subnet. The Slave would also be connecting to the Master on eth1 as it is internal traffic.
You are now ready to configure the Mashery Local instance. You may optionally create a number of slave instances before proceeding by repeating the previous steps for each.


Copyright © Cloud Software Group, Inc. All rights reserved.