Creating a Custom Authenticator
This version of the SDK allows you to create a custom authenticator. This triggers an authentication event that a custom processor can handle for the custom authentication.
To create and use a custom authenticator, follow the steps below:
- Download the SDK, then add the SDK to the class path for com.mashery.trafficmanager.event.listener.TrafficEventListener and com.mashery.trafficmanager.event.listener.Authenticator.
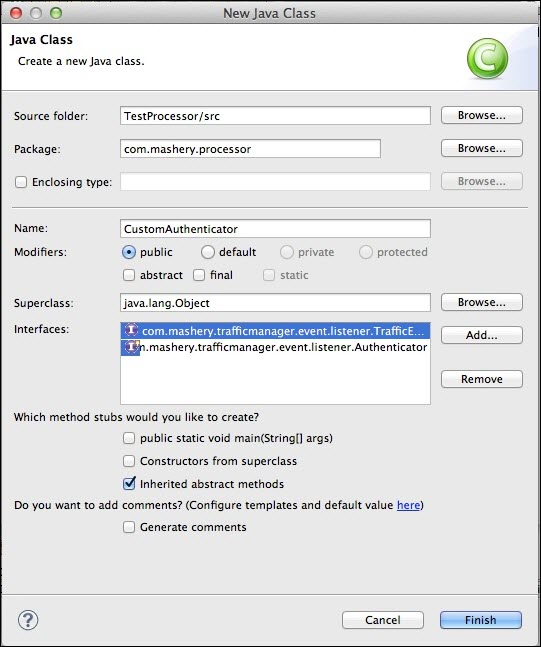
- Create a new class. In Eclipse, select the Java project, right-click and select New > Class in the context menu.
- Set the following fields as shown in the image below, implement the
com.mashery.trafficmanager.event.listener.TrafficEventListener and
com.mashery.trafficmanager.event.listener.Authenticator interface, then click
Finish.

- The new class should contain the following content:
package com.mashery.processor; import com.mashery.trafficmanager.event.listener.Authenticator; import com.mashery.trafficmanager.event.listener.TrafficEventListener; import com.mashery.trafficmanager.event.model.TrafficEvent; public class CustomAuthenticator implements TrafficEventListener, Authenticator { @Override public void handleEvent(TrafficEvent arg0) { // TODO Auto-generated method stub } } - Add the following class annotation, as shown:
package com.mashery.processor; import com.mashery.trafficmanager.event.listener.Authenticator; import com.mashery.trafficmanager.event.listener.TrafficEventListener; import com.mashery.trafficmanager.event.model.TrafficEvent; import com.mashery.trafficmanager.processor.ProcessorBean; @ProcessorBean(enabled = true, name = "CustomAuthProcessor", immediate = true) public class CustomAuthenticator implements TrafficEventListener, Authenticator { @Override public void handleEvent(TrafficEvent arg0) { // TODO Auto-generated method stub } } - Update the
CustomAuthenticator class with the following code snippet:
package com.mashery.processor;

import org.slf4j.Logger;
import org.slf4j.LoggerFactory;

import com.mashery.http.server.HTTPServerRequest;
import com.mashery.trafficmanager.event.listener.Authenticator;
import com.mashery.trafficmanager.event.listener.TrafficEventListener;
import com.mashery.trafficmanager.event.model.TrafficEvent;
import com.mashery.trafficmanager.event.processor.model.AuthenticationEvent;
import com.mashery.trafficmanager.event.processor.model.PostProcessEvent;
import com.mashery.trafficmanager.event.processor.model.PreProcessEvent;
import com.mashery.trafficmanager.processor.ProcessorBean;
import com.mashery.trafficmanager.processor.ProcessorException;

@ProcessorBean(enabled = true, name = "CustomAuthProcessor", immediate = true)
public class CustomAuthenticator implements TrafficEventListener, Authenticator {

    private final Logger log = LoggerFactory.getLogger(CustomAuthenticator.class);
    @Override
    public void handleEvent(TrafficEvent event) {
        try {
            if (event instanceof PreProcessEvent) {
                //preProcess((PreProcessEvent) event);
            } else if(event instanceof PostProcessEvent){
                //postProcess((PostProcessEvent) event);
            } else if(event instanceof AuthenticationEvent){
                authCallprocess((AuthenticationEvent)event);
            }
        } catch (ProcessorException e) {
            log.error("Exception occurred when handling processor event");
        }
    }

    private void authCallprocess(AuthenticationEvent event) throws ProcessorException{
        HTTPServerRequest httpRequest = event.getServerRequest();
        //add code to perform authentication of the request.
    }

}
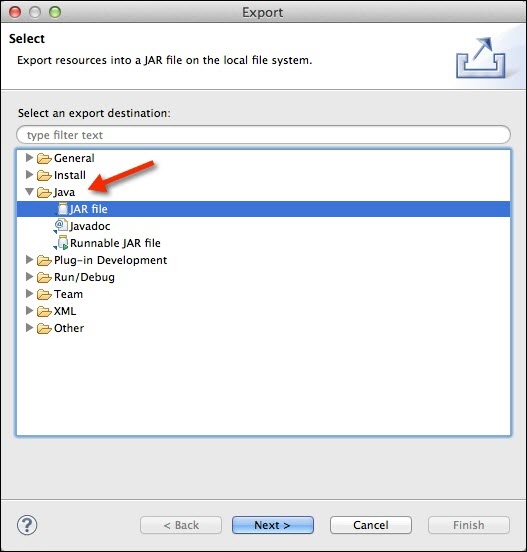
Note: All the headers, status code and status messages set in the custom authentication would not be returned as part of response in case of Authentication Event handling (Custom authenticator). If you want to fail authentication request from custom authenticator, then you need to terminate the call in order to throw "ERR_403_NOT_AUTHORIZED" for a request. Refer to the example in Terminating a Call During Processing of an Event for more information. - Ensure there are no compilation errors and export the JAR file. In Eclipse, select the Java project, right click and select Export from the context menu.
- In the Export wizard, select and export destination of type
Java > Jar file.

- Provide the JAR file name and click Finish.
- Create a zip archive, adding the exported JAR file created in the previous step.
- Sign into the Mashery Local Admin UI and select Adapter SDK from the left menu.
- In the
Upload Adapters section, click
Choose File and select the zip file created in Step 9, then click
Upload Adapters to Instance.

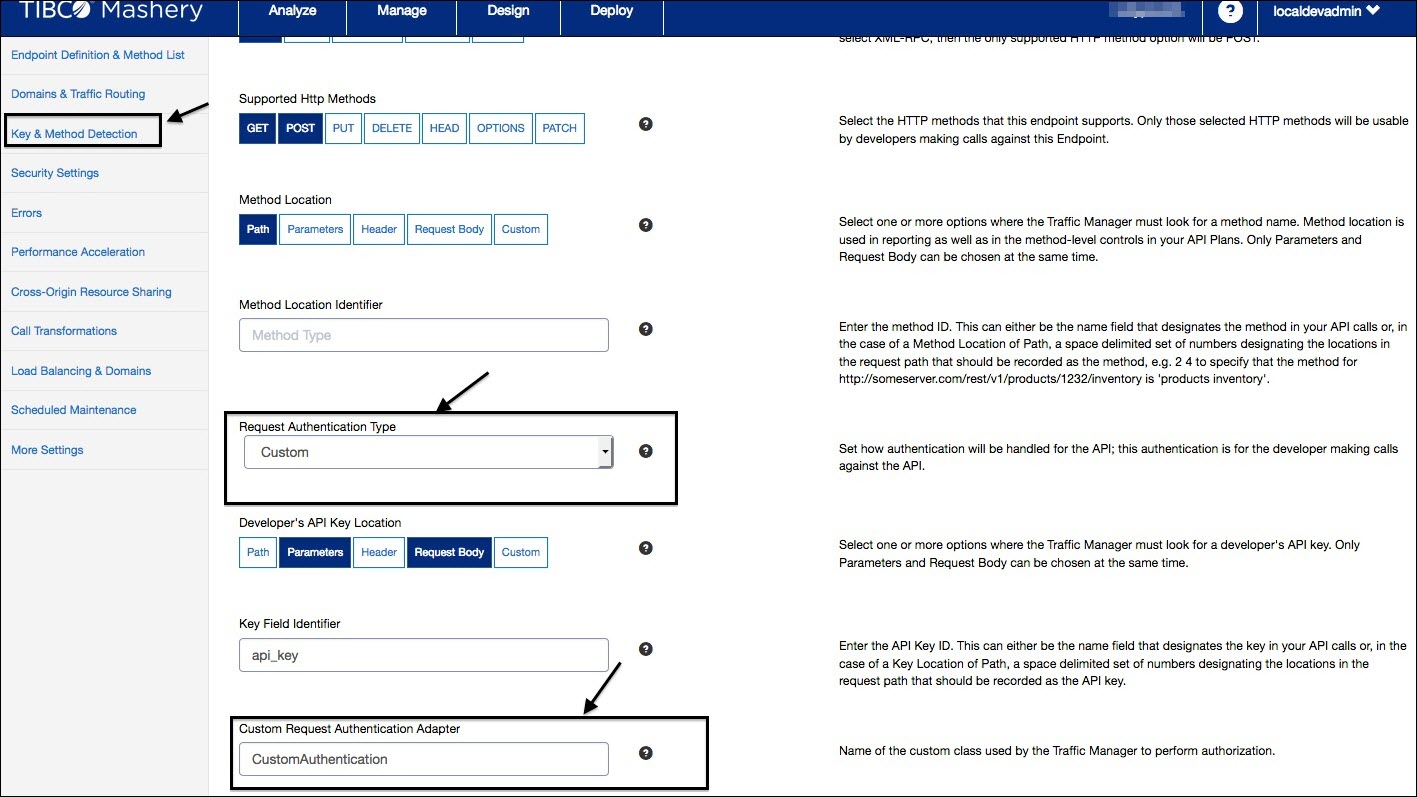
If the upload is successful, a message appears that the adapters were updated successfully. - Update the endpoint's authentication configuration to use the custom authenticator. Log into TIBCO Cloud™ Mashery, navigate to
Design > API > Select Endpoint > Key & Method Detection, select
Request Authentication Type as
Custom, then enter the name of the custom authenticator in the
Custom Request Authentication Adapter field.
Note: The name used for the Custom Request Authentication Adapter field is the ProcessorBean name used in Step 4.

- Save the configuration in the portal dashboard.
Copyright © Cloud Software Group, Inc. All rights reserved.
