Scheduling Jobs Using Configurator
You can manage, that is, add, modify, view, run, and delete jobs using Configurator.
Procedure
- Log in to Configurator.
-
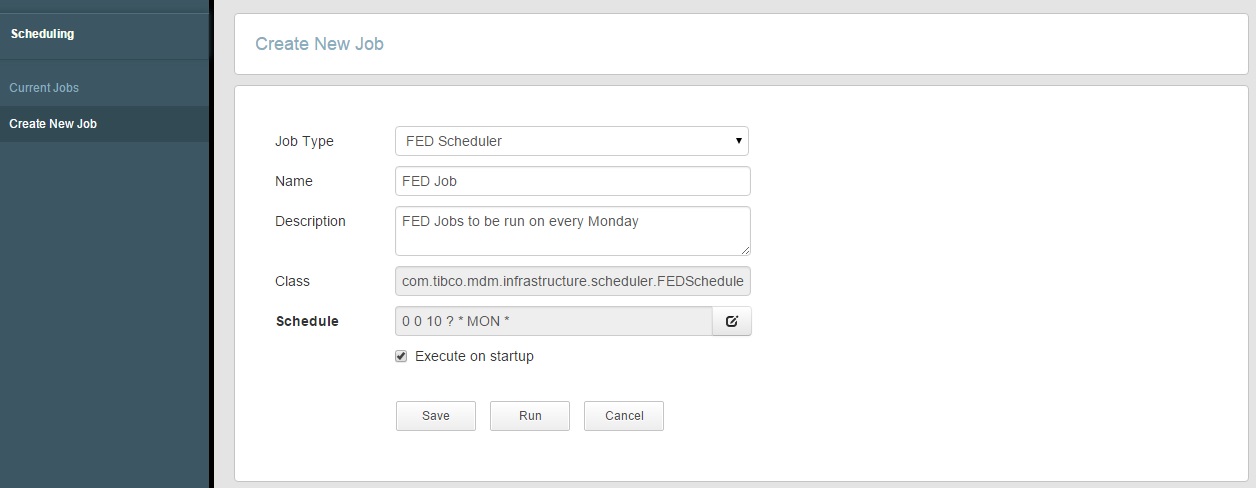
Click
Scheduling.
The Scheduling window is displayed with the Current Jobs and Create New Job options.
- In the right pane, click Create New Job to schedule a new job.
-
Enter job details in the following fields:
Field Name Description Job Type Select the job type from the drop-down list. The available job types are: - FED Scheduler: these jobs are triggered for future effective date records. For more information on future effective date records, see "Effective Date Records" in TIBCO MDM User's Guide.
- PurgeRecordSynchLog: these jobs are used to clean up the old sync logs, which are no longer required. Removal of these logs speed up the retrieval process and you can delete the events faster.
- Purge History: these jobs are used to purge history and the older record versions.
- Job Duplicates: these jobs are used to locate the duplicate records in the golden copy table.
- Checkpoint Scheduler: these jobs are used to checkpoint the Netrics tables or indexes periodically. For more information, refer to Example of Checkpoint Schedulerand see "CheckpointWorkflow Activity" in TIBCO MDM Workflow Reference.
- Workflow Trigger Scheduler: these jobs are used to trigger a file in the specified location so that workflow can be fired.
- JMX Stats Copier: these jobs are used to copy the JMX statistics to cache.
Name Specify the job name. For example, Future Effective Date job or Scheduler Duplicate Detection job. Description Enter a description for the specified job name. Class The Java class is displayed according to the job type selection. For example, Schedule Select the schedule time for the job. You can select the following schedule details: - Minutes: enter the minutes.
- Hourly: enter the hours or select the specific duration from the At drop-down list.
- Daily: enter the number of days or elect the Every week day option. Select the start time.
- Weekly: select the day check box and the start time.
- Monthly: enter the number of days of every month or the number of days of a specific month. Or select the First, Second, Third, or Fourth option of a specific day for a specific month. Select the start time.
- Yearly: select the number of month in a year (number of days). Or select the First, Second, Third, or Fourth option for a specific day of a specific month. Select the start time.
Limitation: You cannot specify multiple trigger expressions.
Execute on startup Select this check box to run the scheduler on the application server startup. Parameters The parameters are displayed according to the selected job type. Parameters for Purge Record SyncLog - Enterprise Name: enter the name of an enterprise.
- Member Name: enter the member name of the server.
- Job Policy : enter the file name of a job policy. The file name should end with .xml.
- Job Policy Description: enter the description for the job policy file name.
- Job Policy Class: by default, the job policy class is displayed, based on the selected job type.
See also, Purge RecordSyncLog
Parameters for Purge History - For Job Policy, Job Policy Description, and Job Policy Class, refer to the description documented for the Purge Record SyncLog parameters.
- Purge Execution Mode: select the purge execution mode from the drop-down list. The following are the available modes:
- Retention Days: by default, the period of retention is 365 days. This field is displayed if you have selected the History History with Force, and Record Versions modes.
- Repository Name: enter the repository name. This field is displayed if you have selected the Repository, Record Versions, Metadata, and Metadata Versions modes.
- Hints: enter the hint characters. The allowed hint characters are A D, F, L, M, S, G, P, and R. For information on hint characters, refer to Hint Characters. This field is displayed if you have selected the Repository mode.
- Data Source Name: enter the data source name. This field is displayed if you have selected the Metadata and Metadata Versions modes.
- Version To Retain: enter the version number that you want to retain in purge. For information on version to retain, refer to Delete Record Versions. This field is displayed if you have selected the Record Versions mode.
- Interval: enter an interval in days and must be a positive integer. For information on interval, refer to Interval in Record Versions. This field is displayed if you have selected the Record Versions mode.
See also, Purge Job Scheduler
Parameters for Job Duplicates Note: To complete the job duplicate process, you need to perform some perquisites. For information refer to the chapter, "Scheduler Duplicate Detection Process" in TIBCO MDM Customization Guide.- Enterprise Name: enter the name of an enterprise.
- User Name: enter the name of a user.
- Job Policy: enter the file name of a job policy. The file name should end with .xml. The JobPolicy is parsed through the MatchRecordRule.xml file, which retrieves the required inputs and passes it to the Scheduler Duplicate Detection job. When a job is triggered, these values are available to the job.
- Job Policy Description: enter the description for the job policy file name.
- Job Policy Class: by default, the job policy class is displayed based on the selected job type.
- Search Entity: select the
Table or
View option. For a single repository, select
Table and for multiple repositories select
View.
- View Name: enter the view name which is indexed with the same repository and attributes. View name is an index entity name. Specify the View name if you have selected the search entity type View.
- Search Mode: select the
Incremental or
Complete
mode. This is a mode of execution for search.
- Complete: for the first time search, all confirmed records are added. Later, when next job runs, search is performed only on the added records between the interval of the last and current jobs.
- Incremental: specifies that only new or changed data is searched except in one case, that is, if a scheduler duplicate detection job was not executed earlier, the server starts with the Complete mode and the search is performed on the entire data.
- Data Provider Class: enter the data extractor helper class name. It retrieves records from the golden copy table for the specified repository ID. For example: DupDetectJobDataExtractor
- Match Threshold: select the threshold score for matching. Specify the value between 0 to 1. For example, 0.2, 0.5, and so on. By default, the score is 0.6.
- Repository Name: enter the existing repository name.
- Root Repository: select the check box if the repository is a root repository.
- Match Attributes: enter the name of matching attributes. You can enter multiple matching attributes. You can perform search based on these attributes.
- Weight: enter the decimal number between 0.00 to 1. This is the weightage of an attribute for matching records.
- Display Attributes: enter the name of attributes that should be displayed in the scheduler duplicate detection report.
- Relationship:
Parameters for Checkpoint Scheduler Parameters for Workflow Trigger Scheduler - Enterprise Name: enter the name of an enterprise.
- Job Policy: enter the file name of a job policy. The file name must end with .xml.
- Job Policy Description: enter the description for the job policy file name.
- Job Policy Class: By default, the job policy class is displayed based on the selected job type.
- Directory Name: enter the directory name to create a trigger file in a specified location. For example, $MQ_COMMON_DIR/directoryname/Prefix.extension
- Prefix: enter the file name of a trigger file, which is required to fire the workflow.
- Extension: enter the extension of a file. For example, .xml.
-
Click
Save.
A new job is added in the CronSchedules.xml file for the selected job type.
-
Optional. Click
Run.
Scheduler runs the job immediately after adding a new job. For information, refer to Running a Job.
-
Optional. Click
Cancel.
A confirmation message is displayed. You can navigate to the Current Job screen, or else stay on the same screen and continue the operation.
Copyright © Cloud Software Group, Inc. All rights reserved.