Configuring TIBCO MDM for WebSphere Application Server
Log in to the Administrative console of WebSphere Application Server to configure the properties.
Configure the following properties in the Configurator:
| Property Name | Value |
|---|---|
| JNDI Naming Service URL | By default, the value is iiop://localhost:2809. As per your application profile, you need to change the host IP address and port number. For the port number, see BOOTSTRAP ADDRESS specified in the WebSphere Application Server. Login to the Administrative console of the WebSphere Application Server console and expand . |
| Security Provider Type | By default, aSUN security provider is defined. For WebSphere Application Server, you need to change it to IBM. |
Note: For clustered setup, it is recommended that you:
- Increase the poolsize per server to 100.
- Increase the transaction timeout of the application server to 36000.
- Procedure
- Creating a Profile on WebSphere Application Server
- Create a profile other than the default using the profile creation wizard.
- Start the Administration Server.
Go to the $WAS_HOME/profiles/profilename/bin directory.Enter the following command: ./startServer.sh server1 - Log in to the Administrative console of WebSphere Application Server.
- Specify Servers Details
- In the left panel, expand and click . The Application servers panel is displayed on the right.
- Under Preferences, click servername. The Configuration tab is displayed.
- For Transaction Service Details:
- Under Container Settings, expand Container Services and click the Transaction Service link. The Configuration tab for the Transaction Service is displayed.
- Under General Properties, enter the following values:
Transaction Service General Properties Field / Drop-down List Name Values Total transaction lifetime timeout 36000 Client inactivity timeout 7200 Maximum transaction timeout 0 Heuristic retry limit 0 Heuristic retry wait 0 Heuristic completion direction ROLLBACK - Click OK. A message is displayed with the Save and Review options.
- Click the Save link to save changes to the master configuration.
- For ORB Service Details:
- Under Container Settings, expand Container Services and click the ORB service link. The Configuration tab is displayed.
- Under General Properties, check the Pass by reference check box.
- Click OK. A message is displayed with the Save and Review options.
- Click the Save link to save changes to the master configuration.
- For Server Infrastructure Details:
- Under Server Infrastructure, expand Java and Process Management and click the Process definition link. The Configuration tab is displayed.
- Under Additional Properties, click the Java Virtual Machine link. The Configuration tab is displayed.
- In the Initial heap size and Maximum heap size fields, enter the heap size to 1024 as the minimum value for both the fields.
- In the Generic JVM arguments field, enter the following JVM arguments:
- For readability, each entry is listed on a separate line. However, you need to enter these arguments in a single line, separated by a single space.
-DLANG=en_US.UTF-8
-DNODE_ID=${NODE_ID}
-Dclient.encoding.override=UTF-8
-DMQ_HOME=${MQ_HOME}
-DMQ_LOG=${MQ_LOG}
-DMQ_CONFIG_FILE=${MQ_HOME}/config/ConfigValues.xml
-DMQ_COMMON_DIR=${MQ_COMMON_DIR}
-DPATH=${PATH}
-DOS=<OS>
-DDISPLAY=:1.0
-Djavax.xml.transform.TransformerFactory=org.apache.xalan.processor.
TransformerFactoryImpl
-Djavax.xml.parsers.DocumentBuilderFactory=org.apache.xerces.jaxp.
DocumentBuilderFactoryImplNote:- For the Oracle database, enter
-DORACLE_HOME=${ORACLE_HOME}. - To improve the performance of
TIBCO MDM, enter the following JVM parameter when starting the application server:
-Dorg.apache.xml.dtm.DTMManager=
"org.apache.xml.dtm.ref.DTMManagerDefault" - To deploy
TIBCO MDM custom pages to a common folder in the cluster environment, set the following parameter:
-DMQ_CUSTOMFORMS_HOME=MQ_COMMON_DIR
- For the Oracle database, enter
- To monitor the JVM application server, enter the following JVM arguments:
-Dcom.sun.management.jmxremote
 -Dcom.sun.management.jmxremote.authenticate=false
-Dcom.sun.management.jmxremote.ssl=false
-Dcom.sun.management.jmxremote.port=9999
-Djavax.management.builder.initial=
The value ofDjavax.management.builder.initialargument must be empty. - Click OK. A message is displayed with the Save and Review options.
- Click the Save link to save changes to the master configuration.
- For Port Details: if multiple servers and clusters are involved while installing
TIBCO MDM on the WebSphere Application Server, you need to configure and allocate multiple ports to the application.
- Under Communications, expand Ports. A list of ports is displayed.
- Verify the value of the wc_defaulthost port. The WebSphere Application Server runs on this default port.
- Ensure that the port is defined as a domain name system (DNS) alias in the
default_host Virtual Host definition.
Note: The DNS alias by which the virtual host is known is defined through Environment > Virtual Hosts > default_host > Host Aliases. The Virtual host for the Web modules that are contained in application is specified through Applications > WebSphere Enterprise Applications > ECM > Virtual hosts.
- Specify Environment Variables
- In the left panel, expand Environment and click The WebSphere Variables panel is displayed on the right.
- In the Scope drop-down list, select Node=<nodeID>,Server=server1.
- Under Preferences, click New. The Configuration tab is displayed.
- Under General Properties, type a system variable name in the Name field and its value in the Value field. The Description field is optional.
Add the following environment variable for the custom pages deployment:
MQ_CUSTOMFORMS_HOME=MQ_COMMON_DIR
- Click
OK. The variable is listed in the table.
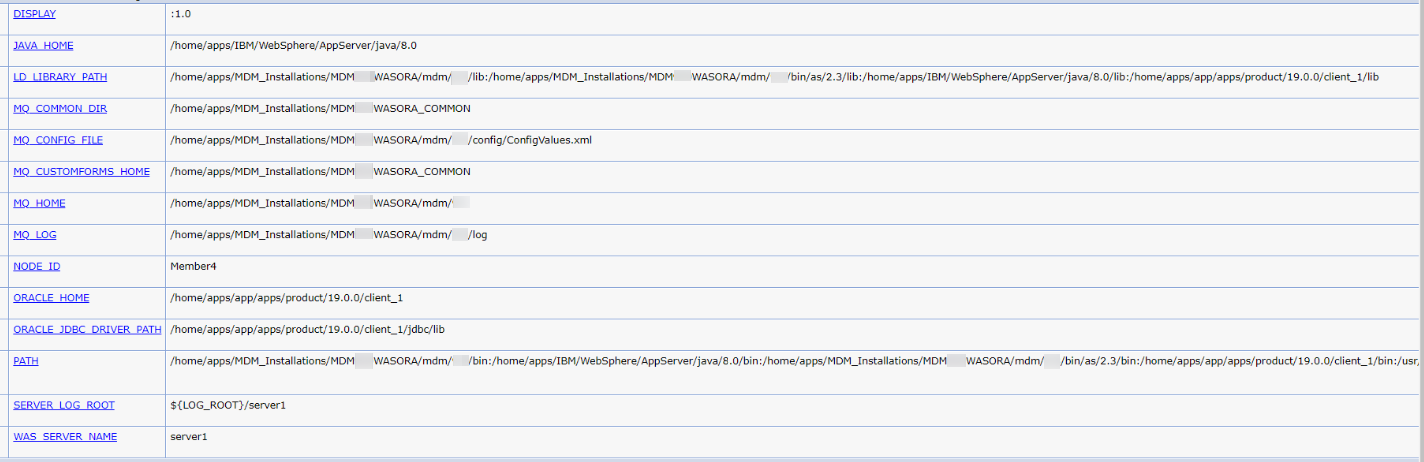
Similarly, create other Environmental Variables. The following table displays a list of all other added environment variables.
- Configuring Database Drivers and Data Source
- Specify JDBC Details
- In the left panel, expand , and then click JDBC providers. The JDBC providers panel is displayed on the right.
- In the Scope drop-down list, select Node=<nodeID>, Server=server1.
- Under Preferences, click New. The Create a new JDBC Provider window is displayed.
- In the Database type drop-down list, select Oracle. The Provider type is populated with Oracle JDBC Driver.
- In the Implementation type drop-down list, select Connection pool data source. The Name and Description fields are populated with Oracle JDBC Driver.
- Click Next. The Enter database class path information window is displayed.
- If you have selected the Oracle database option in the last step, type the location of the ojdbc8.jar file. If you are using Oracle Database 19.3, copy ojdbc8.jar in $ORACLE_HOME/19c/lib.
- Click Next. The Summary window is displayed. Review the information.
- Click Finish. The Oracle JDBC Driver is listed under Preferences and a message is displayed with the Save and Review options.
- Click the Save link to save changes to the master configuration.
- Specify Security Details
- In the left panel, expand Security and click Global security. The Global security panel is displayed on the right.
- Under Authentication, expand Java Authentication and Authorization Service and click the J2C authentication data link.
- Under Preferences, click New. The General Properties window is displayed.
- In the Alias, User ID, and Password fields, type the database alias name, its user ID, and password respectively. The Description field is optional.
- Click Apply, and then click OK. The database Alias is listed under Preferences and a message is displayed with the Save and Review options.
- Click the Save link to save changes to the master configuration.
- Specify Data Source Details
- In the left panel, expand , and then click Data sources. The data source panel is displayed on the right.
- In the Scope drop-down list, select Node=<nodeID>, Server=server1.
- Under Preferences, click New. The Create a data source window is displayed.
- Enter the Data source name and JNDI name.
- Click Next. The Select JDBC provider window is displayed.
- Select either of the following two options:
- Create a new JDBC provider
- Select an existing JDBC provider: After you select this option, the existing JDBC providers are displayed in the drop-down list. You can select it from the list.
- Click
Next. The
Enter database specific properties for the data source window is displayed.
- In the Value field, enter the database connection URL. For example, for Oracle database: jdbc:oracle:thin:@ machinename or ipaddress:portnumber: INSTANCENAME.
- In the Data store helper class name drop-down list, select the appropriate data store helper class name. For example, Oracle11g data store helper.
- Click
Next. The Setup security aliases window is displayed.
- In the Component-managed authentication alias drop-down list, select the alias.
- In the Mapping-configuration alias drop-down list, select DefaultPrincipleMapping.
- In the Container-managed authentication alias drop-down list, select alias.
- Click Next. The Summary window is displayed. Review the information.
- Click Finish. The data source is listed in the Preferences section and a message is displayed with the Save and Review options.
- Click the
Save link to save changes to the master configuration.
Note: You must save the data source name before testing its connection, else an error message is displayed.
- Under Preferences, select the
Data Source name and click
Test Connection
to test the connection. A Connection Successful message is displayed.
Note: Navigate to DataSourceName > Connection pool properties to set the Maximum connections to 50 and the connection timeout to 7200.
- Specify JDBC Details