Enabling Remote JMX Monitoring on JBoss WildFly Application Server
Perform the following steps for remote JMX monitoring using Java VisualVM for JBoss WildFly application server.
- Procedure
- Create Management User Credentials
While connecting to JavaVisualVM, you need to mention the management user credentials. Therefore, first create the management user credentials.
- Navigate to$JBOSS_HOME/bin directory and run
add-user.bat or
add-user.sh file. The following two options are displayed in the command prompt.
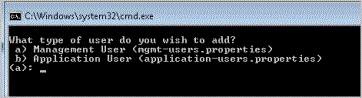
- Type
a. You need to enter Realm credentials.
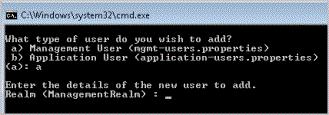
Do not enter any values. Leave it blank.
- Press Enter. You need to enter user credentials.
Note: User name and password must be different, else an error is displayed.
- Type the user name, password, and confirm password.
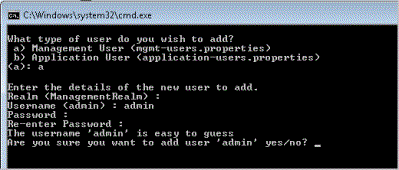
- Type
yes to proceed with the entered user credentials.
Management user is successfully created.
- Navigate to$JBOSS_HOME/bin directory and run
add-user.bat or
add-user.sh file. The following two options are displayed in the command prompt.
- Modify the
standalone.xml file
- Navigate to $JBOSS_HOME/standalone/configuration directory and open the standalone.xml file.
- Modify the
standalone.xml file as follows:
<subsystem xmlns="urn:jboss:domain:jmx:1.3"> <show-model value="true"/> <remoting-connector use-management-endpoint="true"/> </subsystem> - Save the standalone.xml file.
- Start JBoss WildFly application server
- On the command line, run the script that includes environment variables.
- Navigate to $JBOSS_HOME/bin.
- Enter the following command:
./standalone.sh -Djboss.bind.address.management=IP address
- Start Java VisualVM
- Navigate to
$JBOSS_HOME/bin/client directory and copy
jboss-cli-client.jar and place it to the
$JAVA_HOME/lib directory.
Ensure that JAVA_HOME refers to the location from where you want to run Java VisualVM.
- On the command line, type $JAVA_HOME/bin.
- Enter the following command:
jvisualvm --cp:a $JAVA_HOME\lib\jboss-cli-client.jarThe JavaVisualVM window is displayed with the Local and Remote options.
- Navigate to
$JBOSS_HOME/bin/client directory and copy
jboss-cli-client.jar and place it to the
$JAVA_HOME/lib directory.
- Add JMX Connection
- For the Remote option, double-click or right-click to add the host name. After adding the host name, you need to add the JMX connection. Type the following URL in the Connection field:
service:jmx:remoting-jmx://IPAddress:9999
For example, service:jmx:remoting-jmx://10.97.108.72:9999.
In this case, 9999 is the JMX port for the TIBCO MDM Server on 10.97.108.72.
- Specify the user credentials that you have created in step1.
- Click
Connect.
If the JMX connection is successful, the connection URL link is displayed following the host name.
- For the Remote option, double-click or right-click to add the host name. After adding the host name, you need to add the JMX connection. Type the following URL in the Connection field: